GT New Horizons · Ultimate Voltage (UV)
Space Elevator
The Space Elevator (SE) is a UV tier multiblock that can be equipped with up to 24 modules to perform a variety of tasks such as mining ores from other planets, pumping fluids from other planets, and assembling items in space. The SE even supports instantaneous one-way travel to other planets without any rocket fuel. There are five tiers to the SE with each unlocking new recipes and additional module slots. Although neither necessary nor recommended to build as soon as possible, the SE is mandatory for progression (crafting optical circuits in UEV) and almost replaces the need for any Void Miners or Fluid Drilling Rigs.
Spreadsheet: This SE Calculator or the one inside the controller can help determine the best Mining Module settings for specific asteroids.
Construction
The tier of the SE corresponds to the tier of the motor blocks surrounding the central cable. All motor blocks must be the same tier and the cable must not be obstructed for the structure to form. The SE is also available in two sizes which is specified in the GUI of the controller--the leftmost icon. The basic structure has 12 module slots, or enough for Mk-I and Mk-II motors, and the extended structure has 24 module slots. There is no maintenance or muffler hatch. Use the Multiblock Structure Hologram Projector to visualize/build the structure with subchannel "motor" to specify the tier of the motor blocks. The size must be set inside the SE controller to visualize the extended structure.
Power, computation, and plasma are all distributed from the controller to the modules that use them which means energy hatches and optical reception connectors are restricted to the bottom of the SE itself. Multi-amp and laser energy hatches are supported. Other buses/hatches must be built directly into the module sub-structures themselves and are not shared.
Base Structure 
|
Extended Structure 
|
Once formed, the SE spawns an animated climber that oscillates up and down as the machine runs. The animation may be cool to watch, but it is not great for TPS. To disable it, navigate to /config/gtnhintergalactic.cfg and set isCableRenderingEnabled=false.
Mining Modules
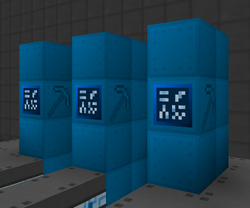
There are three tiers of Mining Modules. Higher tiers offer more parallels and unlock new recipes (asteroids). The modules do not overclock, but they only require a minimum EU/t to run--the voltage is irrelevant. Parallels always process the same asteroid and multiply all input requirements including power, computation, and plasma.
| Module | Requires | Parallels | Max Power | Max Computation |
| Space Mining Mk-I | Motor Mk-I | 2 | 245,760 EU/t | 600 /s |
| Space Mining Mk-II | Motor Mk-II | 4 | 4,815,896 EU/t | 1,280 /s |
| Space Mining Mk-III | Motor Mk-III | 8 | 7,864,320* EU/t | 2,880* /s |
* These would be higher from the draconic core asteroid, but it cannot get more than one parallel due to its very high energy cost
All three tiers of Mining Modules have a built-in filter that can be configured as a whitelist or blacklist. Open the filter through the module's controller, select any of the available asteroids, and then select the specific ores to add. Right-click an asteroid to add all its ores with a single click. Press "e" to return to the previous menu or "ESC" to close everything. Use a parametrizer memory card to copy-paste settings to other Mining Modules.
Blacklisting does NOT remove ores from the pool of options or reduce the overall weight--it only prevents them from being outputted. Regardless, some recommended ores to blacklist are cheese ore, oilsands ore, fluorspar ore, end copper ore, end malachite ore, end chalcopyrite ore, end iron ore, end pyrite ore, end basaltic mineral sand ore, end granitic mineral sand ore, end coal ore, and end lignite coal ore. These are all produced in very large quantities with no real benefit.
Parameters
There are several more configurable parameters in the controller of the Mining Module that can heavily influence the selection of asteroids and the functionality of the module itself. The minimum and maximum values and a short description of each parameter is provided below. These only apply to the module being configured since all modules are independent entities that can each have their own unique parameters even when on the same SE.
- Distance [0, 200] - The height of the climber and therefore where exactly the Mining Module searches for asteroids. The ranges for all the asteroids heavily overlap meaning there is no distance that harvests a single type of asteroid. Use the calculator linked at the top or the one inside the controller to determine the distance where an asteroid is most probable.
- Max Parallels [0, 8] - The total number of parallels allowed to run on the Mining Module. Again, this depends on the tier of the Mining Module but the player can reduce it here if they somehow need to save on power or computation. The miner will also not draw more than one amp of its power tier for the purpose of parallels, so the draconic core asteroid will never get parallels.
- Cycle Distance [Y, N] - An option to toggle cycle mode which automatically changes the distance based on the range and step parameters. Cycle mode is useful for harvesting a wide range of asteroids and the default static mode is better for harvesting a specific type of asteroid.
- Cycle Range [0, 150] - Sets the distance boundaries for cycle mode. For example, if the distance is set to 100 and the range is set to 50 then the Mining Module's distance is bounded between 50 and 150.
- Cycle Step [0, 20] - Determines how much the distance changes per operation in cycle mode. Using the same example as above, if the step is set to 20 then the Mining Module's distance constantly cycles through 50, 70, 90, 110, 130, and 150.
Asteroids
Space Mining is similar to harvesting meteors from Blood Magic's Mark of the Falling Tower ritual, but with more inputs and more complexity. The ores also do NOT spawn in the world; they output directly to an ME output bus which (should) connect to at least one Integrated Ore Factory for processing. Use NEI, the calculator linked at the top, or the calculator inside the controller to see the breakdown of each asteroid. Take the recipe for a coal asteroid as an example.
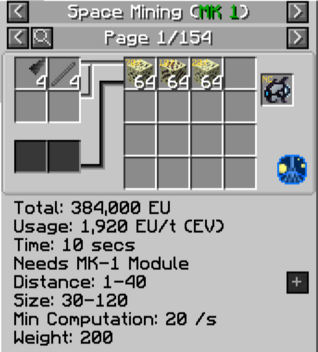
- Drill Tips and Rods - These are the consumable items in the recipe. Every asteroid requires four of each and the material changes with the tier of the mining drone. Use either an Industrial Extrusion Machine or Mass Solidifier to craft these in bulk.
- Mining Drone - This is a non-consumable item that must be present in a REGULAR input bus or the module's controller. They cannot be shared by multiple modules at the same time by using stocking or linked input buses. Not all asteroids are available to every mining drone so keep at least one of each tier. Exceeding the minimum drone tier boosts both the minimum and maximum size of the asteroid based on the following equation where N is the number of tiers above.
- Ores - This is the breakdown of the asteroid. The recipe shows the possible ores and their percentage of the asteroid as a whole. The coal asteroid consists of approximately 70% end coal ore, 10% end lignite coal ore, and 20% end graphite ore. Ignore that the output shows only 64 of each ore--that is a gross underestimate.
- Needs Mk-I Module - Every asteroid requires a Mining Module whose tier is greater than or equal to the one specified in NEI. The coal asteroid needs only a Mk-I module but a Mk-II or Mk-III would also work. There is no benefit to using a higher tier Mining Module other than the aforementioned parallels.
- Distance - The distance of an asteroid refers to the possible range where it can be found orbiting above a planet's surface. The coal asteroid can only be found if the Mining Module's distance is somewhere between 1 and 40.
- Size - The size of an asteroid refers to the total stacks of ore and is determined randomly between a specified minimum and maximum value. The coal asteroid outputs between 30 and 120 stacks of ore with only a Mk-I mining drone. Expect thousands or even tens of thousands of ore every few seconds from a single Mining Module.
- Min Computation - Every asteroid has a minimum computation threshold which means there must be at least one Quantum Computer (QC) or Network Switch with QoS nearby feeding computation to the main structure. Computation is shared between all modules, similar to power, and the thresholds are very low. One QC is all that is really needed per SE even if there are multiple Mining Modules running on max parallels. The coal asteroid with a minimum computation of 20/s is a perfect example of that.
- Weight - The SE does not harvest specific asteroids on request. Instead, the asteroid is chosen randomly by the controller based on its weight. The coal asteroid has a weight of 200 which makes it twice as common as asteroids with a weight of 100.
Plasma
Not shown in NEI is the plasma required to harvest an asteroid. Only five types of plasma are compatible with the Mining Module and the amount consumed varies with each one, as seen in the following table. Insert plasma through an input hatch on the main structure to automatically share it between all Mining Modules, similar to computation and power. The type of plasma used also affects the recipe duration and determines the probability for every stack of ore above the minimum asteroid size to appear. Stacking multiple types of plasma has no effect on the operation of the machine since only the highest tier is consumed until it needs to switch to a lower tier.
| Tier | Plasma | Consumed | Duration | Output Chance (p) |
| 1 | Helium Plasma | 825L per Parallel | 100% | 0.46% per Stack |
| 2 | Bismuth Plasma | 550L per Parallel | 90% | 3.70% per Stack |
| 3 | Radon Plasma | 375L per Parallel | 80% | 12.50% per Stack |
| 4 | Technetium Plasma | 250L per Parallel | 70% | 29.62% per Stack |
| 5 | Plutonium-241 Plasma | 150L per Parallel | 60% | 57.87% per Stack |
The total output stacks or final size of the asteroid is random and normally distributed around the average value in the following equation. More specifically, the minimum number of stacks is guaranteed but every additional stack up to the maximum has a chance (p) to appear. Consider for example a Mining Module with radon plasma that finds a coal asteroid. At least 30 stacks are guaranteed because that is the minimum size, but then there is a 12.50% chance (p) for each of the remaining 90 stacks to appear. At that rate, the average size of coal asteroids is 41.25 stacks per parallel.
In summary, higher tier plasmas are consumed in lower quantities, process asteroids faster, and even increase the average size of the asteroids. Parallels increase the power, computation, and plasma cost of the module but they are directly proportional to the output of the machine and are therefore highly recommended, especially since the modules cannot overclock.
Pumping Modules
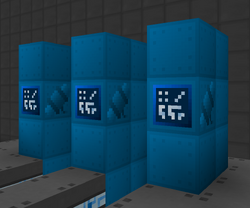
There are three tiers of Pumping Modules. Higher tiers offer more parallels and the ability to run multiple recipes (threads) simultaneously. All three tiers have access to every possible fluid and gas. The modules do not overclock, but they only require a minimum EU/t to run--the voltage is irrelevant. Parallels process the same fluid and multiply the power requirement.
| Module | Requires | Threads | Parallels | Max Power |
| Space Pumping Mk-I | Motor Mk-II | 1 | 4 per Thread | 7,864,320 EU/t |
| Space Pumping Mk-II | Motor Mk-III | 4 | 4 per Thread | 31,457,280 EU/t |
| Space Pumping Mk-III | Motor Mk-IV | 4 | 64 per Thread | 503,316,480 EU/t |
Unlike the Mining Module, the recipes for the Pumping Module are very explicit. The player must specify a planet type and gas type in the controller for it to start pumping. With Mk-II and Mk-III Pumping Modules, the player must specify a planet type and gas type for each individual recipe. However, they do not all need to be different. All four recipes could be xenon, for example. Use a parametrizer memory card to copy-paste module settings. The following table lists all the available planet types, gas types, fluids, and pumping speeds for various amounts of parallels.
| Planet Type | Gas Type | Fluid | 1 Parallel (L/s) | 4 Parallels (L/s) | 64 Parallels (L/s) |
| 2 | 1 | Chlorobenzene | 896,000 | 3,584,000 | 57,344,000 |
| 3 | 1 | Ender Goo | 32,000 | 128,000 | 2,048,000 |
| 2 | Very Heavy Oil | 1,400,000 | 5,600,000 | 89,600,000 | |
| 3 | Lava | 1,800,000 | 7,200,000 | 115,200,000 | |
| 4 | Natural Gas | 1,400,000 | 5,600,000 | 89,600,000 | |
| 4 | 1 | Sulfuric Acid | 784,000 | 3,136,000 | 50,176,000 |
| 2 | Molten Iron | 896,000 | 3,584,000 | 57,344,000 | |
| 3 | Oil | 1,400,000 | 5,600,000 | 89,600,000 | |
| 4 | Heavy Oil | 1,792,000 | 7,168,000 | 114,688,000 | |
| 5 | Molten Lead | 896,000 | 3,584,000 | 57,344,000 | |
| 6 | Raw Oil | 1,400,000 | 5,600,000 | 89,600,000 | |
| 7 | Light Oil | 780,000 | 3,120,000 | 49,920,000 | |
| 8 | CO2 Gas | 1,680,000 | 6,720,000 | 107,520,000 | |
| 5 | 1 | Carbon Monoxide | 4,480,000 | 17,920,000 | 286,720,000 |
| 2 | Helium-3 | 2,800,000 | 11,200,000 | 179,200,000 | |
| 3 | Salt Water | 2,800,000 | 11,200,000 | 179,200,000 | |
| 4 | Helium | 1,400,000 | 5,600,000 | 89,600,000 | |
| 5 | Liquid Oxygen | 896,000 | 3,584,000 | 57,344,000 | |
| 6 | Neon | 32,000 | 128,000 | 2,048,000 | |
| 7 | Argon | 32,000 | 128,000 | 2,048,000 | |
| 8 | Krypton | 8,000 | 32,000 | 512,000 | |
| 9 | Methane | 1,792,000 | 7,168,000 | 114,688,000 | |
| 10 | Hydrogen Sulfide | 392,000 | 1,568,000 | 25,088,000 | |
| 11 | Ethane | 1,194,000 | 4,776,000 | 76,416,000 | |
| 6 | 1 | Deuterium | 1,568,000 | 6,272,000 | 100,352,000 |
| 2 | Tritium | 240,000 | 960,000 | 15,360,000 | |
| 3 | Ammonia | 240,000 | 960,000 | 15,360,000 | |
| 4 | Xenon | 16,000 | 64,000 | 1,024,000 | |
| 5 | Ethylene | 1,792,000 | 7,168,000 | 114,688,000 | |
| 7 | 1 | Hydrofluoric Acid | 672,000 | 2,688,000 | 32,008,000 |
| 2 | Fluorine | 1,792,000 | 7,168,000 | 114,688,000 | |
| 3 | Nitrogen | 1,792,000 | 7,168,000 | 114,688,000 | |
| 4 | Oxygen | 1,792,000 | 7,168,000 | 114,688,000 | |
| 8 | 1 | Hydrogen | 1,568,000 | 6,272,000 | 100,352,000 |
| 2 | Liquid Air | 875,000 | 3,500,000 | 56,000,000 | |
| 3 | Molten Copper | 672,000 | 2,688,000 | 32,008,000 | |
| 4 | Unknown Liquid | 672,000 | 2,688,000 | 32,008,000 | |
| 5 | Distilled Water | 17,920,000 | 71,680,000 | 1,146,880,000 | |
| 6 | Radon | 64,000 | 256,000 | 4,096,000 | |
| 7 | Molten Tin | 672,000 | 2,688,000 | 32,008,000 | |
Automation
OpenComputers can automatically switch the Pumping Module settings based on which fluids are needed at the time, similar to a level maintainer. This saves from having to manually change the settings all the time, or creating dedicated modules for each fluid. The only requirement is a target amount for each fluid. The computer handles everything else such as detecting when certain fluids are low and changing the settings. For more information, visit the OpenComputers Space Pumping page.
Assembler Modules
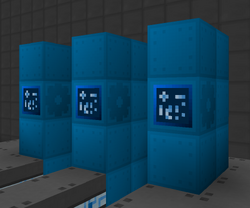
There are three tiers of Assembler Modules. Higher tiers run at a higher voltage, run at a faster speed, offer more parallels, and unlock new recipes. The voltage of each module is fixed so they cannot overclock beyond those that, but they have unlimited tier skips and therefore can process any recipe as long as there is enough EU/t and the module tier requirement is met. Parallels always process the same recipe and multiply the power requirement.
| Module | Requires | Voltage | Speed | Parallels | Max Power |
| Space Assembler Mk-I | Motor Mk-I | UHV | 100% | 4 | 7,864,320 EU/t |
| Space Assembler Mk-II | Motor Mk-III | UIV | 150% | 16 | 503,316,480 EU/t |
| Space Assembler Mk-III | Motor Mk-V | UXV | 200% | 64 | 32,212,254,720 EU/t |
The Assembling Module recipes appear very similar to Assembly Line recipes, but there are no strict requirements on the location of the input ingredients--they can all go into the same input bus and input hatch. Crafting input buses and crafting input buffers are supported.
Assembler Modules are particularly useful for crafting higher tier batteries because they can be made directly and they are the only machines capable of crafting optical circuit components. The only exception is the shortcut recipe for the ultimate battery which is not worth the MHDCSM cost. In the end game, most SE modules are Assembler Modules.
Space Traveling
The SE even supports instantaneous one-way travel to other planets without any rocket fuel. Simply open the SE controller, click on the button above power to open the galaxy map, and select the desired planet. The only limitation is that Mk-III+ motors are required for traveling to T9 planets. Those require transcendent metal so you still need the Mothership to reach the Amun-Ra system, or a couple of extremely expensive meteors.