GT New Horizons · Insane Voltage (IV)
Lightning Rod
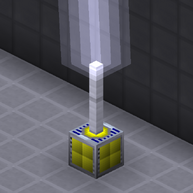
The Lightning Rod is an IV tier singleblock generator that distributes an immense amount of power every time it is struck by lightning during a thunderstorm. The Lightning Rod is available in three tiers or voltages but all of them have the same 50M EU buffer and a maximum output of 512A. The Lightning Rod does not consume any sort of fuel or produce any pollution, but it does require at least one iron fence above it to attract lightning and each strike voids exactly one of them at random. The weather obelisk from EnderIO also consumes concentrated cloud catalyst and fireworks to repeatedly create thunderstorms for the Lightning Rod.
Lightning strikes completely fill the 50M EU buffer of a Lightning Rod, but 1% of the current EU in the buffer is loss every tick so it must be extracted as quickly as possible. The solution is using energy distributors which can pull up to 320A each and automatically transform power up to their rated voltage.
Construction
The Lightning Rod could almost be considered a multiblock because it requires 1+ iron fences above it to attract lightning during thunderstorms. There cannot be gaps inbetween the iron fences and the highest one must have direct sky access. Not even glass or partial blocks are allowed to obstruct its view. This is especially problematic when a lightning strike voids an iron fence in the middle of a stack because that creates a gap and renders the Lightning Rod unusable until the missing iron fence is replaced.
The Lightning Rod is not affected by rain on its top side, but the remaining sides and any nearby energy distributors must all be covered to prevent them from exploding. Alternatively, build the Lightning Rod in a biome without precipitation such as a desert since that does not prevent lightning from striking. The optimal y-level for Lightning Rods is anything above 200.
Structure
- 1 Lightning Rod
- 1+ Iron Fence
- 0+ Energy Distributor
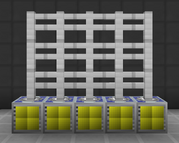
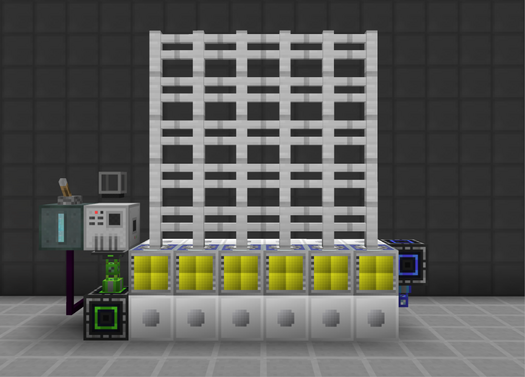
Lightning Rods are tileable which means they can be built next to each other and extend infinitely in either direction, as seen in the image to the right. This is actually highly recommended because it makes centralizing power and automating the replacement of iron fences much easier. Having so many in close proximity has no effect on the odds of lightning strikes since each Lightning Rod is effectively its own independent entity.
Usage
The Lightning Rod is available in three tiers but all of them have the same 50M EU buffer and a maximum output of 512A. The only difference between them is their output voltage which determines how quickly they can empty their buffer and consequently how much EU can be saved per lightning strike. The result is +46% EU/t for T2 Lightning Rods and +69% EU/t for T3 Lightning Rods, which is not exactly worth the 8x and 64x cost to craft them. Therefore, it is highly recommended to just build more T1 Lightning Rods rather than upgrade them.
| Lightning Rod | Unlocked | Buffer | Voltage | Max Output | Average Output | ||
| Power | Amps | Power | Per Lightning | ||||
| T1 | IV | 50M EU | HV | 262,144 EU/t | 512A | 109,410 EU/t | 28,009,049 EU |
| T2 | LuV | 50M EU | EV | 1,048,576 EU/t | 512A | 160,228 EU/t | 41,018,560 EU |
| T3 | UV | 50M EU | IV | 4,194,304 EU/t | 512A | 185,331 EU/t | 47,444,918 EU |
Energy Distributors
Lightning strikes completely fill the 50M EU buffer of a Lightning Rod, but 1% of the current EU in the buffer is loss every tick so it must be extracted as quickly as possible. The solution is using energy distributors which can pull up to 320A each and automatically transform power up to their rated voltage. For example, a single IV energy distributor can pull 320A HV from a T1 Lightning Rod and output it as 20A IV to an adjacent cable. A second IV energy distributor can then pull the remaining 192A HV and output it as 12A IV to the same cable. Energy distributors are also tileable so they can be built next to each other and extend infinitely in either direction, since they have only one input side.
 |
 |
Logistics
Lightning Rods should ideally be anywhere above but the problem with that is transporting the power back down to your base without placing an absurd amount of superconductors or suffering too much cable loss. The Lightning Rods may even be in a separate dimension because it is not very pleasant to live in a constant thunderstorm. The recommended solution is using EU P2P tunnels and an AE2 quantum bridge to carry channels across any distance or across dimensions with only 5% loss. If building Lightning Rods in a personal dimension, verify that weather is enabled by sneak right-clicking the portal to open its configuration settings.
Sound
If living in the same dimension as Lightning Rods, then it is highly recommended to muffle both the rain and thunder sound. This can be accomplished in two different ways. The first is navigating to Music & Sound Options under the normal game options and turning down weather. The second is opening the Extreme Sound Muffler (ESM) via the top right button in your inventory and turning down anything that comes up when searching for weather under All Sounds. The latter is more precise and flexible, but the ESM folder needs to be pulled over whenever you migrate versions and it does not work on all thunder sounds--a few still manage to cut through.
Lightning
The Lightning Rod does not rely on naturally occuring lightning strikes. Instead, there is a chance () every 12.8 seconds for the Lightning Rod to generate its own fake lightning strike based on the y-level of the highest iron fence, the total number of iron fences, and the current weather. Again, having multiple Lightning Rods next to each other has no effect on the odds of lightning strikes since each one is effectively its own independent entity. The fake lightning strikes may appear and sound identical to real lightning strikes but they do not transform mobs into their charged variants or upgrade the pig Adventure Backpack into the pigman one.
A lightning strike is guaranteed every 12.8 seconds during thunderstorms if . That means build Lightning Rods as high as possible or stack more iron fences on top of them, except the latter is not recommended because it creates a higher initial start cost and requires more flexible automation. Place the Lightning Rod anywhere above to require only five iron fences at most, as seen in the following table.
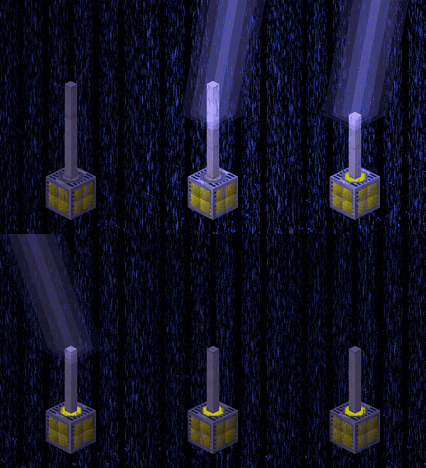
| Highest y-Level | 103-114 | 115-128 | 129-147 | 148-171 | 172-204 | 205-255 |
| Max Iron Fences | 10 | 9 | 8 | 7 | 6 | 5 |
Every lightning strike voids exactly one iron fence at random which could be the very bottom one, somewhere in the middle, or the top. Automation methods for replacing the iron fences must be able to adjust for that to keep the Lightning Rod running, since a gap would render the machine unusable until the missing iron fence is replaced--it would be obstructed by the floating iron fences above it. See the iron fence automation section for details.
One iron fence costs exactly one iron rod or 0.5 iron ingots to craft in an assembler. Assuming 12.8 seconds between lightning strikes, the average cost of replacing iron fences for a single Lightning Rod is approximately 0.039 iron per second, 2.344 iron per minute, or 140.6 iron per hour. Passively automate the production of iron fences or use an ME Level Maintainer to ensure a surplus at all times.
Weather Automation
Thunderstorms occur naturally once every 9 hours on average and last anywhere from 3-13 minutes. Lightning Rods can generate a lot of power in that short amount of time but it would be significantly better and much more reliable if thunderstorms were persistent. Fortunately, there are ways to automate the weather at a very low cost.
 Caution: | Thunderstorms reduce the overall light level which encourages mobs to spawn, and they create suboptimal conditions for bees. |
Method 1: Weather Obelisk
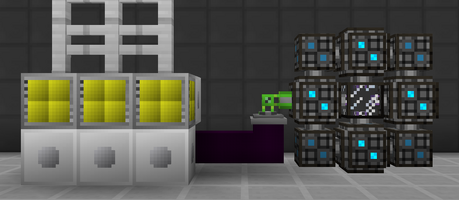
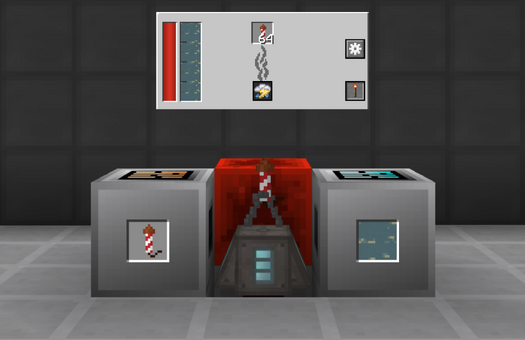
The weather obelisk from EnderIO can repeatedly create 10 minute long thunderstorms with one firework rocket, 5000 RF, and 1000L of concentrated cloud seed. The flight duration of the firework rocket is irrelevant so craft them with one gunpowder and one piece of paper. The RF is equivalent to approximately 1,389 EU and can be supplied by connecting any GregTech cable directly to the weather obelisk itself. The concentrated cloud seed can be made in either the EnderIO Vat or the Bacterial Vat.
| STEP 1 | |
| Supply the firework rockets, power, and concentrated cloud seed to the weather obelisk by any means necessary. The example to the right uses a super chest and super tank for the inputs and a cable underneath for power.
Set the control mode of the weather obelisk to LAUNCH ON REDSTONE SIGNAL and place a block of redstone next to it. The weather obelisk does not activate until the current thunderstorm expires, so no daylight sensor or anything else is required. Chunkload the weather obelisk and the Lightning Rod(s) with ServerUtilities, especially if everything is in a separate dimension. |
|
Method 2: Witchery
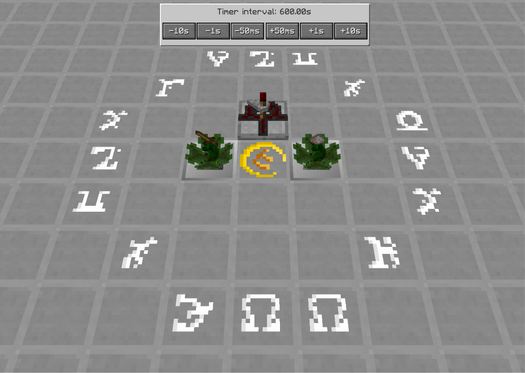
The rite of sky's wrath ritual from Witchery can repeatedly create 10 minute long thunderstorms with one wooden sword, one wood ash, and 1000 altar power. The ritual circle consists of a ring of white chalk around a single gold chalk at the very center. Grasspers hold the two inputs and the ritual is activated with a redstone timer. Create grasspers by placing grass on all four sides around a chest above a block of water, and then right-clicking the chest with a mutating sprig. Create wood ash by smelting saplings in a vanilla furnace or witches oven. Ensure there are no flammable blocks around the ritual circle because it causes several lightning strikes and fires around the area when activated.
| STEP 1 | |
| Supply the wooden sword and wood ash by any means necessary. The example to the right uses super chests with conveyor modules for both inputs.
Place two grasspers within the ritual circle to hold the inputs, and build an altar with at least 1,000 altar power nearby. The altar power recovers naturally overtime. Place a timer next to the gold chalk at the center to automatically start the ritual on a 10 minute interval. The ritual can activate regardless of the current weather, so there may be some tiny overlap between triggers. Chunkload the ritual circle, altar, and the Lightning Rod(s) with ServerUtilities, especially if everything is in a separate dimension. |
|
Iron Fence Automation
The difficulty in using the Lightning Rod effectively is having to replace iron fences as they are voided regardless of where they were on the stack. At maximum, one iron fence is voided every 12.8 seconds per Lightning Rod.
Method 1: Applied Energistics
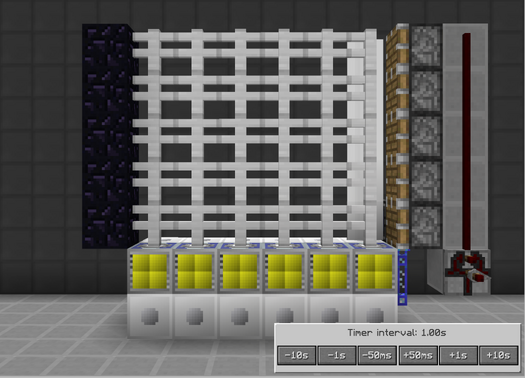
The core mechanic behind this approach is spawning iron fences with AE2 formation planes and then pushing them to the correction position with vanilla pistons. The pistons are triggered on a regular basis by a redstone clock and are stopped by obsidian at the other end. This approach is simple, robust, and quick to set up. The only downside is that there are a lot of moving parts, but the TPS impact is very low anyway.
| STEP 1 | |
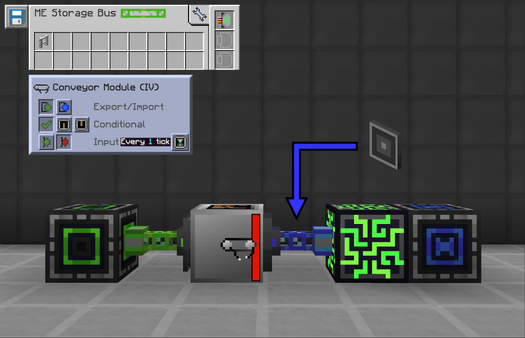
| Store iron fences in a super chest or some other large inventory on the main network (green). The example to the right uses a storage bus with a sticky card filtered to iron fences, but it could also be an assembler outputting directly into a buffer chest.
On the opposite side of the super chest, place an IV+ conveyor module to push the iron fences into an ME interface on the Lightning Rod subnetwork (blue). There should not be any storage cells or ME drives on the Lightning Rod subnetwork. Power the Lightning Rod subnetwork with a quartz fiber cable, but upgrade to a neutronium energy anchor later on to save TPS in the late game. |
|
| STEP 2 | |
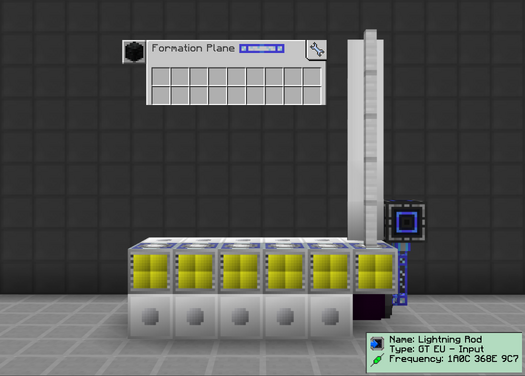
| The Lightning Rods may be setup in either layout described earlier but always have two energy distributors per Lightning Rod to pull the maximum 512A. Use superconductor or high-amp cables to carry the power into an EU P2P Tunnel which should lead to an LSC for long term storage.
If the Lightning Rods are above , then only five iron fences are needed above them to guarantee lightning strikes during a thunderstorm. Therefore, place five formation planes set to BLOCK PLACEMENT MODE above the first Lightning Rod in the row. Formation planes act sort of like a storage bus and immediately place the iron fences as soon as they enter the Lightning Rod subnetwork (blue) through the ME interface in the previous step. |
|
| STEP 3 | |
| Place pistons next to the first column of iron fences and facing the rest of the Lightning Rods. Connect the pistons to a redstone timer set to 1 second to repeatedly trigger them and push iron fences across the entire row.
On the opposite end, place immovable blocks such as obsidian to keep the iron fences from extending more than necessary. Alternatively, place a second set of formation planes and pistons facing back towards the Lightning Rods to double the replacement speed, but use the same redstone timer for both. Scaling this approach is as simple as adding more Lightning Rods and pushing the obsidian back, or adding more rows. Do not forget to cover everything to protect it from rain. |
|
Method 2: BuildCraft
The core mechanic behind this approach is using the BuildCraft Filler to spawn iron fences in exactly the correct locations as they are voided. The boundaries of the BC are specified with land marks and it is repeatedly activated with a specially crafted iron AND gate. This approach is very simple to setup with very few moving parts, but the maximum range of the land marks is 64 blocks and the maximum fill rate is 1 block per tick.
 Important: | The BC Filler has fake-player building permissions which could unintentionally be blocked by ServerUtilities chunk loading. If necessary, change the permissions required to edit blocks under group settings. |
| STEP 1 | |
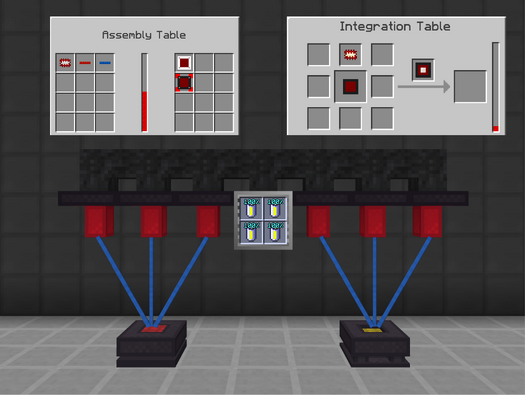
| Start by crafting an iron AND gate in the assembly table and then adding a quartz chipset to it inside of an integration table.
Both tables are powered by BuildCraft lasers which just need to be facing the tables from a close distance and connected to any GregTech cable. Very little power is needed for these crafts and it only needs to be done once so a single battery buffer is more than enough. The same lasers can be used for both tables and only one is technically required, but it would be rather slow by itself. |
|
| STEP 2 | |
| The Lightning Rods may be setup in either layout described earlier but always have two energy distributors per Lightning Rod to pull the maximum 512A. Use superconductor or high-amp cables to carry the power into an EU P2P Tunnel which should lead to an LSC for long term storage.
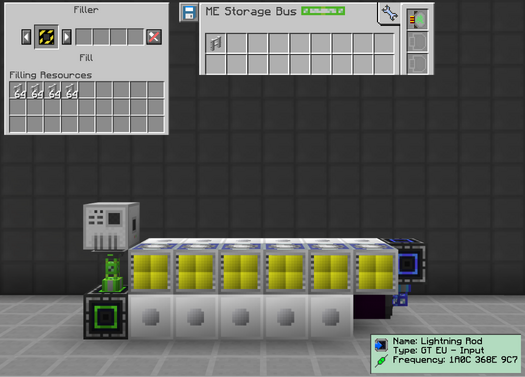
Store iron fences in the BC Filler itself. The example to the right uses a storage bus with a sticky card filtered to iron fences, but it could also be an assembler outputting directly into the BC Filler. Ensure the BC Filler mode is set to fill and do not excavate. This allows it to place iron fences without breaking anything else within the boundaries. |
|
| STEP 3 | |
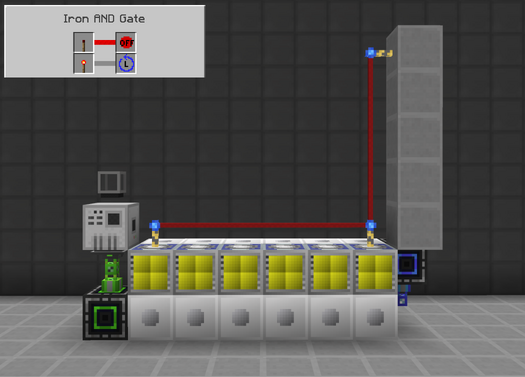
| If the Lightning Rods are above , then only five iron fences are needed above them to guarantee lightning strikes during a thunderstorm. Therefore, place the first two land marks across the entire row of Lightning Rods and the third up five blocks vertically.
Right click the land marks to link them, and then break and replace the BC Filler next to the first land mark to confirm the boundaries. The land marks should fall to the ground and the red lines should turn into black and yellow ones. Place any BC pipe next to the BC Filler and then place the iron AND gate on the pipe facing into the BC Filler. Configure its settings to turn off without a redstone signal and loop with a redstone signal. |
|
| STEP 4 | |
| Break the remaining blocks around the landmarks because they are no longer necessary after the boundaries have been set. Power the BC Filler with a capacitor bank connected to any GregTech cable, such as the superconductors used for the Lightning Rods.
Place a lever above the capacitor bank and next to the iron AND gate. This serves as a manual override to stop the replacement of iron fences at any time. Scaling this approach is as simple as widening the boundaries of the BC Filler, or adding more Lightning Rods and rows. Placing blocks such as glass in the empty space within the BC Filler boundaries prevents iron fences from being placed there. Do not forget to cover everything to protect it from rain. |
|
Trivia
- The Lightning Rod was the very first machine added by GregTech, when it was still only an add-on for IndustrialCraft2 (source).