GT New Horizons · Getting started
Installing and Migrating
 | Caution! GTNH updates regularly. Use the latest release for the best performance. All Dev Builds, Beta Versions, and Release Candidates (RC) are for testing purposes only and may have game-breaking bugs. |
Installing
GTNH is compatible with many different launchers and Java versions. However, it is highly recommended to use the Prism Launcher and Java 25+ over everything else. Not only is Prism extremely easy to use for installing/migrating, but it is highly configurable and does not require any additional Java arguments to run. Java 25+ is the best because it is the most optimized and least memory intensive version that can run GTNH.
Some baselines for all launchers:
- GTNH requires a valid Minecraft account & Microsoft Login.
- 4-6 GB of memory (min-max RAM) is recommended for Single Player (SP) on 16 render distance, 4GB+ for Client with a Dedicated Server.
- Ensure there's still enough free RAM available for the operating system.
- Assign the total memory allocation for both minimum and maximum in the launcher.
- Allocating more than 8GB with Java 8 will likely cause serious stuttering due to poor default garbage collection optimization.
- It's strongly encouraged to install the latest release.
- For multiplayer (MP) servers, your GTNH client needs to be the same version as the server.
Prism Launcher with Java 17-26 (Recommended)
Note: Java 25 is only compatible with GTNH 2.8+, and Java 26 with GTNH 2.9+. Use Java 17-21 for older releases.
Prism supports newer Java versions and is incredibly easy to use. It also allows precise configuration of memory and Java settings.
- Download and install the Prism Launcher. If on Windows 10 or 11, do NOT install it in a OneDrive folder!
- Register your Minecraft account with the launcher. It must run in online mode at least once to authenticate.
- Download the latest stable version of the pack for Java 17-26. Do not unzip, instead drag it into the Prism window to create the instance.
- Download Java and get the chosen Java version from Adoptium. This should auto-set your Java to the downloaded version
- (Optional) You can also download Java in Prism itself. Navigate to Settings > Java > Installations. On older versions of Prism it is Settings > Java > Management.
- Press on Download Java and get the chosen Java version from Adoptium or Mojang (note that versions 21+ are available only after deselecting the "Recommended" at the bottom of the download window and are not provided by Mojang).
- Use auto-detect to select the path of the chosen Java installation, or manually browse to it.
- Set the Minimum and Maximum Memory Allocation.
- Specifically for Java 25-26, you can add
-XX:+UseCompactObjectHeadersunder JVM Arguments to reduce memory usage. - Specifically for Java 24, you can add
-XX:+UnlockExperimentalVMOptions -XX:+UseCompactObjectHeadersunder JVM Arguments to reduce memory usage.
If you don't want to change the global launcher settings, individual instances can also be assigned a specific Java version, arguments and memory allocation. Right-click the instance icon, choose Edit > Settings > Java.
-
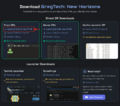 1) Download the latest release for Prism/MMC Java 17-26.
-
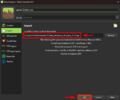 2) Drag the downloaded zip file into the launcher to import it.
-
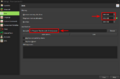 3) Install and configure Java for the launcher.
-
 4) Launch and Enjoy!
MultiMC with Java 17-26 (Not Recommended)
MultiMC also supports newer Java versions, but does not offer a Java download nor reads the Java arguments from the pack file. Therefore, Java must be downloaded manually and the player needs to add the arguments themselves. It is much easier to just use Prism.
- Download and install the MultiMC launcher. If on Windows 10 or 11, do NOT install it in a OneDrive folder!
- Download the Java version you want from Adoptium or Oracle. Pick the JRE that matches your computer's OS and architecture. Unpack and install. Then select the java file path you installed in MultiMC.
- Typical Windows file path:
C:/Program Files/Eclipse Adoptium/jre-21.0.3.9-hotspot/bin/javaw.exe - Typical MacOS file path:
/Library/Java/JavaVirtualMachines/temurin-21.jdk/Contents/Home/bin/java
- Typical Windows file path:
- Register your Minecraft account with the launcher. It must run in online mode at least once to authenticate.
- Download the latest stable version of the pack for Java 17-26. Do not unzip, instead drag it into the MMC window to create the instance.
- Then for 2.8+, add the additional JVM arguments from here under MultiMC setup. You only want the Java arguments from that page, nothing else. For older versions before 2.8.0, you might need a different set of arguments specific to the lwjgl3ify version you are using.
- Specifically for Java 25-26, you can add
-XX:+UseCompactObjectHeadersto your JVM Arguments to reduce memory usage. - Specifically for Java 24, you can add
-XX:+UnlockExperimentalVMOptions -XX:+UseCompactObjectHeadersunder JVM Arguments to reduce memory usage.
Prism Launcher or MultiMC with Java 8 (Not Recommended)
- Install Prism Launcher or the MultiMC Launcher. If on Windows 10 or 11, do NOT install it in a OneDrive folder!
- Download the latest stable version of the pack for Java 8.
- Drag it into the Prism/MMC window to create the instance, or use the "Add Instance" button in the main window.
- Under settings - Java, make sure you are using a version of 64-bit Java 8.
Technic Launcher
- Install the Technic launcher.
- In the launcher, go to the Modpacks tab and enter "GT New Horizons" in the search box. Make sure the pack named "GT New Horizons" is selected in the results list.
- Optionally, click the Modpack settings link in the upper-right to select a specific version and the installation path. By default, the latest stable release will be installed, but some servers may need a different version.
- Click the Install button on the lower right to install the pack.
Starting with version 2.9.0 of GT:NH, Technic Launcher supports natively Java 25, which enables the pack to perform at its best.
CurseForge Launcher
- Install the CurseForgelauncher.
- Be sure to configure the launcher to start minecraft from the CurseForge launcher itself and not through the vanilla launcher, as it is mandatory for version 2.9.0 and above to play GT:NH, as this enables the pack to run on java 25, which allows the pack to perform at its best.
- Search for the GT: New Horizons modpack and install it.
Note: before version 2.9.0, it is strongly discouraged to use the CurseForge launcher, as the pack uses a mod downloader to shortcircuit old policy about mod upload at CurseForge. Given the brittleness of the downloader, this used to cause a variety of weird bugs which led to the bad reputation of playing GT:NH on CurseForge, in addition to run on Java 8.
Java Arguments for Java 8
GTNH runs best with configured Java 8 arguments for targeted garbage collection and memory usage. Optimal arguments will vary depending on hardware, launcher, and build version. Note that the best performance gains are from switching to Java 17-21, not by tweaking Java 8.
Troubleshooting
- If you are on Linux and the game window doesn't show up and/or the log freezes, go to (on Prism Launcher) the instance's Settings > Workarounds and disable "Use system installation of GLFW/OpenAL".
- If you are on linux and you get the "[Angelica]: FATAL: Failed to create OpenGL core profile context." error, set SDL_VIDEODRIVER to wayland or x11 (depending on which server you use) in your instance environment variables.
- If experiencing issues with fullscreen mode on Java 17-26, set a resolution in your launcher and check other settings in
config/lwjgl3ify.cfg. - If a Windows Firewall warning appears, just click "Allow Access" for your launcher.
Updating
This information is for clients. See here for servers.
The following is two methods for updating GTNH to a newer version. The only difference between them is how the files are transferred. Regardless, it is highly recommended to only update ONE major version at a time. For example, do not update directly from 2.6 to 2.8. Instead, update to 2.7 first, load into any saved worlds, and then update to 2.8.
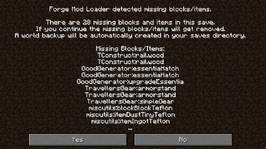
If the game asks about missing blocks when entering a save, just select Yes to confirm. These types of screens just mean the developers removed something intentionally and it is safe to accept. However, once confirmed, the save cannot go back to the previous version of the modpack, so backup everything just in case. For servers, you might need to type /fml confirm. If the game does NOT ask about missing blocks, then it may be corrupted.
 Caution: | ALWAYS BACKUP YOUR CURRENT SAVE(S) BEFORE MOVING OR DELETING FILES |
Method 1: Migrating to a New Instance (Recommended)
This method involves copying files from the current GTNH instance and pasting them into a new GTNH instance. This is also the only way to transfer saves between launchers.
1. Setup the new launcher and/or GTNH instance after downloading the latest stable version. Ensure it can run without issues before making any changes to the files.
2. Copy the following from the current instance into the .minecraft folder of the new instance, replacing any files with the same name.

|
.minecraft
| ||
| ├── |
|
backups for backups (not needed if you keep the old instance).
| |
| ├── |
|
config (not the whole folder)
| |
| │ | ├── |
|
vendingmachine/favourites if present.
|
| │ | └── | 
|
shaders.properties
|
| ├── |
|
ESM if present for sound muffler settings.
| |
| ├── |
|
journeymap for JourneyMap settings and map data.
| |
| ├── |
|
resourcepacks
| |
| ├── |
|
saves for existing worlds and NEI data.
| |
| ├── |
|
schematics for saved schematics.
| |
| ├── |
|
screenshots
| |
| ├── |
|
shaderpacks
| |
| ├── |
|
TCNodeTracker for JourneyMap node data.
| |
| ├── |
|
visualprospecting for JourneyMap ore vein data.
| |
| ├── |
|
BotaniaVars.dat for miscellaneous Botania things.
| |
| ├── |
|
localconfig.cfg for local config changes.
| |
| ├── |
|
options.txt
| |
| ├── |
|
optionsnf.txt
| |
| └── |
|
servers.dat if present.
| |
3. (OPTIONAL) The following are potentially helpful reminders to further customize your instance. If you did not make any of these changes before then they can be safely ignored.
|
|
.minecraft
| ||
| ├── |
|
config
| |
| │ | ├── |
|
GregTech/Pollution.cfg Disable pollution by setting "Activate Pollution"=false.
|
| │ | ├── |
|
txloader/load/minecraft/sounds.json Disable main menu music by removing music.menu section.
|
| │ | ├── |
|
gtnhintergalactic.cfg Disable Space Elevator animation by setting isCableRenderingEnabled=false.
|
| │ | ├── |
|
lwjgl3ify.cfg Enable borderless fullscreen mode by setting borderless=true.
|
| │ | └── |
|
tectech.cfg Disable Tesla Tower animation by setting TESLA_VISUAL_EFFECT=false.
|
| │ | └── |
|
TinkersConstruct.cfg Restore the classic crafting station layout by setting classicCraftingStationLayout=true.
|
| ├── |
|
mods Add any previously installed additional mods, such as WorldEdit for GTNH and WorldEdit CUI.
| |
| └── |
|
serverutilities Configure ServerUtilities permissions (ie. ranks, homes, chunk loading), or risk copying it over.
| |

|
Disable or remove the DefaultServerList mod if you don't want it to repopulate your servers.dat.
| ||
|
|
Disable compact vertex format in video settings (under advanced) to remove the small white dots that appear everywhere. | ||
|
|
Switch units from mB to liters in GTNH Lib mod settings (under number_formatting). | ||
|
|
Disable shader usage in Botania mod settings to eliminate the poor reflections of mana pools. | ||
|
|
Enable wuss mode in Thaumcraft mod settings to disable warp events. | ||
|
|
Disable item dislocator sound in Draconic Evolution mod settings. | ||
|
|
Disable tool cycling in Adventure Backpacks mod settings (under gameplay). | ||
|
|
Change the Multiblock Structure Hologram Projector's autoPlaceBudget to 200 and autoPlaceInterval to 1 in StructureLib mod settings (under common) to build large multiblocks much faster. | ||
Method 2: Direct Update (Not Recommended)
This method involves duplicating the current GTNH instance and replacing some of the files with those from a new GTNH instance.
1. Clone the current GTNH instance.
- Prism: Right-click on the instance icon and choose Copy.
- MultiMC: Select Copy Instance in the drop-down.
- ATLauncher: Select Edit Instance > Clone Instance in the drop-down. Select the Open Folder button for a new instance.
2. Rename the copy to the GTNH version being updated to, or anything else to help identify it.
3. Replace the following files in the copied instance with those from the new instance. The "show hidden files" setting might need to be enabled to see the .minecraft folder on Mac or Linux. The libraries, patches, and mmc-pack.json are only necessary if using Java 17 or newer. MultiMC might need new java arguments as well.
|
|
.minecraft
| |
| ├── |
|
config
|
| ├── |
|
mods
|
| └── |
|
serverutilities
|
|
|
libraries
| |
|
|
patches
| |
|
|
mmc-pack.json
| |
-
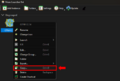 1) Clone the current GTNH instance.
-
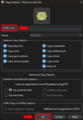 2) Rename the copy to the new GTNH instance.
-
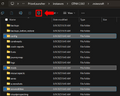 3) Delete and replace the above files.
-
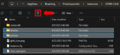 3) If using Java 17 or newer, delete and replace the above files
Additional Resources
- For more information on any of the terms/acronyms on this page, see the Lexicon.
- For compatible mods, see Additional Mods.
- For texture packs, see Resource Packs.
- For backups, see Backups and Recovery (already included for single player).
- For server installation and updates, see Server Setup.
- For daily and experimental builds, see Dev Builds.