GT New Horizons · Mega Ultimate Voltage (UMV)
Eye of Harmony
The Eye of Harmony (EOH) is a UMV tier multiblock for harnessing the power and resources of small solar systems by creating a pocket of spacetime with transdimensional engineering. The EOH is required to craft UXV components because it is the only machine capable of producing White Dwarf Matter (WDM), Black Dwarf Matter (BDM), and Universium. Other than the Shielded Lagrangian Annihilation Matrix, the EOH greatly surpasses every other Power Generation method in GTNH while also gathering billions of resources with each iteration. However, operating the EOH is no small feat and requires delicate precision to avoid penalties and long(er) waiting times.
Spreadsheet: GTNH Power Planner 2.9
Construction
The EOH has a few restrictions on the buses/hatches. The input bus must be regular (not stocking) and is only for inserting Astral Arrays and setting the desired number of overclocks. Both input hatches must be regular (not stocking) and are only for inserting hydrogen, helium, or raw stellar plasma mixture. The output bus/hatch should ideally be ME to buffer the massive amount of dusts and plasmas but quantum buses also work. There is no energy hatch because the EOH uses too much power to be handled with conventional means. Instead, it interacts directly with the owner's wireless EU network. Right-click the controller with a screwdriver to toggle animations. Use the Multiblock Structure Hologram Projector to visualize/build the structure with subchannels "spacetime compression", "time dilation", and "stabilisation" to specify the tier of those components.
Structure
- Controller: Front center, 17th layer
- 896 Reinforced Spatial Structure Casing
- 534 Reinforced Temporal Structure Casing
- 168 Time Dilation Field Generator (Tiered)
- 138 Spacetime Compression Field Generator (Tiered)
- 48 Stabilisation Field Generator (Tiered)
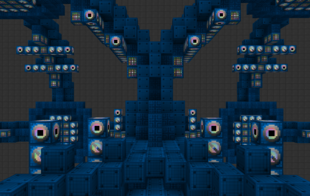
Wallshared EOHs - 31 Infinite Spacetime Energy Boundary Casing
- 1 Input Bus: Any boundary casing (no stocking bus)
- 2 Input Hatch: Any boundary casing (no stocking hatch)
- 1 Output Bus: Any boundary casing
- 1 Output Hatch: Any boundary casing
Lastly, a tiny planet (not consumed) needs to be inserted into the controller to tell the EOH which recipe to run. Right-click the controller with the tiny planet in hand for quick insertion. Hopefully you listened to the quests and gathered some planet/dungeon blocks as you visited them.
Wallsharing
EOHs may wallshare the 9 compression field generators and 12 time dilation generators on each of their sides including those directly behind the controller. The slight overlap does not cause any issues with forming and is highly recommended because the field generators are some of the most expensive blocks in GTNH. The only downside is that it is more difficult to upgrade the field generators because the must all be the same tier for the structures to form.
Usage
The EOH requires very precise input fluid amounts but otherwise is not very complicated to use. The field generators determine the stats of the machine including its speed, the maximum tier of recipes that it can run, and the success chance (). The tiny planet inside the controller determines the specific recipe to run and therefore the required amount of hydrogen and helium--generally 1B liters of each per tier. Once it has enough of both fluids and enough power in the wireless network, it immediately begins processing.
The EOH does not support any type of energy hatch, but it can still run a configurable number of overclocks via the programmed circuit in the input bus. For example, set the programmed circuit to three to run the EOH with three "imperfect" overclocks. Each one provides the normal 2x speed for 4x power (2/4) but they do not increase the total power output or gain so the overclock ratio is actually 2x speed for 8x power (2/8).
Success Chance
EOH recipes are very long and not guaranteed to succeed with each iteration. If the recipe does succeed, then all the dusts and plasmas listed in NEI are outputted in full. If the recipe fails, then nothing is outputted except for a compensatory amount of spacetime, as seen in the following equation where is the tier of the recipe and is the success chance. Although spacetime requires the recipe to fail, it is still affected by the overflow penalty to prevent players from intentionally failing recipes to farm spacetime.
All input power is consumed at the start of recipes and all output power is produced at the end of recipes, regardless if the recipe succeeds or not. There is no EU/t cost inbetween and any mention of that is simply an average. Use the planner linked at the top to know exactly how much input power is required to not powerfail your base.
Pity SystemThe EOH has a built-in pity system that guarantees a successful recipe after enough failed attempts to compensate for bad luck and overall frustration. The "pity chance" starts at the success chance () and additively increases with each failed attempt until it reaches 100% and forces a success. Pity has no effect on the operation of the machine until then. The amount of pity added per failed attempt depends on the success chance (), as seen in the following equation. Scoring a successful attempt or switching recipes resets the pity chance back to the original success chance. Pity is applied before the overflow penalty so it can still be lost if not careful.
|
|
Field Generators
There are three different types of field generators available and each one boosts the output of the EOH in their own unique way. They also come in nine different tiers for scaling their effects, as seen in the following table. Higher tiers are always better, aside from one exception that is discussed later. "Star Matter" assumes the EOH is running the highest possible tier recipe and refers to either White Dwarf Matter (WDM), Black Dwarf Matter (BDM), or Universium. Recipes also have their own success and power penalties which can be found in NEI--there are too many to list here.
Note that "X/Y/Z EOH" is a shorthand method to refer to an EOH with tier X spacetime compression field generators, tier Y time dilation field generators, and tier Z stabilisation field generators.
| Tier | Compression Gen. | Time Dilation Gen. | Stabilisation Gen. | |||||
| Star Matter | Per Success | Time Multiplier | Success Penalty | Success Boost | Yield Penalty | Power Penalty | ||
| 1 | Crude | WDM | 1,152 L | x1.00 | 0.00% | +0.00% | 0.00% | -40.00% |
| 2 | Primitive | WDM | 4,608 L | x0.501 | -9.25% | +5.00% | -5.00% | -35.00% |
| 3 | Stable | WDM | 18,432 L | x0.502 | -18.50% | +10.00% | -10.00% | -30.00% |
| 4 | Advanced | BDM | 1,152 L | x0.503 | -27.75% | +15.00% | -15.00% | -25.00% |
| 5 | Superb | BDM | 4,608 L | x0.504 | -37.00% | +20.00% | -20.00% | -20.00% |
| 6 | Exotic | BDM | 18,432 L | x0.505 | -46.25% | +25.00% | -25.00% | -15.00% |
| 7 | Perfect | Universium | 1,152 L | x0.506 | -55.50% | +30.00% | -30.00% | -10.00% |
| 8 | Tipler | Universium | 4,608 L | x0.507 | -64.75% | +35.00% | -35.00% | -5.00% |
| 9 | Gallifreyan | Universium | 18,432 L | x0.508 | -74.00% | +40.00% | -40.00% | 0.00% |
Spacetime Compression Field Generators determine which recipes can be run in the EOH. More specifically, the tier of these casings must be greater than or equal to the tier of the tiny planet (recipe). The only exception is T10 Deep Dark which can be run with T9 Gallifreyan compression field generators. Exceeding the tier of a recipe decreases the processing time by 3% per tier over the requirement (multiplicative).
Time Dilation Field Generators decrease the time required for a recipe by 50% per tier (multiplicative). However, this comes at a cost and decreases the probability of a recipe succeeding by 9.25% per tier (additive).
Stabilisation Field Generators increase the probability of a recipe succeeding by 5% per tier (additive), but the downside is that it decreases the yield of a recipe by 5% per tier (additive). Lower tier stabilisation field generators also have a power output penalty starting at 40% for T1 Crude and decreases by 5% per tier (additive).
Cost Breakdown
The following table lists the required amount of star matter for each set of field generators. The cost for the stabilisation field generators does not include the cost of the other two field generators used to craft them. Multiply the cost by three if those need to be crafted too.
| Tier | Star Matter | Per Block | 138 Compression Gen. | 168 Time Dilation Gen. | 48 Stabilisation Gen. | |
| 2 | Primitive | WDM | 36 L | 4,968 L | 6,048 L | 1,728 L |
| 3 | Stable | WDM | 144 L | 19,872 L | 24,192 L | 6,912 L |
| 4 | Advanced | WDM | 576 L | 79,488 L | 96,768 L | 27,648 L |
| 5 | Superb | BDM | 36 L | 4,968 L | 6,048 L | 1,728 L |
| 6 | Exotic | BDM | 144 L | 19,872 L | 24,192 L | 6,912 L |
| 7 | Perfect | BDM | 576 L | 79,488 L | 96,768 L | 27,648 L |
| 8 | Tipler | MHDCSM | 36 L | 4,968 L | 6,048 L | 1,728 L |
| 9 | Gallifreyan | MHDCSM | 144 L | 19,872 L | 24,192 L | 6,912 L |
Fluid Input
Every recipe (before astral arrays) requires a specific amount of hydrogen and helium to run. Stocking input hatches are not supported and do not input any fluids into the machine. Instead, fluids must be inserted via regular input hatches such as UMV input hatches or humongous input hatches. View the current fluid levels inside the machine by using a Portable Scanner on the controller or by using an industrial information panel. The EOH does not start processing until it reaches the minimum amounts required by the recipe, at which point it consumes all stored fluid immediately.
 Caution: | The EOH does not input fluids while a recipe is actively running, but it does input fluids while the machine is disabled. Therefore, it could potentially store a limitless amount of helium and hydrogen without any way to remove it. The only thing to do in that scenario is break the controller and reset the fluids back to zero. |
Overflow Penalty
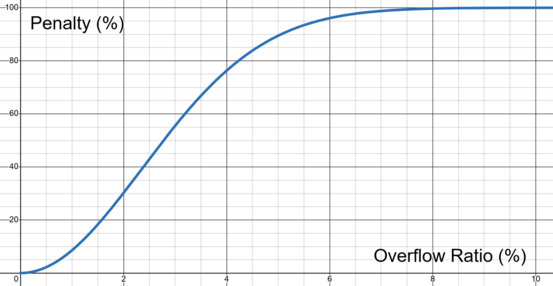
Exceeding the minimum amount of hydrogen and helium required to run has a very significant penalty on the recipe's success chance and yield, as seen in the following equation where is the overflow ratio and the penalty is the total reduction in star matter.
Note that the penalty is nearly 10% with just 1% overflow and approximately 100% with just 8% overflow. For reference, constantly filling a UMV input hatch with the maximum amount of hydrogen and helium possible peaks at 1.6% overflow which has a 20.58% penalty. In other words, carelessly filling the input hatch is NOT a very good strategy for automating the EOH prior to the humongous input hatch.
Automation
The challenge in using the EOH effectively is providing the exact amount of input fluid required to avoid steep overflow penalties. There is also no input hatch large enough to insert all the fluid at once so it must be done iteratively.
Method 1: Cell Swapping
The core mechanic behind this approach is using AE2 cell swapping to move very large and very specific amounts of hydrogen, helium, and raw stellar plasma. This approach is compact, simple, and very flexible. There are no significant downsides.
| STEP 1 | |
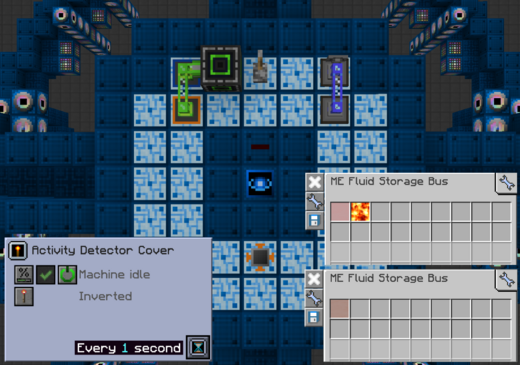
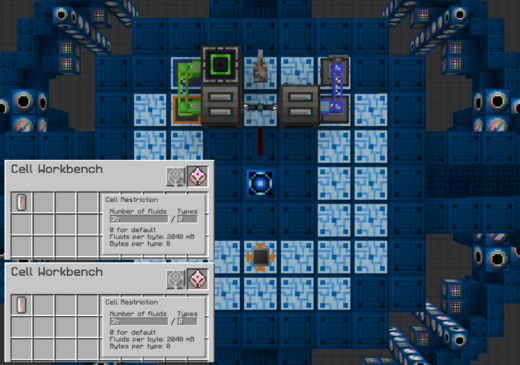
| Place the necessary buses/hatches around the controller as shown. That includes 1 input bus, 2 input hatches, 1 ME output bus, and 1 ME output hatch.
Connect the output bus/hatch to the main network (green) or possibly a subnetwork that can route the outputs to the main network. Place a fluid storage bus on both input hatches. Filter one to hydrogen and the other to helium, or raw stellar plasma if working with AA. Power the fluid subnetwork (blue) with a neutronium energy cell. Place an activity detector cover set to MACHINE IDLE with INVERTED redstone behavior on the top of the controller. Right-click it with a soldering iron to change the signal strength to STRONG. The lever is a manual override. |
|
| STEP 2 | |
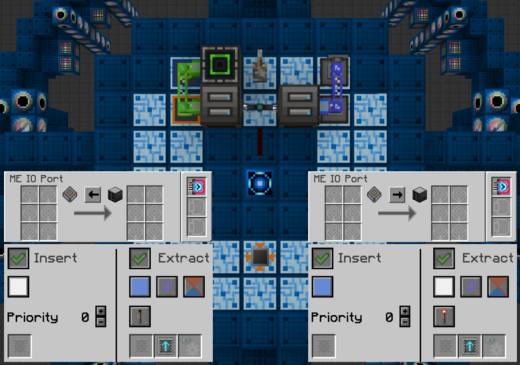
| Place an ME IO port on both the main network (green) and fluid subnetwork (blue). Insert a superluminal acceleration card into both and change their direction as shown.
Place an item conduit inbetween the ME IO ports with the settings shown and insert a speed upgrade into both ends. Ensure the left is ACTIVE WITHOUT SIGNAL and the right is ACTIVE WITH SIGNAL. The ME IO port on the main network (green) fills the storage cells with the exact input amounts, the conduit pulls it over, and then the ME IO port on the fluid subnetwork (blue) fills the input hatches. The activity detector toggles the conduit as necessary to avoid overflowing the machine. |
|
| STEP 3 | |
| Craft a 16384k fluid storage cell for hydrogen, helium, and/or raw stellar plasma. Filter them in a cell workbench to ONE fluid only and then restrict them to the required input amounts for the current recipe. The example to the right restricts the storage cells to 3B liters each to run T2 planet recipes.
Finally, place the cells in the ME IO port on the main network (green) to start the automation. Use the lever to permanently disable the item conduit as necessary. |
|
Method 2: Level Maintaining
The core mechanic behind this approach is using an ME level maintainer to constantly request very specific amounts of hydrogen, helium, and raw stellar plasma. A fake crafting card is used to automatically complete the crafting requests whether the recipe failed or not. This approach is slightly more complicated but still very compact and flexible.
| STEP 1 | |
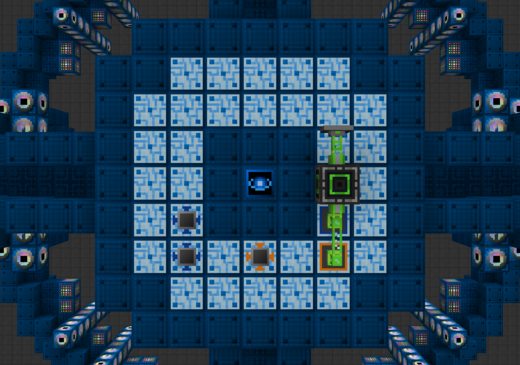
| Place the necessary buses/hatches around the controller as shown. That includes 1 input bus, 2 input hatches, 1 ME output bus, and 1 ME output hatch.
Connect the output bus/hatch to the main network (green) or possibly a subnetwork that can route the outputs to the main network. Place an ME dual interface on the main network with DEFAULT SETTINGS. This is used by the subnetwork in the next step to pull hydrogen, helium, and/or raw stellar plasma from the main network. |
|
| STEP 2 | |
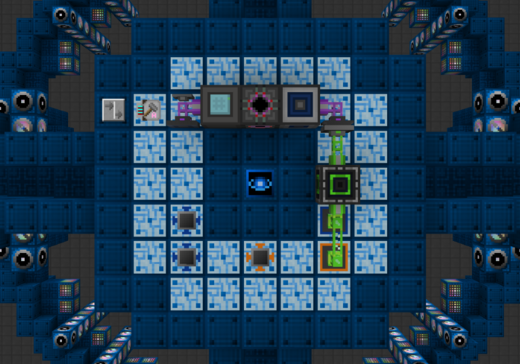
| Build the EOH subnetwork (purple) with an ME level maintainer, singularity crafting storage, and fluid discretizer. Power the subnetwork with a neutronium energy anchor.
Alternatively two 16,384k crafting storages can be used in place of the singularity crafting storage. Place a fluid storage bus set to EXTRACT ONLY facing into the ME dual interface on the main network. This reads the contents of the main network for the crafting requests made by the level maintainer. Also place an ME dual interface with a FAKE CRAFTING CARD and BLOCKING MODE enabled. This is where the dummy pattern in step 4 goes. |
|
| STEP 3 | |
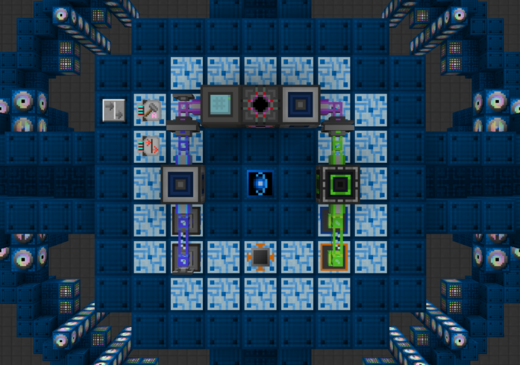
| Build the fluid subnetwork (blue) with a fluid discretizer and a fluid storage bus on each of the input hatches. Power the subnetwork with a neutronium energy anchor.
Filter one fluid storage bus to hydrogen and the other to helium, or raw stellar plasma if working with AA. Also place an ME dual interface with an ADVANCED BLOCKING CARD facing into the ME dual interface on the EOH subnetwork. This receives the fluids from the crafting requests made by the level maintainer, but not if there is anything currently in the input hatches. |
|
| STEP 4 | |
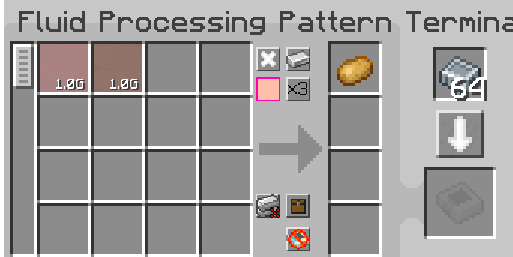
| Pattern a “dummy” item that takes exactly 1B hydrogen and 1B helium as inputs, or however much raw stellar plasma is needed if working with AA.
Place the pattern in the ME dual interface on the EOH subnetwork. This is used by the level maintainer to make automatic crafting requests. |
|
| STEP 5 | |
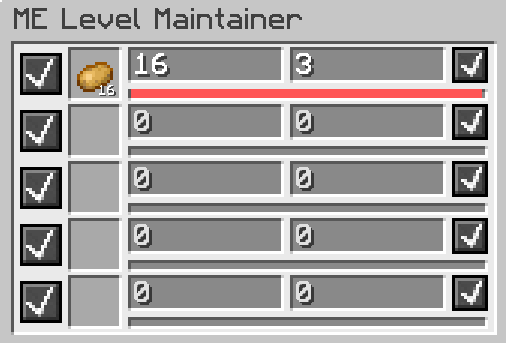
| Make a request for 16 total dummy items in the level maintainer (which it will never obtain) and set the batch size to the amount of fluid required for the recipe.
This example has a batch size of 3 which means it requests 3B hydrogen and 3B helium per iteration, or the exact fluid needed for a T2 planet. The craft is automatically completed by the fake crafting card as soon as the inputs are pushed to the fluid subnetwork. |
|
Method 3: Shortcut
The core mechanic behind this approach is using ME output hatches to buffer a tremendous amount of fluid and automatically push fluids when there is open storage. This approach only works with humongous input hatches and for recipes whose fluid input requirements are a multiple of 500M. This is mostly used for running power EOHs on T10 Deep Dark--a recipe that requires exactly 10B hydrogen and 10B helium, or conveniently 5x the size of a humongous input hatch. If necessary, a quad-humongous input hatch only inserts 500M at a time.
| STEP 1 | |
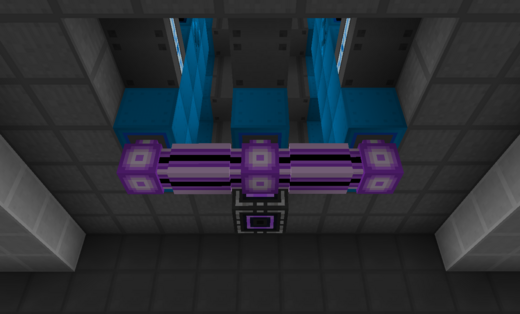
| Equip a few Mk-II or Mk-III space pumping modules with ME output hatches and fluid quantum storage cells, or better.
Set the pumping modules to half hydrogen and half helium. Let them run for a few minutes to build up a large buffer. Do NOT let the hydrogen or helium be stored anywhere outside the buffer of the ME output hatches. |
|
| STEP 2 | |
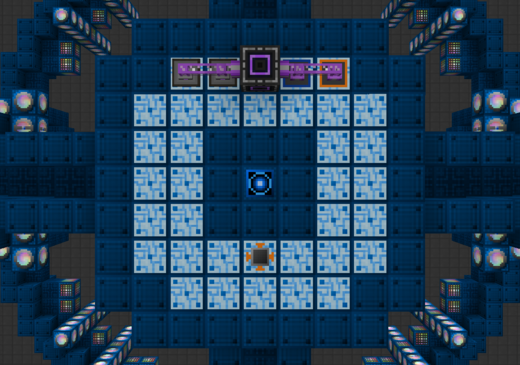
| Connect the EOH subnetwork (purple) to fluid storage buses facing into humongous input hatches on the EOH.
Set the fluid storage buses to INSERT ONLY and filter one to hydrogen and the other to helium, or raw stellar plasma if working with AA. The ME output bus and ME output hatch can also be on this network so long as hydrogen and helium are blacklisted from going anywhere else. |
|
Climbing the Tiers
There are MANY different approaches to climbing up from a 1/1/1 EOH to a 9/9/9 EOH. Some involve skipping tiers to save on resources while others rely on serious power infrastructure to overclock as much as possible. Regardless, everyone's goal is to climb the tiers as quickly and efficiently as possible. This section explains which field generators to upgrade first since they do not contribute equally to the gain of star matter.
Prioritizing Field Generators
1) First and foremost are compression field generators because each tier quadruples the gain of star matter for a new recipe that is 40% longer and 5% less efficient. This means compression field generators offer an impressive x2.714 increase to star matter production.
2) Second are time dilation field generators which double star matter production with some penalty to success chance. The net gain to star matter production varies significantly with the previous success chance (earlier tiers are better), but still offers between x1.815 and x1.383 increase in star matter production for 100% and 30% probabilities of success, respectively. Note that later tiers could even REDUCE star matter production if the new success chance is less than half the previous one; do NOT upgrade the time dilation generators if the success chance is already less than 18.5%.
3) Last are the stabilisation field generators with a net gain to star matter production that varies with both the previous success chance and yield. Lower probabilities of success increase the effectiveness of upgrading these which makes these not very important in the lower tiers. In the higher tiers, however, the net gain to star matter production can be as high as x1.16 assuming a minimum of 18.5% success chance.
Recommended Approach
The following table is the recommended order for upgrading field generators based on the above information. The EOH is power positive at 6/7/7 with no overclocks but this approach prioritized speed over efficiency for those last few tiers. The average star matter production rates include pity, unlike the Portable Scanner which does not.
| EOH | OC | AA | Planet | Duration | Success (+Pity) | Star Matter | Power | |||
| Type | Average | Input | Output | Net Rate | ||||||
| 1/1/1 | 3 | 0 | Overworld | 37m 30s | 100% (+0.00%) | WDM | 0.512 L/s | -2.32e18 EU | 1.30e16 EU | -5.12e13 EU/t |
| 2/1/1 | 3 | 0 | Mars | 73m 29s | 90.0% (+9.00%) | WDM | 0.941 L/s | -4.55e18 EU | 3.41e16 EU | -5.12e13 EU/t |
| 3/1/1 | 3 | 0 | Ceres | 102m 53s | 85.0% (+12.8%) | WDM | 2.546 L/s | -6.37e18 EU | 5.37e16 EU | -5.12e13 EU/t |
| 3/3/1 | 2 | 0 | Ceres | 51m 26s | 66.5% (+22.3%) | WDM | 4.126 L/s | -1.59e18 EU | 5.37e16 EU | -2.49e13 EU/t |
| 4/3/1 | 2 | 0 | Io | 72m 1s | 61.5% (+23.7%) | BDM | 0.174 L/s | -2.23e18 EU | 8.36e16 EU | -2.48e13 EU/t |
| 5/3/1 | 2 | 0 | Titan | 100m 50s | 56.5% (+24.6%) | BDM | 0.469 L/s | -3.12e18 EU | 1.29e17 EU | -2.47e13 EU/t |
| 5/5/1 | 1 | 0 | Titan | 50m 25s | 38.0% (+23.6%) | BDM | 0.679 L/s | -7.80e17 EU | 1.29e17 EU | -1.08e13 EU/t |
| 5/5/5 | 1 | 0 | Titan | 50m 25s | 58.0% (+24.4%) | BDM | 0.763 L/s | -7.80e17 EU | 1.72e17 EU | -1.01e13 EU/t |
| 6/5/5 | 1 | 0 | Proteus | 70m 35s | 53.0% (+24.9%) | BDM | 2.059 L/s | -1.09e18 EU | 2.61e17 EU | -9.78e12 EU/t |
| 6/7/5 | 1 | 0 | Proteus | 17m 38s | 34.5% (+22.6%) | BDM | 5.889 L/s | -1.09e18 EU | 2.61e17 EU | -3.91e13 EU/t |
| 6/7/7 | 1 | 0 | Proteus | 17m 38s | 44.5% (+24.7%) | BDM | 5.991 L/s | -1.09e18 EU | 2.94e17 EU | -3.76e13 EU/t |
| BUILD A SECOND OR THIRD EOH | ||||||||||
| 7/7/7 | 1 | 0 | Pluto | 24m 42s | 39.5% (+23.9%) | Universium | 0.248 L/s | -1.52e18 EU | 4.45e17 EU | -3.63e13 EU/t |
| 8/7/7 | 1 | 0 | Vega B | 34m 35s | 34.5% (+22.6%) | Universium | 0.657 L/s | -2.13e18 EU | 6.72e17 EU | -3.52e13 EU/t |
| 9/7/7 | 1 | 0 | Deep Dark | 48m 25s | 29.5% (+20.8%) | Universium | 1.586 L/s | -2.99e18 EU | 1.01e18 EU | -3.41e13 EU/t |
| 9/7/9 | 1 | 0 | Deep Dark | 48m 25s | 39.5% (+23.9%) | Universium | 1.736 L/s | -2.99e18 EU | 1.12e18 EU | -3.22e13 EU/t |
| PULL GALLIFREYAN PARTS OFF TO CRAFT AA | ||||||||||
| 8/7/7 | 1 | 1 | Vega B | 34m 35s | 34.5% (+0.00%) | Universium | 4.290 L/s | -2.04e18 EU | 3.95e17 EU | -3.97e13 EU/t |
| 9/7/7 | 1 | 1 | Deep Dark | 48m 25s | 29.5% (+0.00%) | Universium | 10.480 L/s | -2.87e18 EU | 5.93e17 EU | -3.91e13 EU/t |
| 9/7/9 | 1 | 1 | Deep Dark | 48m 25s | 39.5% (+0.00%) | Universium | 12.028 L/s | -2.87e18 EU | 6.59e17 EU | -3.80e13 EU/t |
| 9/8/9 | 0 | 1 | Deep Dark | 48m 25s | 30.3% (+0.00%) | Universium | 9.211 L/s | -7.16e17 EU | 6.59e17 EU | -9.83e11 EU/t |
Astral Arrays
With a crafting cost equal to a full 9/9/9 EOH, an Astral Array (AA) is a very powerful device that changes four major aspects about the EOH, listed below. Insert AA through the input bus and retrieve them by right-clicking the controller with a wire cutter. They are stored internally and cannot be shared between machines. The maximum number of AA is 8,637 although that is nearly impossible to sustain.
1) Parallel Processing
The most appealing factor of AA is that they unlock parallel processing Use the following equations to calculate the parallel exponent (PE) and the total number of parallels from the total number of AA. Note that the floor operator means not every AA is going to increase the number of parallels so some sample calculations are provided. The success or failure of every parallel is calculated independently.
| Astral Arrays | 1 | 2 | 4 | 6 | 9 | 15 | 26 | 43 | 73 | 124 | 211 | 358 | 609 |
| Parallels | 8 | 32 | 64 | 128 | 256 | 512 | 1,024 | 2,048 | 4,096 | 8,192 | 16,384 | 32,768 | 65,536 |
2) New Fluid Input
Regardless of the recipe, having at least one AA changes the input fluid requirement from hydrogen/helium to condensed raw stellar plasma mixture. The amount required depends on the original helium amount and the number of parallels, as seen in the following equation. Overflow penalties still apply so this absolutely needs to be automated with a high degree of precision (Method 1 or 2 from earlier).
3) New Power Calculation
Having at least one AA also applies a power penalty that prevents the EOH from ever being power-positive, as seen in the following equations. Note that both and are the base values from NEI, OC is the number of overclocks, PE is the parallel exponent, and is the efficiency of the stabilisation field generators.
| Without Astral Arrays | ||
| With Astral Arrays |
4) No Pity System
Parallels tend towards an average output instead of all-or-nothing, and it is very likely that at least one succeeds. There is no longer a need for the pity system and is therefore ignored when using at least one AA.
Power vs. Production EOH
Due to the effects of AA, it becomes necessary to specialize EOHs in either power (for EU) or production (for resources).
Power EOH
There is only one best setup for power generation and it is very simple. There cannot be any overclocks or AA to keep the EOH power-positive which means the only way to generate more power is to physically build more of them. Fortunately, it is quick to automate using the shortcut method from earlier and the recipe does NOT need to succeed to generate power. A single EOH running this setup generates approximately 1.29e13 EU/t which is equivalent to 38 Dyson Swarm Ground Units or 19 Large Naquadah Reactors with max fuels, but pales in comparison to what the SSASS and SLAM can produce with mid and higher tier fuels.
- BEST Power: 9/9/9 with T10 Deep Dark
Production EOH
As the name suggests, these types of EOH are primarily used to generate resources. One of each is all that is necessary to gather each of the three different star matters and raw stellar plasma. These should not have any overclocks as the combination of astral arrays and overclocks leads to unreasonable power demands.
- BEST Raw Stellar Plasma: 9/9/9 with T0 Overworld + AA
- BEST White Dwarf Matter: 9/9/9 with T3 Ceres + AA
- BEST Black Dwarf Matter: 9/9/9 with T6 Proteus + AA
- BEST Universium: 9/8/9 with T10 Deep Dark + AA
Maxed 9/9/9 EOH's are used in each setup because the highest tier field generators yields the highest L/s of each star matter regardless of the number of AA. However, the best universium setup actually uses tier 8 time dilation generators because otherwise there is a net negative in raw stellar plasma which is harder to sustain and naturally requires more AA to compensate. The best raw stellar plasma setup may also seem surprising, but this stems from the overworld being a T0 planet (a shorter recipe) while producing the same amount of raw stellar plasma as a T1 planet and having the highest probability of success.
Oversized Recipes
A few EOH recipes have over 81 item outputs which means they are not all displayed in NEI. The following tables therefore list out the output quantities for those specific recipes to serve as a reference, since they are not visible anywhere else.
T0 Twilight Forest (82 Outputs)
|
T10 Deep Dark (329 Outputs)
|
Trivia
- There are 729 possible combinations of field generators.
- Moving the render block at the center of the animation (e.g. with a teleposer) makes it stay around permanently.
- Iron plasma is the only plasma shared between all 40 planet recipes.
- Helium plasma, radon plasma, nitrogen plasma, and americium plasma are all exclusive to T10 Deep Dark.