GT New Horizons · GTNH Basics
Automation
Automation is one of the primary themes of the New Horizons modpack. From the humble hopper to a full auto-crafting Matter Energy system, the available options increase with every new technology tier. This page is a list of potential automation systems available in GT:NH. Comprehensive guides can also be found below, where available.
Pre-AE2 Automation
Automation before Applied Energistics 2 (AE2) is generally very limited, with the exception of the optional mods Logistics Pipes (LP) and ProjectRed (PR), which are lower-tech ways to accomplish many of the same things as AE2, including complex routing and on-demand autocrafting. Outside of LP, automation before AE2 takes the form of fixed processing lines, particularly for power generation, but also for certain materials like Polyethylene that are both required in large quantities and difficult to just batch craft when needed.
Hoppers
Primitive early game automation. Chests or other storage can be placed on top to extend buffer size. Can be placed beneath steam machines to pull contents. Output direction can be adjusted using GT wrench. Transfer rate is fairly slow, 1/s. Transfers until receiver is full. Can be disabled with redstone signal. Buggy with certain containers like drawers, may pull items even if the hopper is full.
GT Pipes, Conveyors & Pumps
More advanced automation. Conveyors and pumps pull or push items/fluids, with rates increasing by tier. Fluid pipes try to divide flows evenly, but can suffer from backflow issues. Multi-pipes available with fluid filter covers allowing specific fluids into or out of each pipe. Item pipes route item to nearest-allowed-destination based on distance. Smaller pipes are automatically given a longer distance. Simple filtering possible with locked barrels or drawers. Transfers until receiver is full. Can be used for dedicated setups, ie compressing and centrifuging air, oil desulfurizing and mixing to max diesel, etc. Automation is a pull-based system - you pull something out at the end, and the ingredients slowly percolate to the start. Can be upgraded to be redstone controlled. GT item filters and chest buffers can be used with other systems to do type filtering or providing specified amounts of items.
GT Machine Controls
Electric GT machines have a few built-in abilities that can be useful for simple automation. Every singleblock machine has a single output face, which can be set with a wrench; if the "fluid auto-output" or "item auto-output" options are enabled in the GUI, the respective outputs will automatically be pushed through the output face. Right clicking either the output face or the front face with a screwdriver will toggle the ability to insert through the output face, and shift-right clicking will toggle the input filter, which determines whether items without a recipe in the machine (ignoring voltage) can be inserted automatically. Similar features exist for electric multiblocks: input buses and hatches support the input filter, and output buses and hatches will automatically push into inventories or tanks in the direction they face. Input buses also have a "limit insertion" toggle, which will prevent more than one stack of an item type from being inserted, preventing the bus from clogging.
GT Logistic Blocks
GT also adds various blocks that can be used for complex item routing tasks. Each one is tiered to the different GT electrical tiers, but only the Chest Buffer and Super Buffer meaningfully differ by tier; for the other blocks, it only affects the voltage that can be sent through the block (like a Machine Hull) without an explosion.
Chest Buffer
Chest Buffers can store up to 27 stacks of items, and automatically output them to an inventory in front of them at a rate that depends on the tier of the Chest Buffer. By right clicking the output face with a Screwdriver, they can have a "max stack size" configured; what this means depends on whether stocking mode is enabled in the GUI. By enabling stocking mode, they will limit the size of the stacks in the target inventory based on the output stack size value. If stocking mode is disabled, this setting instead controls how many items it will output per operation.
Super Buffer
Super Buffers are a variant of Chest Buffers with a much larger internal inventory: 256 stacks instead of 27. However, this comes at the cost of being unable to view or interact with the inventory manually, unlike a Chest Buffer, although the Holo Glasses can help with the former issue.
Item Filter
Item Filters can have up to 9 different filters set in their GUI to control which items can be inserted, and any items that are inserted will be output in the direction the Item Filter is facing. Right clicking the output face with a Screwdriver can be used to limit the number of items output per tick.
Type Filter
Type Filters can have one Ore Dictionary prefix set in their GUI, and will only allow items matching that prefix to enter and be output in the direction the Type Filter is facing. They're particularly useful for early game ore processing setups. Similar to Item Filters, a Screwdriver can be used to limit the output rate.
Recipe Filter
Recipe Filters are analogous to Item Filters and Type Filters, but are configured with a GT machine, and will only allow items through if those items are inputs in a recipe in that GT machine.
Regulator
Regulators are an advanced version of Item Filters in which each filter can have an item quantity and slot number, and the Regulator will only output items when doing so would leave the exact quantity in the filter in the target slot. One application of this is for automating singleblock Electrolyzers that need to work on multiple different dusts without getting clogged, such as in an Ashes centrifuging setup.
Item Distributor
Item Distributors can be right clicked on each side with a screwdriver to set an "items per side" for that side, which defaults to 0. Items input into the Distributor will be sent to each side proportionate to their "items per side" values, which is useful for many chemical loops in the early game, especially those involving fluid cells.
GT Tanks
GT singleblock tanks can be used to fill and empty fluid cells automatically for cell chemistry in the early game, for lower cost than Fluid Canners and without requiring power. Super Tanks, first available in MV, also have the ability to automatically output fluids to their output face, and the ability to void overflow fluids.
Translocators
Simple 1 block automation. Fast and can be upgraded with a glowstone dust for speed, and a diamond nugget for stocking. Easy to pull and sort items out of a mixed output into different destinations, including GT pipes. Multiple inputs/multiple outputs within the 1 block. Interface must touch another block. Item and fluid variants, however the fluid version is much worse than the item one, and is worse than a lot of GT pipes. Like an advanced, high-speed hopper. Good for compact setups like air centrifuging/water electrolyzing or simple sorting into destination pipes. The item versions are some of the fastest analog item transport you have available, especially in MV.
Item/Fluid Conduits (Ender IO)
EnderIO Conduits are first unlocked in MV, and have the ability to place multiple types of conduit within the same block space, making them great for compact setups. Conduits exist for items, fluids, RF power (although not EU), AE2 channels, and OpenComputers cable.
Conduits have an automation level similar to GT pipes but without sloshing, and with better filtering. Can store small amounts of fluid within the conduit itself. Can be redstone controlled. Supports basic filtering. Transfer rate isn't upgradeable on fluid conduits, but item conduits can get up to 64items/cycle instead of the base 4. You can also downgrade item speed to 1/cycle which plays well with round robin mode. They also pull by themselves, and don't need a pump/conveyor like GT.
Item conduits shine when their existing item filter is used. It essentially is an infinite filter, which also has the abilities of normal EIO filtering. This is many people's go to for separating siftable ores from thermal centrifuge ores. It can also be used in conjunction with automated assemblers that use more than 1 type of fluid.
In additions item conduits with filters can be used as a low tech equivalent of AE2 transportation solution. By having all outputs extract on one channel, you can use filters to control what machines get certain inputs. This works well since conduits will only input 1 stack of a item into machines and the default behavior of item conduits when place are to extract with signal. This lets you run a conduit line throughout your base pre-ev and allows easy transportation of items throughout the base for the cost of a lot of filters. This idea also can apply to ender fluid conduits.
Ender Fluid Conduits are a very versatile means of fluid transport. They're instant, have what can be a really high throughput, and can have every fluid move through one conduit. They also have built-in support for filtering fluids on both the input and output sides, and 16 colored channels to disambiguate fluids further. They have instant transport, but a limited extraction rate and a higher, but still limited, maximum I/O rate. So if you want to do more than that, you need something pushing into the conduit. This makes their pull speed reliant on the output rather than their listed rate. Not the fastest thing overall, but great for systems that use a lot of fluids. As simple move 1 fluid a few blocks, they aren't great. There are also two non-Ender fluid conduit tiers, but they don't have fluid teleportation, are limited to one fluid at a time, and are subject to gravity, so they're almost never useful.
Transfer Node (Extra Utilities)
Extra Utilities's transfer system includes Transfer Nodes, which can extract fluids and items from inventories, and Transfer Pipes, which can route those fluids and items and insert them into inventories. Transfer Pipes can be right clicked with a wrench to prevent them from connecting to any inventories or to limit the directions items can flow through them. Filter Pipes are a variant that can be filtered to limit the items that can pass through from each direction.
Transfer Nodes themselves have a few upgrades as well. Their speed can be improved with Speed Upgrades or Stack Upgrades. Breadth-First Search, Depth-First Search and Round Robin Upgrades can be used to control the way items are distributed when a Transfer Node extracts them. They also support Item Filters to limit the items they can extract from an inventory, and these filters can also be nested to create more complicated filters or filters with more distinct items. The Advanced Item Filter is especially noteworthy for being able to filter on some properties that are otherwise impossible, such as having been renamed by an anvil or Forming Press, which is useful for machines like the Blood Altar and Runic Matrix. The World Interaction Upgrade allows item transfer nodes to generate cobblestone, autocraft crafting table recipes, and pick up dropped items, and fluid transfer nodes to generate water.
Golems (Thaumcraft)
Low tier transport and mid-tier player actions emulation. Golems can do specific actions, such as planting, harvesting crops, lumberjacking, fishing, etc. Transport golems can move items from inventory to inventory. Not particularly fast, and pretty pricey to make. OK for low-speed player emulation needs. Solution for alchemy automation.
ProjectRed Pipes
See More: ProjectRed Transportation
Mid-tier on-demand automation, unlocked in LV. No support for fluids. Fluids must be placed into a tank and transported using cells. Supports automated extraction and stock-keeping (keep XX of YY in this slot). Items can be extracted from general purpose storage and provided on demand. Items can be crafted on-demand. Using setups for multiple roles is difficult but doable. Works best when a setup's outputs is used in multiple locations - think Oxygen and sending it to a polyethylene setup, polyvinyl chloride setup, and nitric acid setup. Automation is pull-based - you pull something out, and the ingredients slowly bubble back to the starting requirements. Has special requirements for pipe intersections. Can be expensive with circuits, not recommended until LV circuit assembler is available. Perhaps worse for lag since pipes show contents.
Logistics Pipes
See More: Logistics Pipes
Logistics Pipes is an earlygame mod that works as an analog version of AE2 available in LV, including the ability to create complex automated setups and on-demand autocrafting.
Applied Energistics 2
See More: Applied Energistics 2
Applied Energistics 2 (AE2) is the ultimate storage, logistics, and autocrafting mod for handling items, fluids, and even essentia. AE2 handles and transports items in digital form, giving it unlimited throughput, unmatched flexibility, and far better performance when compared with analog transportation. It's powerful enough to replace all of the above automation methods in 99% of cases once it's unlocked in EV. This page will outline some of the ways that AE2 can be used for automation.
On-Demand Autocrafting
One of the most valuable features of AE2 is the ability to automatically craft items and fluids on request, making the progressively more complex crafting recipes of later tiers approachable. Every recipe is encoded in a pattern, which contains a set of items and fluids as input, and a second set as output, and is placed into an ME Interface or Dual Interface to associate it to a machine. When the player orders an item, AE2 will calculate a crafting tree using the patterns and inputs it has access to, and then automatically send the ingredients for each pattern to its respective machine. There are two types of recipes: crafting recipes, which are made in a vanilla crafting table, and processing recipes, which are everything else. All recipes require Crafting CPU multiblocks on the network to be ordered, and fluid recipes require using a Dual Interface to send inputs to the machine, as well as a Fluid Discretizer anywhere on the network. Recipes don't have to be regular machines; anything where the system can send some inputs to an inventory somewhere (including another ME network) and then receive some output as a result can be encoded as a recipe.
Automating Recipes with Loops
Some recipes require feeding part of their output back into the input, referred to as a "loop" or a "catalytic" recipe; examples include duplicating Nether Stars with Null Catalyst or making Raw Crystal Chips from Raw Crystal Chip Parts. AE2 cannot calculate recipes with loops, so in order to pattern these recipes, it is necessary to handle the loop outside of the pattern. The pattern should not include the catalytic ingredient itself. To handle the recycling, one method is to use an Item Distributor, which can precisely split incoming items. This example demonstrates how to approach this with the Raw Crystal Chip recipe, made in an Industrial Autoclave:
| STEP 1 | |
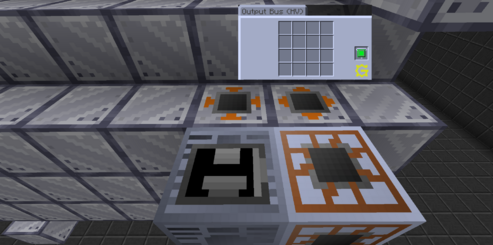
| Place an Output Bus on the desired machine, and filter it to the output of the looping recipe. Using a filter here means that it's possible to use the same machine for a looping recipe as for other on-demand crafts.
Note that the buses here are rotated for visibility; they should be both be facing downwards in practice. |
|
| STEP 2 | |
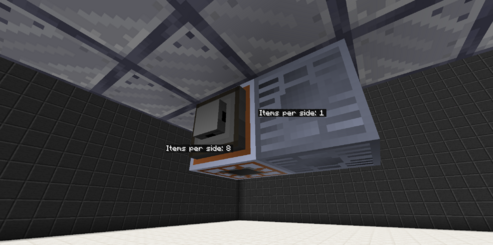
| Place any tier of GT Item Distributor underneath the filtered Output Bus, with its input side (the unlabeled side) facing the Output Bus.
Right click two of its sides with a Screwdriver to set it to output to them: one side should be for the number of outputs that are recycled (1 for Raw Crystal Chips), and one for the number of outputs that are sent back to the main network as the result of the recipe (8 in this case). Place a ME Interface on the side for the result, and connect it to the ME system. |
 |
| STEP 3 | |
| Place a singleblock machine on the recycling side of the Item Distributor; a multiblock can also be used for higher throughput, at the cost of more clutter. In this case, it's a Forge Hammer, which will recycle the Raw Crystal Chips into Raw Crystal Chip Parts. Set it to auto-output into an Input Bus on the machine, and give it power. | 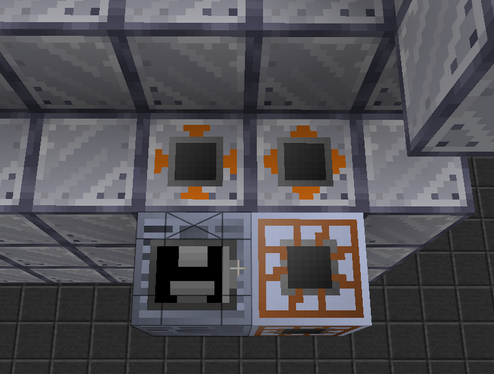
|
| STEP 4 | |
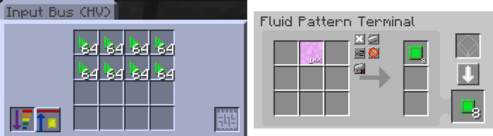
| Prime the system by putting the catalytic ingredient in that Input Bus. Ensure there are enough to continuously run the recipe at max parallels.
Encode a pattern that does not include the catalytic ingredient, and add it to an ME Interface going into the machine. |
 |
On-Demand Recipe Parallelization
It's often necessary to parallelize recipes across many different copies of the same machine in order to finish on-demand crafts in a reasonable amount of time, and there are many different approaches to doing so depending on technology level.
Method 1: Interface P2P Tunnels
ME Interface P2P Tunnels are a type of P2P Tunnel that is used to duplicate an ME Interface with its patterns. Because AE2 is able to push a pattern to multiple interfaces, as long as the pattern is identical in each one, this can be used to create multiple ME Interfaces for different copies the same machine and push recipes into each copy in parallel. This technique is the earliest available way to parallelize on-demand crafting, and is the best way to parallelize singleblock machines such as Circuit Assemblers before their multiblock versions are available.
| STEP 1 | |
| Place a ME Interface (or Dual Interface) P2P Tunnel somewhere on the main network. Name it using a Cutting Knife and fill it with patterns. | 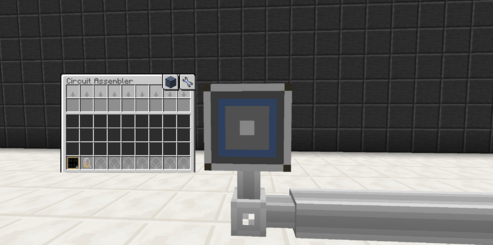
|
| STEP 2 | |
| Place an ME Interface P2P for each machine. It should be set up in the same exact way as a regular ME Interface would be. Ensure that blocking mode is on, and smart blocking mode is off. | 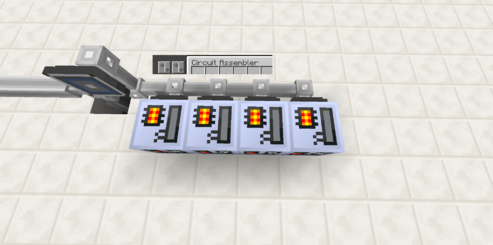
|
| STEP 3 | |
| Use a Memory Card to link the P2P with the patterns (the input) to each of the other Interface P2Ps (the outputs). Shift-right click the input P2P to save it, then right click each output P2P to link. | 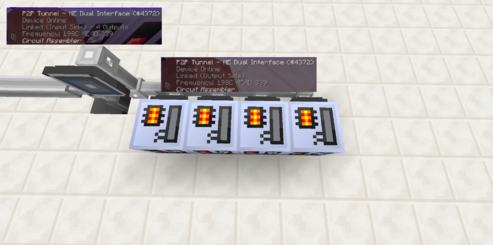
|
Method 2: Stocking Inputs
Stocking Inputs are a very powerful tool for parallelization that allow many different multiblocks to work off the same inventory of inputs. The simplest practical way to use them for on-demand recipes, which is unlocked in LuV, is Advanced Stocking Input Buses, which can be used for simple parallelization of recipes, especially those that don't need varying circuits or other non-consumed inputs and don't have a variety of fluid inputs. One of the most notable examples of where they shine is for arrays of Volcani, which meet these requirements and are needed in large quantities for the smelting demands of midgame. This technique takes advantage of the fact that stocking inputs don't actually pull the items anywhere, and instead leave them in the system's storage while making them available to the machine, meaning that multiple machines can pull from the same pool of items at once.
| STEP 1 | |
| Place a Volcanus quad. Wallshare the Advanced Stocking Input Bus, the ME Output Buses and Hatches, the Pyrotheum Heating Vent, and the Quad Input Hatch for gases. The Advanced Stocking Input Bus is placed in the center due to being the most expensive component; in UV, with Stocking Input Hatches, that should be in the middle instead. | 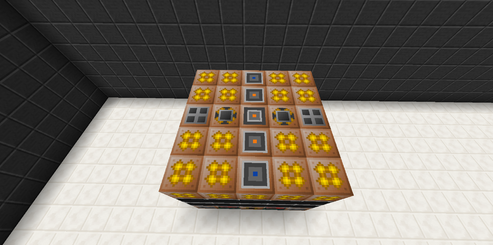
|
| STEP 2 | |
| Place a subnetwork for the Advanced Stocking Input Bus (orange in this example), and a subnetwork for the fluids and outputs (blue in this example). Place a Dual Interface against the Pyrotheum Heating Vents, set it to stock Blazing Pyrotheum, and place an Electric Pump set to Import on the Vent itself. | 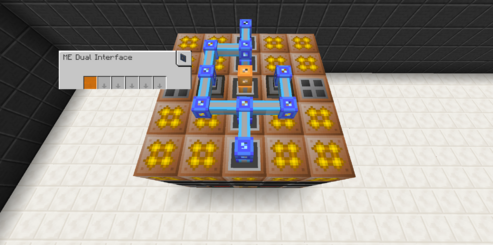 |
| STEP 3 | |
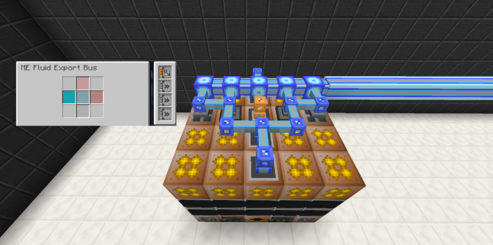
| Place a Fluid Export Bus against each Quadruple Input Hatch, add a Capacity Card and 3 Acceleration Cards, and configure them with the four EBF gases: Hydrogen, Nitrogen, Oxygen, and a noble gas. Note that dense cables will be needed to have enough channels.
In UV, this can be replaced with a Stocking Input Hatch. |
|
| STEP 4 | |
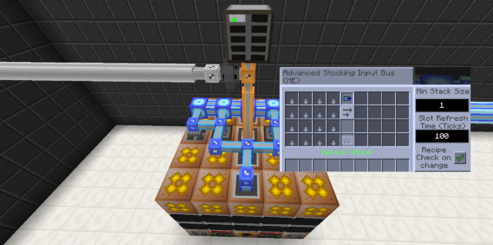
| Place an ME Drive somewhere on the orange subnetwork. Configure the Advanced Stocking Input Bus by enabling auto-pull mode and "recipe check on change". Set the relevant programmed circuit or other non-consumed items, such as circuit 11 in this case.
Place an ME interface on the orange subnetwork, and another ME Interface on the main network (white in this example) pointing into it to contain the patterns. Ensure all patterns do not contain fluid inputs. |
 |
| STEP 5 | |
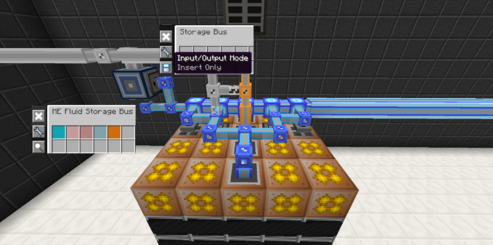
| Place a Dual Interface on the main network, and place a Fluid Storage Bus and a regular Storage Bus against it on the blue subnet. Set the regular Storage Bus to Insert Only, and the Fluid Storage Bus to Extract Only. Filter the Fluid Storage Bus to only the relevant EBF gases.
Power both subnets with quartz fiber. |
 |
| STEP 6 | |
| Add more processing capacity by simply adding additional Volcanus quads connected to the same orange network. | 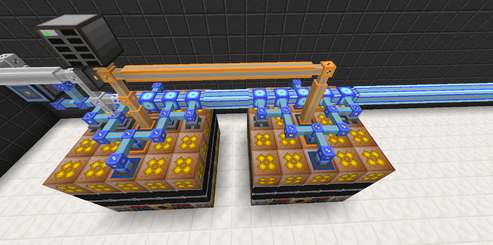 |
Advanced Stocking with Fluids and Circuits
This technique can also be expanded to support recipes using fluids as well as machines using many different circuits or other non-consumed items.
Adding fluid support is fairly simple, but requires much more tech progression to be possible. First, the storage subnetwork needs Fluid Storage Cells added, with enough space to support any recipes that are likely to be ran. The regular Stocking Input Hatch (SIH) is UV, and can be used for parallelization by adding one to each multiblock in the same way as the Advanced Stocking Input Bus. However, because the SIH does not support auto-pull, it's necessary to manually set each fluid that can appear in a recipe in its sixteen filter slots, and to update these filters when new recipes are added. Many machines use a small enough amount of fluids that a single SIH is sufficient, including the Cutting Machine, EBF, and Mixer, but a few, such as the LCR, will require multiple. The Advanced Stocking Input Hatch (ASIH), unlocked in UEV, supports auto-pull and therefore removes the need to manually set filters, allowing it to act as an easy upgrade to the SIH.
Supporting different programmed circuits or other non-consumed items (such as Extruder shapes) is much more involved, although it lacks any progression gate beyond the ASIB itself. The concept is to have distinct subnetworks with their own storage for each supported programmed circuit, and have one ASIB on each copy of the machine for each subnetwork.
Fluid support and circuit support can also be combined by extending the above principles. In this setup, each circuit has its own subnetwork with item storage and a dedicated ASIB per machine, and pushes into a shared fluid subnetwork with fluid storage and SIHs or ASIHs on each machine. Advanced Blocking Cards are used to prevent multiple recipes from conflicting with each other. This tutorial demonstrates such a system for the Industrial Mixing Machine, a common use case due to its variety of circuits, many recipes that require fluids, and needing parallelization to keep up with the crafting demands of midgame and lategame.
| STEP 1 | |
| Place the relevant multiblock with one Advanced Stocking Input Bus per circuit, and one Stocking Input Hatch or Advanced Stocking Input Hatch. | 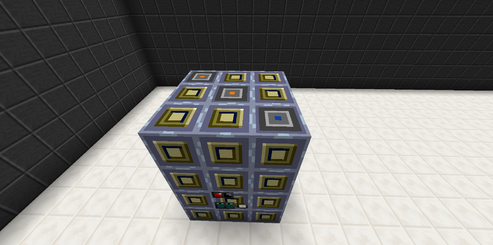
|
| STEP 2 | |
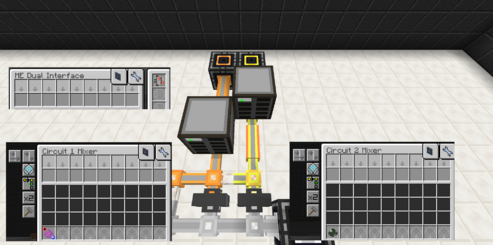
| On the main network, place one Dual Interface per circuit. Enable Blocking Mode in its interface, fill it with patterns, and rename it to indicate the machine and circuit.
Place a second Dual Interface against each of these Dual Interfaces. Add an Advanced Blocking Card to each one. These will be used to receive items in the circuit-specific subnetworks. Create a subnetwork for each circuit, using different colored cables to distinguish them and prevent them from connecting. Ensure each one is powered. Add an ME Drive to each subnetwork and fill it with at least one Storage Cell. |
 |
| STEP 3 | |
| Connect each subnetwork to an ASIB on the multiblock, set the correct circuit in each ASIB, and enable auto-pull. | 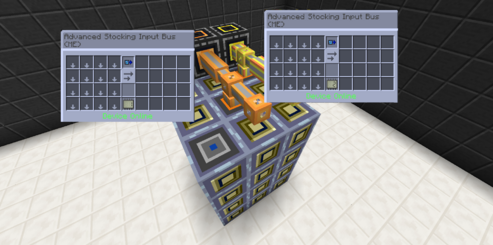
|
| STEP 4 | |
| Add an additional subnetwork to carry the fluids. Place a Fluid Storage Bus on each of the item subnetworks, facing into a Dual Interface on the fluid subnetwork. Add an Advanced Blocking Card to each Dual Interface. Add an ME Drive containing at least one Multi-Fluid Storage Cell to the fluid subnetwork. | 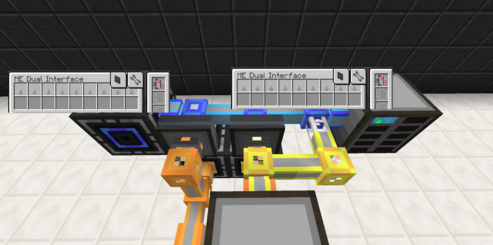 |
| STEP 5 | |
| Connect the SIH or ASIH on the multiblock to the fluid subnetwork. If using an ASIH, simply set it to auto-pull mode. If using a regular SIH, each fluid that is used in a recipe needs to be manually set, and multiple SIHs are needed if there are more than 16 fluids in use. | 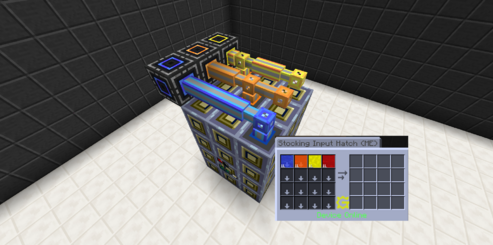 |
| STEP 6 | |
| Add more processing capacity by simply adding additional multiblocks with the same configuration of Stocking Inputs on the same subnets. | 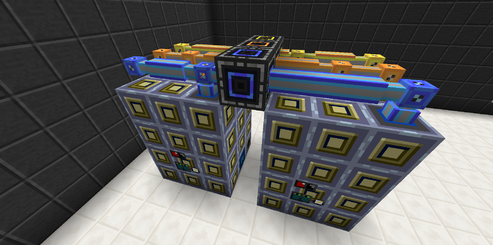
|
Method 3: Crafting Input Proxies
The best way to push patterns to multiblocks is the Crafting Input Bus, unlocked in LuV and limited to items only, and its upgraded variant the Crafting Input Buffer, unlocked in UEV and with fluid support. This tutorial will refer to both as "Cribs", although that term sometimes specifically refers to the Crafting Input Buffer. Cribs themselves are incredibly powerful due to their ability to perfectly isolate patterns from the rest of the machine's inputs, unlimited buffer space for ingredients, instant machine wakeup, and having maximum priority in recipe checks, but they also provide access to the best way to parallelize patterns: Crafting Input Proxies, unlocked in UIV. Proxies can be linked to a Crib using a Data Stick, and do not require channels or power. When a pattern is pushed to a Crib, it will be simultaneously pushed to all Proxies linked to that Crib, with no limit to the number of connected Proxies. Note that it is not possible to use Crafting Input Buses with fluid recipes by inputting fluid separately; their perfect isolation prevents them from ever being used for fluid recipes, so fluid-using machines must be automated in other ways until Crafting Input Buffers are available.
| STEP 1 | |
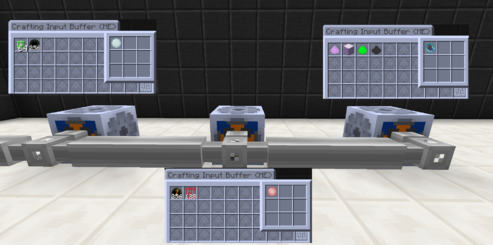
| Place one Crib for each relevant circuit or non-consumable. Ensure each one has a channel available. Fill each Crib with the relevant patterns for that circuit; if there are more patterns than will fit, add a second Crib with the same circuit. Cribs can either be placed as part of an actual multiblock or outside of one; this tutorial will demonstrate the latter.
For non-consumable items other than circuits, such as lenses, click the plus sign button to add them to the Crib. Cribs can be renamed with an AE2 Cutting Knife to help find them on the Interface Terminal, although they will auto-generate names based on the machines they are placed in, if applicable. |
|
| STEP 2 | |
| Place one Proxy on each multiblock for each Crib. Left click the Crib with a Data Stick to save it, then right click one Proxy per multiblock in order to link them to the Crib. Repeat until all Proxies are linked. | 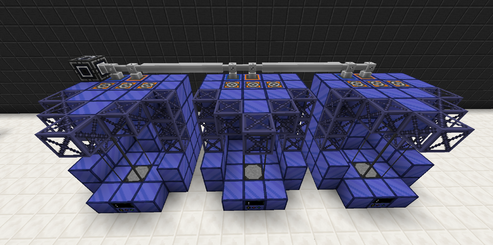
|
Method 4: Universal Automation
Universal Automation is an advanced automation strategy in GregTech: New Horizons that solves longstanding issues with recipe conflicts in multi-block machines using non-consumable circuit items. By leveraging Applied Energistics 2, pre-filled ME cells, and a technique known as cell swapping, this method enables centralized, parallelized processing of recipes across shared machines without duplication or circuit mismatches. It was originally invented by Ivelieu[1], with Sampsa developing the cell swapping technique, and IX documenting Sampsa's enhancements in video form[2].
https://www.youtube.com/watch?v=v_ppUYeVeqs
Universal Automation delivers highly efficient, scalable, and sustainable crafting setups—not only streamlining complex systems like LCRs, mixers, and precise assemblers, but even trivializing early platinum-line automation that would otherwise require extensive manual setup.
Passive Processing with AE2
Many processing lines in the game, such as the Platline and the Naqline, are completely impractical to run on demand, and need to instead be processed passively without interrupting the rest of the base. AE2 can be used to provide the inputs and chemicals needed to run these lines, but it's also extremely powerful for handling logistics within a processing line. There are two main techniques that are used to automate a processing line like this with AE2. Examples of both, using the Rutile line, are shown below.
Method 1: Fully Passive
The "fully passive" method of automation relies on AE2 for routing items and fluids around, as well as to source its inputs and have somewhere to put outputs and byproducts. It relies on the ability of ME Output Buses and Hatches to push items into the network, and the ability of Storage Buses to store items sent to the network in specific physical inventories. In this design, the subnetwork does not have any storage itself beyond the inputs and outputs of each machine.
| STEP 1 | |
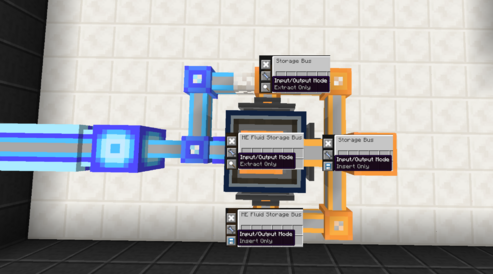
| Set up a subnetwork to handle logistics for the processing line. Place a Dual Interface on the main network, and place two Fluid Storage Buses and two item Storage Buses against it; one of each should be set to Insert Only, and one should be Extract Only. Use quartz fiber to power the subnetwork.
In this example, the main network is blue and the subnetwork is orange. |
|
| STEP 2 | |
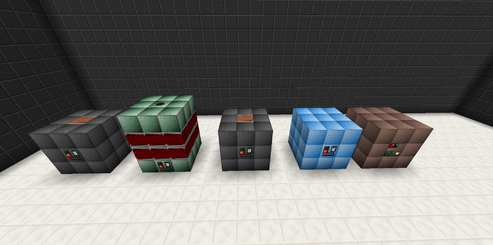
| Place machines for each step in the processing line. Usually, there will be one machine per step, but it is often possible to share the same machine between multiple steps, as long as the recipes in those steps are fast enough to not create a bottleneck, and the ingredients can't conflict. In this example, the Electrolyzer is used for both salt and carbon monoxide. Supply all of the machines with power.
Some recycling steps, such as electrolyzing the salt and carbon monoxide here, are optional, and can be handled on the main network instead, treating them as outputs. |
 |
| STEP 3 | |
| Add an ME Output Bus to every machine that produces an item output, and an ME Output Hatch to every machine that produces a fluid output. Connect them all to the subnetwork; this will likely require ME Controllers to have enough channels available. | 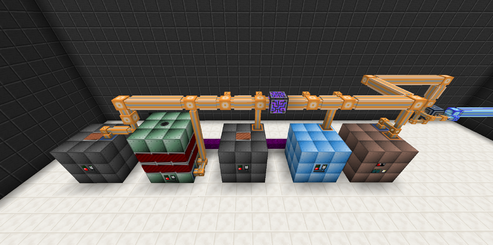
|
| STEP 4 | |
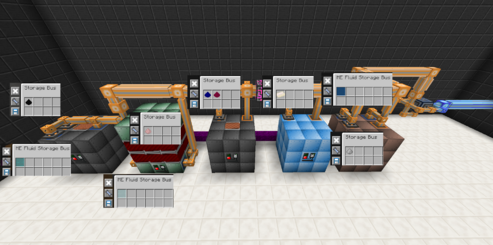
| Add an Input Bus or Input Hatch for every ingredient in the line that is produced by the line, including recycling loops.
Place a Storage Bus or Fluid Storage Bus, respectively, on each input, set to Insert Only. Filter it to only accept the relevant item or fluid. In this example, these ingredients are Titaniumtetrachloride and Magnesium in the EBF, Hot Titanium in the Vacuum Freezer, Magnesiumchloride in the second LCR, and Salt and Carbon Monoxide in the Electrolyzer. |
 |
| STEP 5 | |
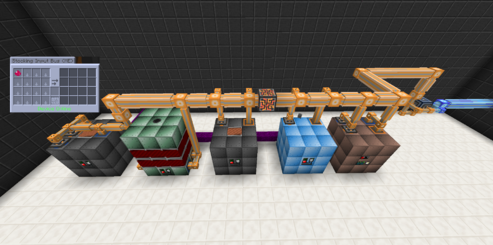
| Stock all of the ingredients that are not produced by the line itself, and are instead sourced from the main network. For items, use a regular Stocking Input Bus. For fluids, since the Stocking Input Hatch is UV, use a Dual Interface to stock the fluid, and an Electric Pump to pull the fluid into an Input Hatch.
In this example, these ingredients are Rutile in the first LCR, and optionally Chlorine and Carbon in the first LCR and Sodium in the second LCR if skipping the Electrolyzer step. |
 |
| STEP 6 | |
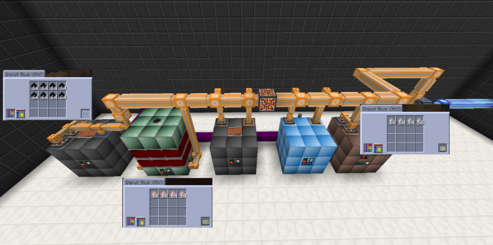
| Prime each recycling loop by putting some amount of the recycled item or fluid into the machine that uses it. The exact amount needed will vary, but it should be enough that machines are never idle waiting for recycled inputs.
Ensure that every machine that needs a Programmed Circuit has one set. |
 |
| STEP 7 | |
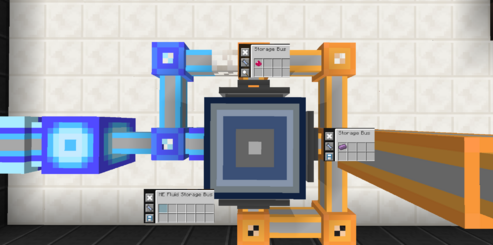
| Filter each of the Storage Buses connected to the main net Dual Interfaces. The insert-only buses should be filtered to only the items produced as outputs, excluding intermediates. The extract-only buses should be filtered to only the items or fluids that are passively stocked, whether by a Stocking Input Bus/Hatch or a Dual Interface.
In this example, the only item in the extract-only buses is Rutile, and the items and fluids in the insert-only buses are Titanium Ingot and Oxygen. The extract-only Fluid Storage Bus can be removed. |
 |
It is also possible to use fully passive lines where some or all of the intermediates are stored on the subnetwork in AE2 cells or external storage, and are sent to the machines using stocking inputs or other means of fluid export. The primary advantage of such a design is its ability to use stocking input buses/hatches, which both allows for greater parallelization and avoids issues with limited input space.
Method 2: Level Maintained
Level maintained lines, sometimes abbreviated to just "maintained", route intermediates around using AE2's autocrafting functionality, using ME Level Maintainers to continuously order recipes. This method's primary advantage is the ability to share many different steps across the same machine without fear of recipe conflicts, thanks to AE2's blocking mode; this saves on resources, space, and logistical complexity, and makes upgrading simpler.
| STEP 1 | |
| Set up a subnetwork to handle logistics for the processing line. Place a Dual Interface on the main network, and place two Fluid Storage Buses and two item Storage Buses against it; one of each should be set to Insert Only, and one should be Extract Only. Use quartz fiber to power the subnetwork.
In this example, the main network is blue and the subnetwork is orange. |
|
| STEP 2 | |
| Place machines for each step in the processing line. The minimum is one machine of each type to run all the recipes used to produce the line's product, and one machine of each type to passively run recycling steps. In this case, that works out to the same number of total machines as the passive version, but in more complex lines like the Platline, it can save on dozens of LCRs and other machines. | |
| STEP 3 | |
| Add an ME Output Bus to every machine that produces an item output, and an ME Output Hatch to every machine that produces a fluid output. Connect them all to the subnetwork; this will likely require ME Controllers to have enough channels available. |
|
| STEP 4 | |
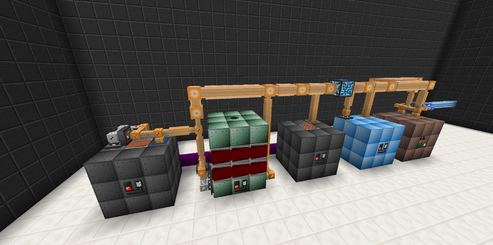
| Add Input Buses and Hatches to each machine that will run a non-recycling recipe. Place an ME Dual Interface against each of them, in a way that can be used to run recipe patterns for that machine. Ensure each one has Blocking Mode enabled, and is using an Advanced Blocking Card if necessary.
In this case, only the first LCR, EBF, and Vacuum Freezer are used for non-recycling recipes. |
 |
| STEP 5 | |
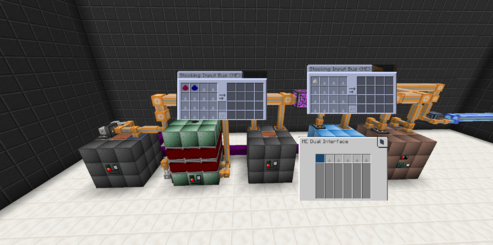
| Set up all the recycling loops to run passively. For items, use a Stocking Input Bus; for fluids, use an ME Dual Interface to stock the fluid, and an Electric Pump to pull it into the hatch, unless Stocking Input Hatches are unlocked.
In this example, these loops are Magnesiumchloride + Sodium in the second LCR and Carbon Monoxide and Salt in the Electrolyzer. |
 |
| STEP 6 | |
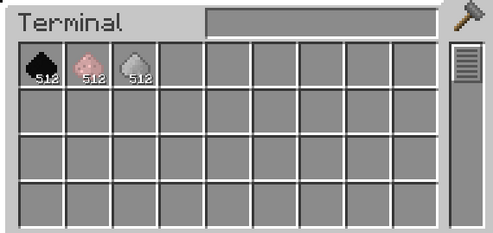
| Add storage to the subnetwork, using partitioned cells in ME Drives. At a minimum, all byproducts not immediately sent to the main network, as well as anything involved in a recycling loop, needs a dedicated cell, but it's good practice to add space for other items as well to avoid them getting stuck in crafting CPUs.
Add some amount of the items/fluids used in recycling loops into the network through a terminal. |
 |
| STEP 7 | |
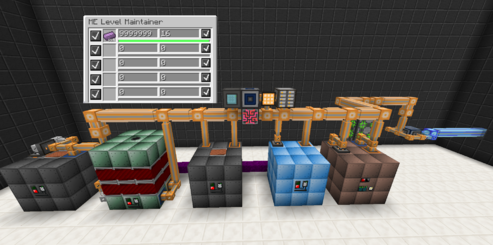
| Add a Level Maintainer to the network. Configure it to make each of the final products (only Titanium Ingot, in this case), with a very high amount to maintain. Since the product will be sent back to the main network immediately, the line will never stop running until it is out of the input ingredients. The batch size can be anything, but higher batch sizes are generally faster to process and will have less lag, at the cost of running less frequently.
Add a crafting CPU multiblock and a Fluid Discretizer to the network. |
 |
| STEP 8 | |
| Encode all the patterns needed to make the line's main product. Do not pattern any byproducts; they will be recycled passively. Place each pattern in the appropriate Dual Interface. | 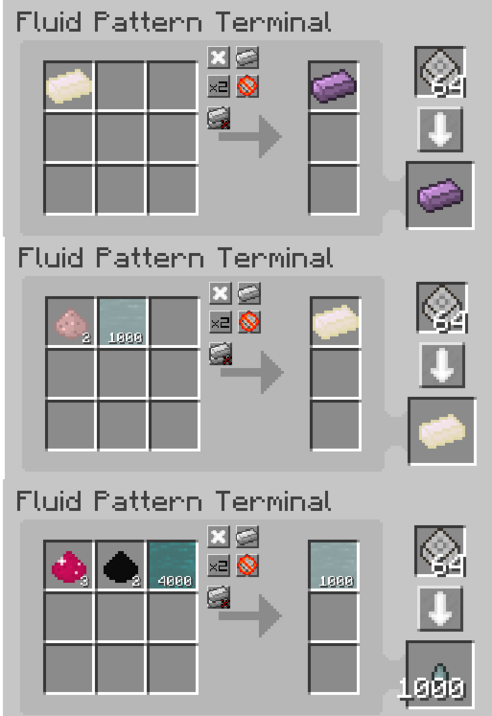 |
| STEP 9 | |
| Filter each of the Storage Buses connected to the main net Dual Interfaces. The insert-only buses should be filtered to only the items produced as byproducts or final outputs. The extract-only buses should be filtered to only the items or fluids that are used in recipes, and not produced as a byproduct or by a recycling loop
In this example, the Oxygen is an unused byproduct, and so is sent to the main network, as is the main product, Titanium Ingots. The Rutile is the only input needed from the main network, as everything else is a closed loop. |
|
Some processing lines, such as Rutile or the Platline, have inputs whose only purpose (at least before the Quantum Force Transformer in UEV) is to be sent through those lines, and so they should be run continuously for as long as their inputs are available. Other processing lines, however, do not share that property, and so should be limited to keeping a certain amount in stock before shutting off. This is easy to do with maintained lines by making the output visible to the subnetwork, and setting an actual amount to maintain instead of a dummy value. For fully passive lines, the best approach is to use a Machine Controller Cover on one of the machines used for a key step, and use a Level Emitter to only run the machine when below a set threshold.
Post-AE2 Automation Technologies
There are a few automation technologies that are unlocked after AE2, but have some capabilities that give them niche uses even when most other automation is obsoleted by AE2.
Ender Chests and Ender Tanks
Ender Chests and Ender Tanks are both unlocked in IV, but are quite expensive to make early in the tier, requiring Iridium, multiple Nether Stars, and significant Thaumcraft progress; most players will instead get them by opening IV Lootbags. They have a frequency, defined by a combination of three Minecraft colors (for a total of 4,096 frequencies available), and all Ender Chests/Tanks with the same frequency will share the same contents, even across dimensions. The frequency can be changed by right clicking the colored areas on the top with any dye, and they can be set to use a private per-player pool of frequencies by right clicking the lock (for Ender Chests) or circle (for Ender Tanks) with a diamond, which can avoid collisions on servers. Ender Tanks can also be set to auto-output to the bottom by right clicking the central circle.
The main use for both is to operate Ore Drilling Plants and Fluid Drilling Rigs far away from the main base, especially those on other planets. Ender Chests and Tanks can be used to bring ores and fluids back, and Ender Tanks can be used to send fuel to a singleblock generator for power. Another common use is for farms that are placed far away from the base, often for lag reasons or to have a better biome for IC2 Crops. It's also possible to take advantage of the shared inventory for approximate round-robin distribution of items or fluids.
Linked Input Bus
The Linked Input Bus (LIB) is available in IV, once Iridium and PBI are obtained, and works as a combination between an Input Bus and an Ender Chest, although unlike Ender Chests it cannot cross dimensions. Frequencies are set in the GUI by typing into a text box, and private frequencies can be enabled as well. Its main use is as a substitute for the Advanced Stocking Input Bus (ASIB) for parallelizing machines in IV, before the Assembly Line makes the latter craftable. To do this, follow the tutorial above for ASIB parallelization, but replace the ASIBs with Linked Input Buses on the same frequency, remove the ME Drive, and use a Storage Bus on the subnetwork to insert directly into one of the LIBs.
Advanced Control Logic
Although most processes can be automated with the techniques above, there are a few machines that are difficult, if not impossible, to automate purely with either analog item movement or with the advanced capabilities of Applied Energistics; examples include parts of the Waterline, the Bacterial Vat, and the Pseudostable Black Hole Containment Field. The following mods and mechanics exist in GTNH to help solve these automation challenges.
Advanced GT Covers
See More: Covers
GregTech has many covers that interact with redstone signals and can be used to implement complex logic. Many of them also have a wireless variant that supports GT's wireless redstone system, which allows redstone signals to be sent on a numeric frequency, and received by compatible wireless covers anywhere else in the world. Both global frequencies and player-specific private frequencies are available. Right clicking a face of a GT block with a GT soldering iron will toggle the redstone signal on that side between being weak and strong, which affects all covers that output a redstone signal.
Machine Controller
The Machine Controller Cover is one of the most useful redstone-related GT covers. Placing it on a singleblock machine, or the controller of a multiblock machine, allows that machine's operation to be controlled using a redstone signal. Note that, by default, this will cause a multiblock machine that has powerfailed to automatically restart, potentially repeatedly voiding its inputs; this can be prevented in the GUI by enabling Safe Mode if not desired. The Machine Controller Cover can also be used to control blocks that aren't machines, such as input hatches and buses, which will affect covers like Electric Pumps that are configured to use the machine processing state to decide whether to run.
Item Detector
The Item Detector Cover emits a redstone signal whose strength depends on how full its connected inventory is. It can also have an "item threshold" set in its GUI, which causes it to emit no signal if the item count is below the threshold. It has a wireless variant, the Wireless Item Detector Cover, which can only connect to advanced wireless redstone GT covers.
Fluid Detector
The Fluid Detector Cover is the same as the Item Detector Cover, except that it reads fluids instead of items; it also has a wireless variant, the Wireless Fluid Detector Cover.
Energy Detector
The Energy Detector Cover is like the Item and Fluid Detector Covers, except for energy. It can be used to detect the amount of EU stored, the rate of EU input or output, and even the amount of steam in tanks. Its most common use is for automatically turning generators on and off based on the amount of charge in a Lapotronic Supercapacitor. Unlike its item and fluid analogues, it does not have a wireless variant.
Fluid Regulator
The Fluid Regulator is an advanced version of an Electric Pump, with the ability to precisely control how much fluid it moves in a given timeframe, subject to a maximum throughput dependent on its tier. It's most commonly used for turbines, which expect a precise amount of fuel every tick, and for machines like the Dissolution Tank that require exact amounts of fluid to work.
Needs Maintenance
The Needs Maintenance Cover can output a redstone signal based on how many maintenance issues the machine it is attached to has. It also has the ability to output a redstone signal based on the remaining durability in a multiblock turbine rotor. This cover is most commonly used for machines where maintenance issues would be a major issue, such as the Cleanroom or those involved in power production. It has a wireless variant, the Wireless Needs Maintenance Cover.
Activity Detector
The Activity Detector Cover can detect whether a machine is running, as well as how far into its current recipe it is. It has three modes: recipe progress, idleness, and unspecified. In recipe progress mode, it emits a signal from 0 to 15 based on the progress of the recipe, with 0 before ~6% and 15 after ~94%. In idleness mode, it emits 15 if the machine is idle, and 0 if it is running. In the poorly-named "unspecified" mode, it emits 15 if the machine is capable of running (regardless of whether it actually is), and 0 if it is blocked by a Machine Controller Cover, a Soft Mallet toggle, maintenance issues, or the like. It has a wireless variant, the Wireless Activity Detector Cover.
Wireless Redstone
There are four types of wireless redstone covers, although only three are useful in practice. The Redstone Transmitter (External) effectively converts normal redstone signals to wireless ones on the frequency it is set to. The Redstone Receiver (External) does the opposite, converting wireless redstone signals on its frequency to physical signals, and has five logic gates it can use to do so and to handle having multiple inputs to its frequency. AND, NAND, OR, and NOR modes simply apply that logic gate to all of the input signals to its wireless frequency, while Analog mode only uses one input (the first one placed) and completely ignores the rest.
The Redstone Receiver (Internal) works like a combination of an Redstone Receiver (External) and a Machine Controller Cover: it can be placed directly on a machine to control it using wireless redstone signals, without needing to convert them to physical signals first. The Redstone Transmitter (Internal) is meant to send signals based on the state of the machine it is attached to, but it's useless due to only ever sending 15.
Each of these covers has a normal and an advanced version; the normal covers can only connect to other normal covers, and the same for advanced, but other GT wireless covers like the Wireless Fluid Detector Cover can only connect to the advanced versions.
WR-CBE Wireless Redstone
Another way to send wireless redstone signals is to use the Wireless Transmitter and Wireless Receiver from WR-CBE Logic. They can be more convenient for applications unrelated to GT machines, since they're full blocks and not covers. They also have the ability to be placed on walls and ceilings in addition to floors, similar to ProjectRed components.
ProjectRed
See More: ProjectRed
ProjectRed adds many new redstone components that have the ability to be placed on walls and ceilings, work as multiparts, and can greatly compact many redstone circuits. One of the most useful is Red Alloy Wire, an improved version of Redstone dust, which can create very compact automated setups when combined with GT redstone covers. The mod also adds many types of logic gates that can do combinatorial logic, timing, information storage, and more, which have a wide variety of uses.
Steve's Factory Manager
See More: Steve's Factory Manager
Steve's Factory Manager (SFM) is a versatile automation helper that is able to move specific items and fluids to specific locations extremely effectively, and supports complex control flow. It excels in last-mile item and fluid routing and can eliminate almost all cable clutter. It is unlocked in HV, requiring Stainless Steel and IV circuits. The central block is the Machine Inventory Manager (MIM), which is where programs are written, stored, and executed. Inventory Cable is used to connect the MIM to external inventories or tanks and to other SFM devices. These devices can send and receive redstone signals, pick up dropped items, interact with entities, and more, but cables cannot connect through them without using an Advanced Cable Cluster, which can contain multiple devices as well as work as a cable connection.
The actual programming is a drag-and-drop GUI-based language. Control flow starts with a "trigger", which can be on a timer, a redstone signal, or a block update. It then flows through commands that interact with the world, such as by moving items or fluids, and can be manipulated using conditionals and loops. SFM's precision and flexibility make it very effective for some complex automation, such as Thaumcraft infusion.
OpenComputers
See More: OpenComputers
OpenComputers (OC) is both the most versatile and most complex automation tool available in GregTech: New Horizons. It becomes available in MV at the earliest, although many high-tier components require HV or EV, and some normally Creative-exclusive components are as late as UHV.
The mod adds different types of devices that can be programmed using the Lua programming language, and that have APIs available to interact with inventories, AE2 networks, GT machines, and more. It's powerful enough to automate nearly anything in the game, but requires either programming knowledge or finding a pre-made program to use in order to be effective. Microcontrollers, computers, and servers are static devices that can interact with the blocks around them, including moving items and fluids, sending and receiving redstone signals, and configuring some complex blocks such as ME Interfaces. Robots and drones are able to move around the world, which makes them useful for automating tasks that require heavy world interaction, such as IC2 crop breeding. In order to help understand the mod and be able to write your own programs, there is extensive in-game documentation, as well as a dedicated help channel in the Discord server, #opencomputers-help.