GT New Horizons · Extreme Voltage (EV)
Nuclear Reactors
The Nuclear Reactor is an EV tier multiblock for generating clean power from controlled nuclear fission reactions. Up to 6 reactor chambers are added to the sides of the controller to expand its inventory. All power is generated from fuel rods but they produce a tremendous amount of heat in the process. Place heat vents and heat exchangers around the fuel rods to safely and effectively dissipate heat before it becomes a problem. The Nuclear Reactor damages nearby players above 70% Core Temp, replaces nearby blocks with fire and lava above 85% Core Temp, and explodes in a catastrophic meltdown at 100% Core Temp. Always test designs in a reactor planner before implementing one live and leverage mods such as Nuclear Control 2 to monitor the reactor. Finally, provide a redstone signal to enable/disable the Nuclear Reactor once the necessary precautions are in place.
The four different types of Nuclear Reactors are listed below. See their respective pages for more information--this one covers the Basic Reactor. Note that passive cooling means heat vents/exchangers and active cooling means coolant cells.
- Basic Reactor - Passive cooling, produces EU/t directly.
- Fluid Reactor - Passive cooling, produces Hot Coolant for the Large Heat Exchanger.
- Vacuum Reactor - Active cooling, produces EU/t directly (the best).
- Wrench Reactor - No cooling, produces EU/t directly (a meme).
Construction
The Nuclear Reactor is from IndustrialCraft2 and therefore does not use any buses or hatches like standard GregTech multiblocks. There is only the controller and up to six reactor chambers to expand its inventory by six slots each. The reactor chambers cannot be placed into the world without an adjacent Nuclear Reactor and fall to the ground if the controller is ever broken. All reactor chambers share the same inventory with the controller and can be interfaced for inserting/extracting components. Connect a GregTech cable directly to the Nuclear Reactor or reactor chamber to pull power. Any voltage is fine as long as it can support the necessary EU/t.
The Nuclear Reactor is not a GregTech multiblock so its power conversion to voltages and amps is a little unique. If the total EU/t of the reactor is less than 1A of the attached cable's voltage then there is no loss and all of the power is perfectly extracted as a fractional amp (ie. the 108,346 EU/t MOX Reactor generates exactly 108,346 EU/t if using 131,072 EU/t ZPM cables). Otherwise, if the total EU/t of the reactor is greater than 1A of the attached cable's voltage then it is rounded down to the nearest whole amp (ie. 2,048 EU/t increments for EV cables and 8,192 EU/t increments of IV cables). Therefore, lower tier cables are generally more efficient unless there is a high tier cable available whose voltage exceeds the total output of the reactor.
Although not mandatory, it is highly recommended to surround the Nuclear Reactor with blast-proof blocks such as reinforced obsidian, plated reinforced stone, or warded glass just in case of an accident. A 5x5x5 box with an opening for a power cable needs only 53 blocks and could save you from going back to the Stone Age.
 Caution: | Breaking reactor chambers with the Vajra or a pickaxe returns a basic machine casing--use a wrench instead. Breaking the Nuclear Reactor itself is perfectly safe regardless of the tool and even resets the Core Temp back to 0%! |
Structure
- Controller: Center
- 0-6 Reactor Chamber
- 0+ Blast Proof Blocks
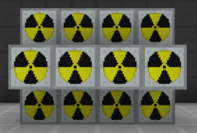
Nuclear Reactors are tileable.
Wallsharing
Nuclear Reactors cannot wallshare any of their reactor chambers, but they can touch if necessary. That means reactors with up to four chambers are tileable (can extend infinitely in either direction). However, it is good practice to isolate reactors in their own blast-proof box to prevent one explosion from affecting the others.
Usage
Heat is measured in heat units (Hu) and is generated by fuel rods every second. Nuclear Reactors have a maximum heat capacity of 10,000 Hu with the current heat or "Core Temp" often represented as a percent of that--use a Portable Scanner on the reactor to see the exact value. The effects of heat are summarized in the following table.
| Core Temp | Effect | Range |
| 40%+ | Sets wood, leaves, and wool on fire. | 2 blocks |
| 50%+ | Evaporates water. | 2 blocks |
| 70%+ | Damages nearby entities. | 3 blocks |
| 85%+ | Replaces nearby blocks with fire and lava. Ignores Tile Entities and indestructible blocks. | 1 block |
| 100% | Explodes in a catastrophic meltdown. | Scales with number of items in Reactor |
Energy is measured in energy units (EU) and is generated by fuel rods every tick. Nuclear Reactors do not have an upper limit despite what the tooltip says. Reactors that generate power directly have a 50% penalty applied, unlike a Fluid Reactor which outputs at 100% efficiency. Even with the penalty, Vacuum Reactors are still the superior option.
A reactor tick occurs once per second to calculate any changes to the heat or energy of the reactor. The values remain constant during the other 19 ticks in a second. That is very important because components such as coolant cells may be swapped during that 19 tick window without ever increasing the Core Temp of the reactor. The same goes for fuel rods and not lowering the energy output of the reactor. As of GTNH 2.8, all Nuclear Reactors in a world are synced to share the same reactor tick.
Fuel Rods
The following table lists all the available fuels in GTNH by their size, base stats, durability, and more. The most commonly used fuels are thorium, uranium, MOX, high density plutonium, and "The Core." The others generate too much heat or are too difficult to sustain. An excellent source of uranium (and titanium) is farming staballoy golems in an Extreme Entity Crusher. They spawn in the Toxic Everglades biome which can be made with the Witchery brew of shifting seasons potion prior to the portal being unlocked in ZPM.
Fuel rods are always crafted individually, but they can be joined together with long rods to form a denser fuel cell. The options are dual (x2), quad (x4), and "The Core" (x32), although the last one is only craftable with naquadah fuel rods specifically. Increasing the size does not change the overall durability/lifespan and they all have the same breeding products.
Fuel rods disperse heat evenly to the four adjacent components while the Nuclear Reactor is enabled. The heat does not wrap-around to the other side if placed on an edge or corner. Fuel rods automatically convert into a depleted fuel rod once their durability reaches 0%. Depleted fuel rods do not generate any heat or energy; their only use is being centrifuged for breeding products or thermal centrifuged for some of the original resources back.
| Fuel | Size | Base Energy | Base Heat | Durability | Crafting Cost | Recycles Into | Other Products |
| Thorium | Single | 10 EU/t | 0.5 Hu/s | 50,000 s | 3x Th | 1x Th | Th-232, Lu, Po, Tl, Kr |
| Dual | 40 EU/t | 1 Hu/s | 50,000 s | 6x Th | 2x Th | Th-232, Lu, Po, Tl, Kr | |
| Quad | 120 EU/t | 2 Hu/s | 50,000 s | 12x Th | 4x Th | Th-232, Lu, Po, Tl, Kr | |
| Uranium | Single | 50 EU/t | 2 Hu/s | 20,000 s | 6x U-238, 0.33x U-235 | 4x U-238 | U-232, U-233, Pu-239, Kr |
| Dual | 200 EU/t | 4 Hu/s | 20,000 s | 12x U-238, 0.66x U-235 | 8x U-238 | U-232, U-233, Pu-239, Kr | |
| Quad | 600 EU/t | 8 Hu/s | 20,000 s | 24x U-238, 1.33x U-235 | 16x U-238 | U-232, U-233, Pu-239, Kr | |
| MOX* | Single | 50 EU/t | 2 Hu/s | 10,000 s | 6x U-238, 3x Pu-239 | 3x Pu-239 | Pu-238, Pu-241, Kr |
| Dual | 200 EU/t | 4 Hu/s | 10,000 s | 12x U-238, 6x Pu-239 | 6x Pu-239 | Pu-238, Pu-241, Kr | |
| Quad | 600 EU/t | 8 Hu/s | 10,000 s | 24x U-238, 12x Pu-239 | 12x Pu-239 | Pu-238, Pu-241, Kr | |
| High Density Uranium | Single | 100 EU/t | 2 Hu/s | 70,000 s | 4x U-238, 2x WC | 1x U-238, 1x WC | U-235, Pu-239, Pu-241, Ne, Graphite |
| Dual | 400 EU/t | 4 Hu/s | 70,000 s | 8x U-238, 4x WC | 2x U-238, 2x WC | U-235, Pu-239, Pu-241, Ne, Graphite | |
| Quad | 1,200 EU/t | 8 Hu/s | 70,000 s | 16x U-238, 8x WC | 4x U-238, 4x WC | U-235, Pu-239, Pu-241, Ne, Graphite | |
| High Density Plutonium* | Single | 50 EU/t | 2 Hu/s | 70,000 s | 1x U-238, 5x Pu-239, 2x HSS-S | 0.5x U-238, 4x Pu-239, 1x HSS-S | U-235, Pu-241, Ar, C |
| Dual | 200 EU/t | 4 Hu/s | 70,000 s | 2x U-238, 10x Pu-239, 4x HSS-S | 1x U-238, 8x Pu-239, 2x HSS-S | U-235, Pu-241, Ar, C | |
| Quad | 600 EU/t | 8 Hu/s | 70,000 s | 4x U-238, 20x Pu-239, 8x HSS-S | 2x U-238, 16x Pu-239, 4x HSS-S | U-235, Pu-241, Ar, C | |
| Excited Uranium | Single | 1,200 EU/t | 32 Hu/s | 6,000 s | 0.25x HD U, 8x K, 4x Qt | Pb, Bi, Ba, Xe | |
| Dual | 4,800 EU/t | 64 Hu/s | 6,000 s | 0.50x HD U, 16x K, 8x Qt | Pb, Bi, Ba, Xe | ||
| Quad | 14,400 EU/t | 128 Hu/s | 6,000 s | 1.00x HD U, 32x K, 16x Qt | Pb, Bi, Ba, Xe | ||
| Excited Plutonium* | Single | 1,600 EU/t | 32 Hu/s | 10,000 s | 0.25x HD Pu, 2x Nt, 4x Cs, 0.50x Nq | Tn, Ce, Au, Kr | |
| Dual | 6,400 EU/t | 64 Hu/s | 10,000 s | 0.50x HD Pu, 4x Nt, 8x Cs, 1.00x Nq | Tn, Ce, Au, Kr | ||
| Quad | 19,200 EU/t | 128 Hu/s | 10,000 s | 1.00x HD Pu, 8x Nt, 16x Cs, 2.00x Nq | Tn, Ce, Au, Kr | ||
| Naquadah | Single | 100 EU/t | 2 Hu/s | 100,000 s | 3x Nq+ | Nq, Nq*, W, Pt | |
| Dual | 400 EU/t | 4 Hu/s | 100,000 s | 6x Nq+ | Nq, Nq*, W, Pt | ||
| Quad | 1,200 EU/t | 2 Hu/s | 100,000 s | 12x Nq+ | 0.25x Nq+ | Nq, Nq*, W, Pt | |
| Core | 108,800 EU/t | 64 Hu/s | 100,000 s | 96x Nq+ | 2.00x Nq+ | Nq, Nq*, W, Pt, Zr | |
| Naquadria* | Single | 100 EU/t | 2 Hu/s | 100,000 s | 3x Nq* | Nq, Nq+, W, Pt | |
| Dual | 400 EU/t | 4 Hu/s | 100,000 s | 6x Nq* | Nq, Nq+, W, Pt | ||
| Quad | 1,200 EU/t | 8 Hu/s | 100,000 s | 12x Nq* | 0.25x Nq* | Nq, Nq+, W, Pt | |
| Tiberium | Single | 50 EU/t | 1 Hu/s | 50,000 s | 3x Tr | 0.25x Tr | Zr, Tr, W, Pt, Xe |
| Dual | 200 EU/t | 2 Hu/s | 50,000 s | 6x Tr | 0.50x Tr | Zr, Tr, W, Pt, Xe | |
| Quad | 600 EU/t | 4 Hu/s | 50,000 s | 12x Tr | 1.00x Tr | Zr, Tr, W, Pt, Xe | |
| Glowstone† | Single | 0 EU/t | 0 Hu/s | 10,000 s | 9x Glowstone | 2x Glowstone | Su |
| Lithium† | Single | 0 EU/t | 0 Hu/s | 10,000 s | 0.11x Li | T | |
Unique Behaviors
Fuels marked with an asterisk (*) exhibit MOX behavior which means their power output scales linearly from 100% up to 250% depending on the Core Temp of the reactor. To SAFELY and SLOWLY increase Core Temp, place a single fuel rod into the reactor and enable it with a lever. Watch closely as the Core Temp increases and stand ready to disable the reactor once it reaches the goal. To decrease Core Temp, place overclocked heat vents into the reactor or physically break the reactor with a wrench. Overclocked heat vents sustain damage in the process but recover on their own after the Core Temp reaches 0%.
The last two fuels marked with a cross (†) are also unique. Instead of losing durability with time, they decay with respect to the number of adjacent fuel rods per second. For example, a glowstone fuel rod surrounded by four quad uranium fuel cells loses 16 durability per second. They also decay 100% faster for every 3,000 Hu of Core Temp (additive).
Neighbor Bonus
Adjacent fuel rods receive an additive energy bonus and a multiplicative heat bonus based on the total number of neighbors (N) and the fuel rod's own size. Neighbors do not need to be the same size, but they should absolutely be the same fuel or else the energy bonus is heavily reduced while the heat bonus remains the same. For example, a single and quad uranium fuel cell produce 50 + 600 EU/t separated and 100 + 800 EU/t together. They also produce 4 + 96 Hu/s separated and 12 + 160 Hu/s together. Notice that there is still a heat bonus even without any neighboring fuel rods.
| Size | Neighbor Energy Bonus | Neighbor Heat Bonus | |||||||||
| Equation | N = 0 | N = 1 | N = 2 | N = 3 | Equation | N = 0 | N = 1 | N = 2 | N = 3 | ||
| Single | +100% x N | 100% EU/t | 200% EU/t | 300% EU/t | 400% EU/t | (1+N) x (2+N) | x2.00 Hu/s | x6.00 Hu/s | x12.0 Hu/s | x20.0 Hu/s | |
| Dual | +50% x N | 100% EU/t | 150% EU/t | 200% EU/t | 250% EU/t | (2+N) x (3+N) | x6.00 Hu/s | x12.0 Hu/s | x20.0 Hu/s | x30.0 Hu/s | |
| Quad | +33% x N | 100% EU/t | 133% EU/t | 166% EU/t | 200% EU/t | (3+N) x (4+N) | x12.0 Hu/s | x20.0 Hu/s | x30.0 Hu/s | x42.0 Hu/s | |
| "The Core" | +5.9% x N | 100% EU/t | 106% EU/t | 112% EU/t | 118% EU/t | (17+N) x (18+N) | x306 Hu/s | x342 Hu/s | x380 Hu/s | x420 Hu/s | |
Neutron Pulses
The amount of heat and energy generated by fuel rods is further amplified by the number of neutron pulses that they absorb during each reactor tick. Neutron pulses are calculated with the following equation where rod count is the number of individual fuel rods in a cell and neighbor pulses is the number of adjacent neutron reflectors. "The Core" surrounded by four neutron reflectors, for example, absorbs 1 + 16 + 4 = 21 neutron pulses.
The final equations for heat and energy are provided below. Notice that heat scales quicker than energy with regards to the number of neutron pulses. "The Core" example from earlier generates 32 x 100 x 21 = 133,440 EU/t while producing 32 x 4 x 21 x 22 / 2 = 29,568 Hu/s. Recall that a reactor's melting point is only 10,000 heat units! Ensure there is adequate cooling to avoid a meltdown!
There are three types of neutron reflectors, listed below, with the only difference being their durability. They all increase the number of neutron pulses by one and only affect fuel rods in the four adjacent slots. Their effect on the heat and energy of a fuel rod is provided using the equations above.
|
|
Coolant Cells & Condensators
Coolant cells and condensators are an ACTIVE way to remove heat from the reactor and adjacent components meaning they constantly need to be restored or swapped out. The heat capacitor and coolant cells are both restored in a Vacuum Freezer while the condensators are restored in a crafting grid with a particular dust. Each one absorbs ALL the heat pushed to them by the four adjacent components. There are a few different types, listed below. Note that the fluid in a coolant cell is irrelevant--the only thing that matters is the durability (lifespan).
| Type | Durability | Restoration Cost |
| RSH-Condensator | 20,000 Hu | x8 Red Alloy Dust |
| LZH-Condensator | 100,000 Hu | x8 Lapis Lazuli Dust |
| 10k Coolant Cell | 10,000 Hu | 1,200 EU (MV) |
| 30k Coolant Cell | 30,000 Hu | 3,600 EU (MV) |
| 60k Coolant Cell | 60,000 Hu | 7,200 EU (MV) |
| 180k Coolant Cell | 180,000 Hu | 21,600 EU (MV) |
| 360k Coolant Cell | 360,000 Hu | 43,200 EU (MV) |
| 540k Coolant Cell | 540,000 Hu | 64,800 EU (MV) |
| 1080k Coolant Cell | 1,080,000 Hu | 129,600 EU (MV) |
| 1G Neutronium Heat Capacitor | 1,000,000,000 Hu | 120,000,000 EU (MV) |
Heat Vents
Heat vents are a PASSIVE way to remove heat from the reactor and adjacent components meaning they are self-sustaining and potentially last forever. There are a few different types, listed below, and they all work slightly differently. Self cooling is the heat removed from itself, reactor cooling is the heat removed from the reactor, and component cooling is the heat removed from the four adjacent components.
| Type | Self Cooling | Reactor Cooling Rate | Component Cooling | Max Heat |
| Heat Vent | -6 Hu/s | 0 | 0 | 1,000 Hu |
| Advanced Heat Vent | -12 Hu/s | 0 | 0 | 1,000 Hu |
| Reactor Heat Vent | -5 Hu/s | -5 Hu/s | 0 | 1,000 Hu |
| Overclocked Heat Vent | -20 Hu/s | -36 Hu/s | 0 | 1,000 Hu |
| Component Heat Vent | 0 | 0 | -4 Hu/s | 1,000 Hu |
Heat Exchangers
Heat exchangers pull heat from the reactor or adjacent components and push it elsewhere, like to a heat vent. There are a few different types, listed below, and they all work slightly differently. Reactor exchange rate is the heat pulled from the reactor and component exchange rate is the heat pulled from the four adjacent components.
| Type | Reactor Exchange Rate | Component Exchange Rate | Max Heat |
| Heat Exchanger | 4 Hu/s | 12 Hu/s | 2,500 Hu |
| Advanced Heat Exchanger | 8 Hu/s | 24 Hu/s | 10,000 Hu |
| Reactor Heat Exchanger | 72 Hu/s | 0 | 5,000 Hu |
| Component Heat Exchanger | 0 | 36 Hu/s | 5,000 Hu |
Plating
Reactor plating increases the maximum heat capacity of a reactor and reduces the explosion radius. There are a few different types, listed below, and they all work slightly differently. Note that these do nothing to reduce heat and often just fill in empty space to facilitate automation OR help with the decay of glowstone/lithium fuel rods.
| Type | Bonus Capacity | Explosion Radius |
| Reactor Plating | +1,000 Hu | -5% |
| Containment Reactor Plating | +500 Hu | -10% |
| Heat-Capacity Reactor Plating | +1,700 Hu | -1% |
Designs
There are two categories of Nuclear Reactor designs, listed below. Breeder designs still generate power in the process but that is not the primary focus so the output is generally lower.
- Power Designs generate as much energy as possible.
- Breeder Designs decay fuel rods as quickly as possible for their recycled materials.
The following tables include examples for both and are optimized for different stages of the game. These have all been tested for safety in the Reactor Planner and the values are exactly what to expect in-game. The reactor planner is a standalone jar file and launched directly by double-clicking on it. Unfortunately, it requires Java 8 to run and usually crashes on open. Ensure the game version is set to 1.7.10 and GTNH under the advanced tab.
 Important: | The power output of these designs may seem low, and that is because they are. For real power, build a Vacuum Reactor. |
Power
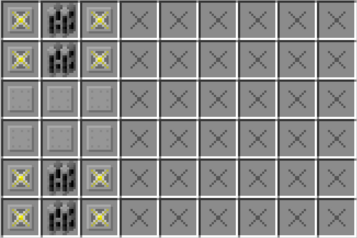
|
DESIGN 1: THORIUM v1
Power
Components
|
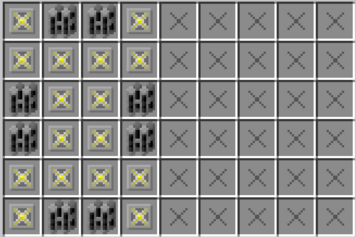
|
DESIGN 2: THORIUM v2
Power
Components
|
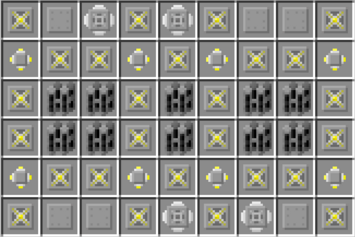
|
DESIGN 3: THORIUM v3
Power
Components
|
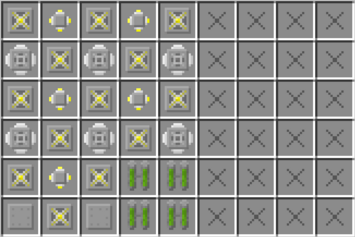
|
DESIGN 4: URANIUM v1
Power
Components
|
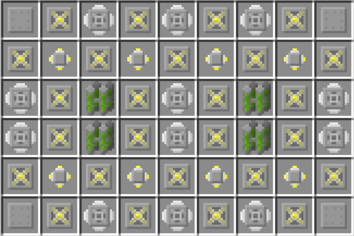
|
DESIGN 5: URANIUM v2
Power
Components
|
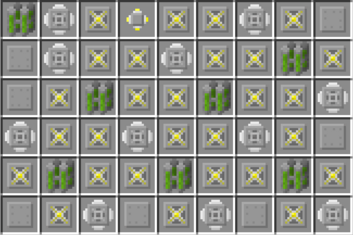
|
DESIGN 6: URANIUM v3
Power
Components
|
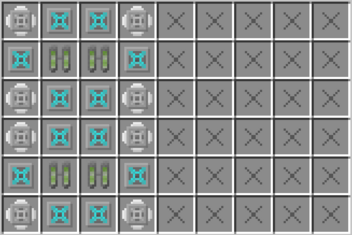
|
DESIGN 7: MOX v1
Power
Components
|
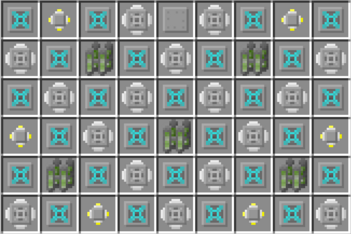
|
DESIGN 8: MOX v2
Power
Components
|
Breeder
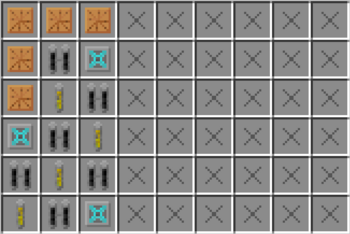
|
DESIGN 1: GLOWSTONE v1
Output
Components
|
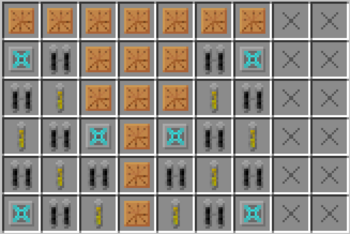
|
DESIGN 2: GLOWSTONE v2
Output
Components
|
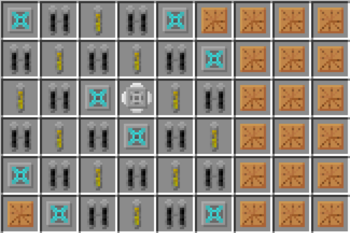
|
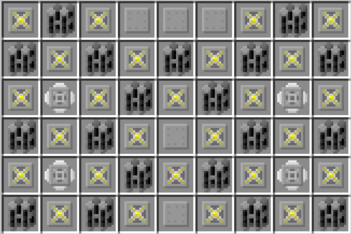
DESIGN 3: GLOWSTONE v3
Output
Components
|
|
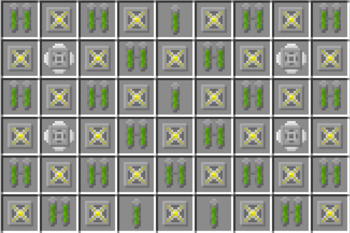
DESIGN 4: MASS THORIUM
Output
Components
|
|
DESIGN 5: MASS URANIUM
Output
Components
|
Note that MOX power designs and glowstone breeder designs scale with the Core Temp of reactor. To SAFELY and SLOWLY increase Core Temp, place a single fuel rod into the reactor and enable it with a lever. Watch closely as the Core Temp increases and stand ready to disable the reactor once it reaches the goal. Recall that the reactor damages players within close proximity at 70% Core Temp, replaces nearby blocks with fire and lava at 85% Core Temp, and explodes in a catastrophic meltdown at 100% Core Temp.
There are two methods to reduce Core Temp. The easy way is to place overclocked heat vents into the reactor. They sustain damage in the process but recover on their own after the Core Temp reaches 0%. They even work while the reactor is disabled. The hard way is to break the reactor with a wrench. This causes the whole machine and the components inside to fall on the ground, but the Core Temp is immediately reset to 0%.
Automation
A Basic Reactor is incredibly easy to automate because the reactor components never break. Designs with one type of fuel rod need only an EnderIO conduit and an item filter. Designs with two or more types of fuel rods require robot arms to place them into specific slots. Regardless, the lifespan of fuel rods is very long so there is not much to worry about.
It is highly recommended to put depleted fuel rods in ME stocking buses for an Industrial Centrifuge or Large Thermal Refinery to automatically harvest their breeding products or recycle their materials.