GT New Horizons · Ludicrous Voltage (LuV)
Circuit Assembly Line
The Circuit Assembly Line (CAL) is an LuV tier multiblock specialized in circuit assembling. The CAL is a direct upgrade from the singleblock circuit assembler because it runs perfect overclocks and bulk recipes that are 1/6th the average cost for crystal, wetware, bioware, and optical circuits. However, the CAL is built as a series of slices similar to the regular Assembly Line and inputs must be inserted in the exact order in which they appear in NEI. The CAL must also be permanently imprinted with a specific circuit type which means it cannot process anything other than that; there is no universal setup and there are no data sticks/hatches. The CAL is superseded by the Nanochip Assembly Complex in UEV.
The CAL has an alternate circuit assembler mode which allows it to craft normal circuit assembler recipes without inserting inputs in a specific order or across the different slices. The circuit assembler mode is compatible with the crafting input buffer/bus and allows input separation, but can only process recipes up to and the structure must be at least 5 slices long. Change mode in the GUI of the controller or by right-clicking the controller with a screwdriver.
Construction
The CAL is built as a series of slices with an input bus at the bottom center of each one to hold a single unique input. The total number of slices required therefore depends on the total number of inputs in the recipe. For example, the crystal processor has six solid inputs and therefore needs seven slices to craft—the last is for the output bus. The order in which the ingredients are inserted is the same order in which they appear in NEI.
The CAL can be built left-to-right or right-to-left. The direction only affects the ordering of the input buses and the location of the output bus. The slice with the controller is always the front and therefore the location of the first input. The glass only needs to be EV+ and has no effect on the operation of the machine. Multi-amp and laser energy hatches are not supported and there can only be ONE regular energy hatch. Unlike the regular Assembly Line, the output bus must be on the bottom center of the last slice. Use the Multiblock Structure Hologram Projector to visualize/build the structure with subchannel "glass" to specify the tier of the glass and the projector stack size to specify the length of the machine, up to the maximum of seven blocks long.
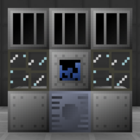
Base Structure
- Controller: First slice, 3rd layer
- 4 Grate Machine Casing
- 4 EV+ Tiered Glass
- 2 Solid Steel Machine Casing
- 2 Assembly Line Casing
- 1 Energy Hatch: Any layer 3 casing
- 1 Maintenance Hatch: Any layer 1 side casing
- 1-6 Input Bus: Bottom center of each slice
- 1 Input Hatch: Any layer 1 side casing
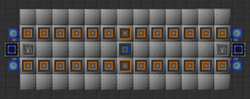
Wallshared CALs - 1 Output Bus: Bottom center of last slice
Each Additional Slice
- Layer 3: Grate Machine Casing, Grate Machine Casing, Grate Machine Casing
- Layer 2: EV+ Tiered Glass, Assembly Line Casing, EV+ Tiered Glass
- Layer 1: Solid Steel Machine Casing, Input Bus, Solid Steel Machine Casing
Wallsharing
CALs may wallshare each of their sides to save on casings, glass, and buses/hatches. Nearly every recipe consumes 0.5A of power or less which means one energy hatch can be shared between four CAL at the same time. The only exceptions are mainframes which consume nearly 1A of power instead. Right-click ME buses/hatches with wire cutters to allow connections from any side and wallshare up to eight machines simultaneously. The example above is only four to show the locations of everything, but another set of four can be built directly on top without any additional buses/hatches.
Imprints
All CAL recipes require a circuit imprint in the controller block to specify the circuit to be crafted in the machine. This is a one-time cost and permanently sets the controller block to that circuit type. Different variants of the same circuit tier (e.g. crystal LuV circuits and wetware LuV circuits) are not the same and require different imprints. Crafting circuit imprints requires a few rare materials, listed below.
1) Prasiolite is most commonly obtained through meteors or smelting quartzite and amethyst dust together in an Electric Blast Furnace to make flawed prasiolite. Both the dust and exquisite versions are needed so do not up the quality of everything right away. A stop on Venus may be necessary to acquire enough amethyst dust. Once the player has a T5 rocket, prasiolite ore can be mined directly on Ross 128ba.
2) Cubic Zirconia is obtained by smelting zirconium dust in an Electric Blast Furnace to make flawed cubic zirconia. The zirconium dust can be farmed from red zircon ore on Ross 128b, sifting cassiterite/tin/ilmenite ore, or chemical bathing tin/rutile ore. The blast furnace recipe also requires a single yttrium oxide or yttria dust which is easily acquired through rare earth (I) or rare earth (II).
3) Tellurium is most commonly obtained by smelting crushed lead ore in an Electric Blast Furnace. It can also be electrolyzed out of alburnite dust or picked up by a Void Miner in the Toxic Everglades dimension.
Automation
The challenge in using the CAL effectively is inputting items in the correct order and limiting each slice to a single item type. Additional inputs do not have to be blocked because the machines are locked to a single recipe. Expect to build many CALs prior to the Nanochip Assembly Complex because there are many different types of circuits and they are all incredibly common in higher tier recipes.
Method 1: Applied Energistics (Small Form)
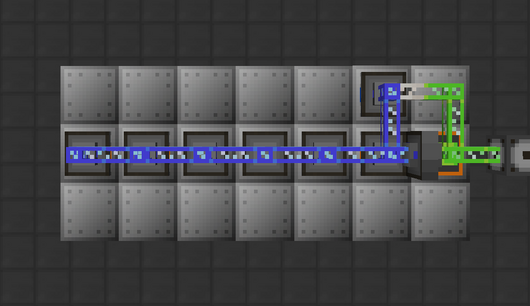
The core mechanic behind this approach is using ME storage buses with set priorities to filter circuit components to the correct slice. ULV input buses are used to limit each slice to a single item type and a regular input hatch is used to hold any fluids. This approach is cheap and very quick to setup but it does not scale as well as the second method.
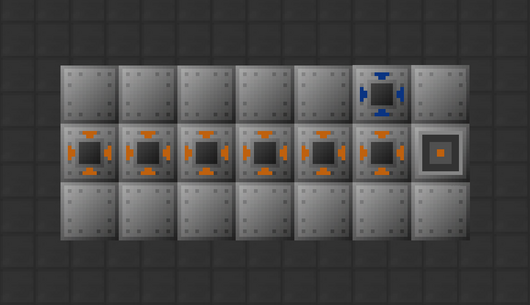
| STEP 1 | |
| Build the CAL with ULV input buses, an input hatch on the second to last slice, and an ME output bus on the very last slice.
The ULV input buses limit each slice to a single item slot, preventing multiple items from going into the same one. |
|
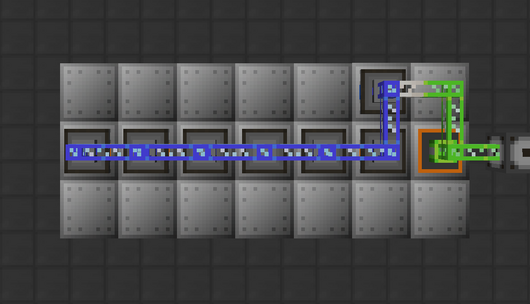
| STEP 2 | |
| Place an ME storage bus on each input bus with DESCENDING PRIORITY from the first slice. Use the priority card to set these very quickly. Also place an ME fluid storage bus on the input hatch and set everything to INSERT ONLY.
Connect the storage buses to the same CAL subnetwork (blue) and the ME output bus to the main network (green). Power the CAL subnetwork with a quartz fiber cable. Upgrade to a Neutronium-Infused ME Controller later on for better performance in the late game. |
|
| STEP 3 | |
| Place a pair of ME dual interfaces in between the CAL subnetwork (blue) and the main network (green). Place any patterns in the ME dual interface on the main network.
Scaling this approach is as simple as using P2P dual interfaces instead of ME dual interfaces to insert circuit components into other CAL subnetworks. |
|
Method 2: Applied Energistics (Large Form)
The core mechanic behind this approach is using stocking input buses/hatches to filter circuit components to the correct slice. This approach has nearly unlimited item throughput and scales extremely well. It is also very quick to set up with the Ring of Loki and datastick for copy-pasting stocking input bus settings. There are no significant downsides.
First and foremost, every circuit type should have its own AE2 subnetwork. This helps with TPS and saves on a significant number of channels on the main network. Expect to use a single ME controller for each circuit type at first, but later expanding to a 3x3x3 or even a 5x5x5 ME controller for some of the higher tier circuits.
| STEP 1 | |
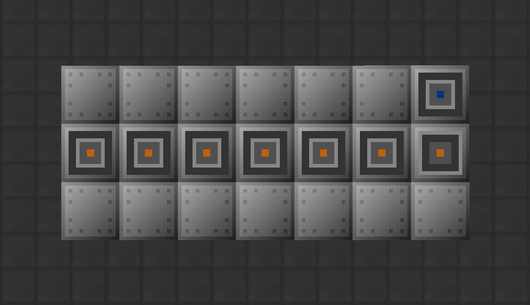
| Build the CAL with stocking input buses, a stocking input hatch, and an ME output bus on the very last slice.
Right-click all of these with wire cutters to allow connections from any side. Also filter them to one circuit component per slice. |
|
| STEP 2 | |
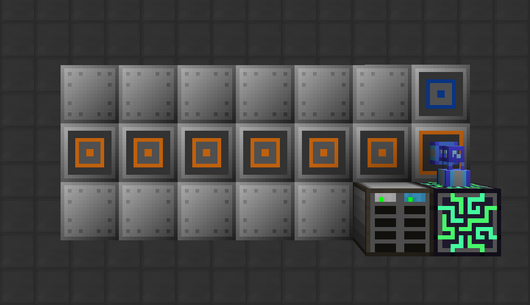
| Build the CAL subnetwork (blue) with an ME drive and ME controller. These do not have to be directly underneath the CAL and will require more space as more machines are built.
Insert at least one storage cell and one fluid storage cell into the ME drive for holding the necessary circuit components. The size of the storage cells should increase with the batch size of crafting requests. Power the CAL subnetwork with a quartz fiber cable. Upgrade to a Neutronium-Infused ME Controller later on for better performance in the late game. |
|
| STEP 3 | |
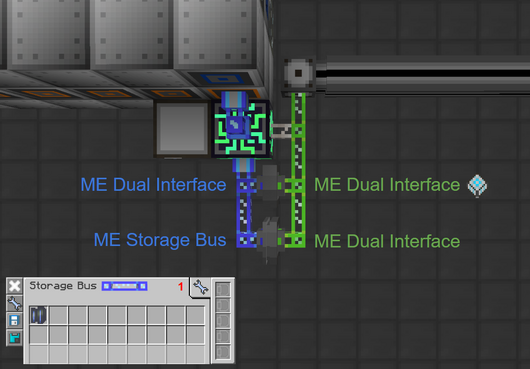
| For the INPUTS, place an ME dual interface on the main network (green) facing directly into an ME dual interface on the CAL subnetwork (blue). Insert patterns into the ME dual interface on the main network.
For the OUTPUT, place a storage bus set to INSERT ONLY on the CAL subnetwork (blue) facing directly into an ME dual interface on the main network (green). Filter the storage bus to the correct circuit and set the priority to anything above zero to avoid it being stored in the ME drive. Use a sticky card if necessary. Scaling this method is as simple as connecting more CAL to the same subnetwork, ideally with wireless connectors. |
|