GT New Horizons · Insane Voltage (IV)
Advanced Assembly Line
The Advanced Assembly Line (AAL) is an IV tier multiblock for running Assembly Line recipes in parallel by leveraging item pipelining; ingredients are consumed slice-by-slice instead of all at once, much like a real Assembly Line. That means the maximum number of parallels corresponds to the number of solid ingredients in a recipe. The AAL also supports multi-amp and laser energy hatches for serious overclocking, but CANNOT tier skip like the regular Assembly Line. Overclocks above the named voltage tiers are considered laser overclocks and scale much worse than imperfect overclocks.
Although craftable at the same time as the Assembly Line, it is not recommended to switch right away for multiple reasons. 1) The AAL is much more complicated than the Assembly Line and is prone to getting stuck if not setup correctly. 2) Parallelism costs a tremendous amount of power which may be difficult to support without laser infrastructure. 3) Automation is much more expensive since it requires significantly more AE2 components. 4) The Assembly Line is still needed for tier skipping.
Spreadsheet: AAL Calculator
Construction
The only structural difference between the AAL and the Assembly Line is the controller. The glass can be any tier and has no effect on the operation of the machine. Multi-amp and laser energy hatches are supported for serious overclocking, but there is no tier skipping (e.g. UV energy hatches cannot run UHV+ recipes). Use the Multiblock Structure Hologram Projector to visualize/build the structure with subchannel "glass" to specify the tier of the glass and subchannel "length" to specify the number of slices ().
The input buses can be any tier but it is recommended to use advanced stocking input buses because their auto-pull feature is very useful for automation. At max length, the output bus should replace a solid steel machine casing on layer 1 of the last slice instead of replacing the final input bus. Only four input hatches are required because no recipe uses more than four fluids. Quadruple input hatches do NOT work, but there can be gaps between the input hatches if necessary.
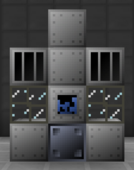
Base Structure
- Controller: First slice, 3rd layer
- 10 Any Tiered Glass
- 8 Grate Machine Casing
- 4-8 Solid Steel Machine Casing
- 5 Assembly Line Casing
- 5 Assembler Machine Casing
- 1+ Energy Hatch: Any layer 4 casing
- 1 Maintenance Hatch: Any layer 1 side casing
- 1 Data Access Hatch: Any grate machine casing NOT on first slice
- 5-16 Input Bus: Bottom center of each slice
- 1-4 Input Hatch: Any layer 1 side casing
- 1 Output Bus: Any layer 1 casing on last slice
Each Additional Slice
- Layer 4: Empty, Solid Steel Machine Casing, Empty
- Layer 3: Grate Machine Casing, Assembler Machine Casing, Grate Machine Casing
- Layer 2: Any Tiered Glass, Assembly Line Casing, Any Tiered Glass
- Layer 1: Solid Steel Machine Casing, Input Bus, Solid Steel Machine Casing
Wallsharing
AALs may wallshare each of their sides to save on casings, glass, and buses/hatches. That includes any input hatches, maintenance hatches, data access hatches, and output buses. Sharing a data access hatch is particularly valuable for saving TPS and reducing the amount of Data Banks needed.
Usage
The AAL starts processing once the contents of the buses/hatches align with a stored data stick, much like the regular Assembly Line. Every recipe must pass through N slices on the machine, where N is the number of solid ingredients. Each slice takes T = (base duration / N) seconds to process the ONE type of item in its input bus before continuing onto the next slice for the next item. This repeats until all ingredients are consumed and the final product is sent to the output bus for retrieval. All fluids are consumed at the very start of processing.
The AAL supports parallel processing by allowing the next recipe to begin once the first slice is done with the first recipe. This creates a staggered pattern that allows every slice to work simultaneously if there are enough resources available. If the next slice is missing the required item in its input bus, then the current slice enters the STUCK state which changes the status light on the controller to orange and halts the entire machine until the missing item is found/returned. Use WAILA to locate where exactly the problem occurred.
| Time | Slice 1 | Slice 2 | Slice 3 | Slice 4 | |
| 1T | Recipe 1 Item 1 | ||||
| 2T | Recipe 2 Item 1 | Recipe 1 Item 2 | |||
| 3T | Recipe 3 Item 1 | Recipe 2 Item 2 | Recipe 1 Item 3 | ||
| 4T | Recipe 4 Item 1 | Recipe 3 Item 2 | Recipe 2 Item 3 | Recipe 1 Item 4 | |
| 5T | Recipe 4 Item 2 | Recipe 3 Item 3 | Recipe 2 Item 4 | ||
| 6T | Recipe 4 Item 3 | Recipe 3 Item 4 | |||
| 7T | Recipe 4 Item 4 |
Laser Overclocks
The energy consumption of the AAL is the number of active slices times the base EU/t, similar to parallels. The AAL then runs up to N imperfect overclocks where N is the difference between the voltage tier of the lowest tier energy hatch and the voltage tier of the recipe. Further overclocks are all laser overclocks, which consume more power and scale even worse than imperfect overclocks. The first one is 2x speed for 4.3x the power and each additional one increases the power multiplier by 0.3, scaling infinitely.
- Imperfect Overclocks - 2x speed for 4.0x power (2/4.0).
- 1st Laser Overclock - 2x speed for 4.3x power (2/4.3).
- 2nd Laser Overclock - 2x speed for 4.6x power (2/4.6).
- 3rd Laser Overclock - 2x speed for 4.9x power (2/4.9).
The increased power cost of laser overclocks means that upgrading the energy hatch(es) is not always going to overclock the machine. It all depends on the recipe's base EU/t and the maximum number of parallels. Use the calculator linked at the top to verify when exactly to upgrade energy hatches, unless using a universal AAL.
Consider the UIV field generator recipe as an example. There can be up to 14 slices active simultaneously and each one consumes 15/16A of UEV power for a total of 13.1A. That means a 16A UEV energy hatch is enough to cover the base cost of the recipe, but does not grant any laser overclocks. Upgrading to a 64A energy hatch grants one laser overclock because that is greater than 13.1 x 4.3 = 56.4A, but upgrading to a 256A energy hatch does NOT grant a second laser overclock because that is less than 56.4 x 4.6 = 259A. The following table lists the amperage needed for a given number of laser overclocks for on-tier recipes (e.g. UEV recipes with one UEV laser energy hatch) that consume 15/16A of power.
| Slices | Laser Overclocks | Examples | |||||||||
| 1 | 2 | 3 | 4 | 5 | 6 | 7 | 8 | ||||
| 4 | 64 | 256 | 1,024 | 4,096 | 16,384 | 65,536 | 1,048,576 | 4,194,304 | |||
| 5 | 64 | 256 | 1,024 | 4,096 | 16,384 | 262,144 | 1,048,576 | 4,194,304 | |||
| 6 | 64 | 256 | 1,024 | 4,096 | 16,384 | 262,144 | 1,048,576 | 4,194,304 | |||
| 7 | 64 | 256 | 1,024 | 4,096 | 65,536 | 262,144 | 1,048,576 | 4,194,304 | |||
| 8 | 64 | 256 | 1,024 | 4,096 | 65,536 | 262,144 | 1,048,576 | 16,777,216 | |||
| 9 | 64 | 256 | 1,024 | 16,384 | 65,536 | 262,144 | 1,048,576 | 16,777,216 | Optical Assembly | ||
| 10 | 64 | 256 | 1,024 | 16,384 | 65,536 | 262,144 | 1,048,576 | 16,777,216 | |||
| 11 | 64 | 256 | 1,024 | 16,384 | 65,536 | 262,144 | 1,048,576 | 16,777,216 | Quantum Circuit, Optical Supercomputer | ||
| 12 | 64 | 256 | 4,096 | 16,384 | 65,536 | 262,144 | 4,194,304 | 16,777,216 | Pico Circuit | ||
| 13 | 64 | 256 | 4,096 | 16,384 | 65,536 | 262,144 | 4,194,304 | 16,777,216 | Optical Mainframe | ||
| 14 | 64 | 1,024 | 4,096 | 16,384 | 65,536 | 262,144 | 4,194,304 | 16,777,216 | Gallifreyan Time Dilation Field Generator | ||
| 15 | 64 | 1,024 | 4,096 | 16,384 | 65,536 | 262,144 | 4,194,304 | 16,777,216 | |||
| 16 | 256 | 1,024 | 4,096 | 16,384 | 65,536 | 262,144 | 4,194,304 | 16,777,216 | Gallifreyan Spacetime Compression Field Generator, Gallifreyan Stabilization Field Generator | ||
Overclocking is only possible down to 1 tick because that is the smallest unit of time in Minecraft, but the AAL (and nearly every other multiblock in GTNH) is capable of subticking or increasing its number of parallels by a corresponding amount to simulate additional overclocks. For example, if an AAL is processing 1 item per slice per tick, then the next overclock would process 2 items per slice per tick. The throughput gain is effectively identical to the normal speed boost without breaking the 1 tick time barrier.
Automation
The challenge in using the AAL effectively is inputting both items and fluids in the correct order, limiting each slice to a single item/fluid type, and creating a large enough buffer for each slice to take advantage of the parallel processing. Additional inputs must also be blocked to avoid mixing recipes. The two predominant strategies for automating the AAL are listed below, although the first one is not very common anymore.
- Dedicated (DAAL) - Processes ONE recipe. Typically used for highly common ingredients or very slow recipes. The automation is similar to the Circuit Assembly Line where ingredients are explicitly enumerated in stocking input buses/hatches.
- Universal (UAAL) - Processes ANY recipe. Typically used for general crafting purposes. The automation is significantly more complicated since it has to be highly flexible and relies on the auto-pull feature of advanced stocking input buses/hatches.
 Important: | All patterns MUST be multiplied to run recipes in parallel on the same AAL. Instead of a single motor, for example, the pattern should craft 16 at a time (hence the need for buffer chests). This is because the advanced blocking card prevents any additional ingredients from being inserted while there are still some in the buffer chests. |
| Important: | Duplicate items that are full stacks also need to be renamed in an Industrial Forming Press. This is because the buffer chests can hold more than a single stack of items, unlike the ULV input buses used in regular Assembly Line automation. |
Method 1: Applied Energistics (Small Form)
The core mechanic behind this approach is using ME chests with set priorities to determine the order in which items are inserted as well as hold hundreds or even thousands of each item. Advanced stocking input buses pull the items from the ME chests and fluid storage buses store any fluids directly in the input hatches. Additional inputs are blocked by an advanced blocking card to prevent mixing. This approach is ideal for uncommon items with small pattern sizes and does not require advanced stocking input hatches, but the full setup needs to be rebuilt for every machine.
| STEP 1 | |
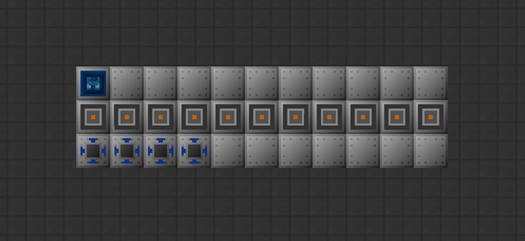
| Build the AAL with advanced stocking input buses set to AUTO-PULL. The slot refresh time can stay at 100 ticks to save TPS.
Place an input hatch on each of the first four slices and a maintenance hatch somewhere on the first layer. Place an ME output bus and wireless assembly line reception connector (not shown) on the last slice facing outward from the machine. |
|
| STEP 2 | |
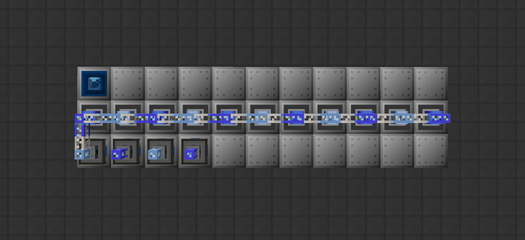
| Place an ME fluid storage bus set to INSERT ONLY on each input hatch with DESCENDING PRIORITY from the first slice.
Place alternating color cables on the advanced stocking input buses and fluid storage buses. Every slice is its own subnetwork. Place quartz fiber cables between slices to share power between them all. Do not forget the extra one on the first slice. |
|
| STEP 3 | |
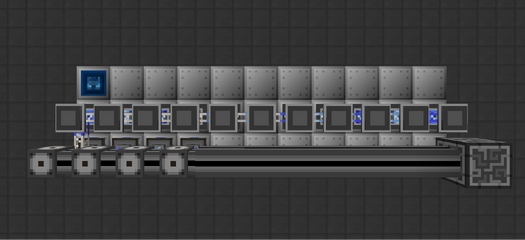
| Place an ME controller and dense fluix cable as shown to serve as backbone cable for the subnetworks (blue).
Notice the ME Controller is at the back of the machine underneath the advanced stocking input bus on the last slice. Place ME storage buses set to EXTRACT ONLY underneath each advanced stocking input bus. No slice can see the contents of any other slice. |
|
| STEP 4 | |
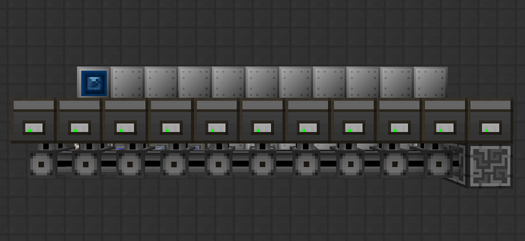
| Place ME chests underneath each storage bus with DESCENDING PRIORITY from the first slice. These serve as a buffer inventory for each slice.
Insert a block storage cell into each ME Chest to limit the slices to ONE type of item at a time. Upgrade to the quantum storage cell later on. Storage buses do not work on every side of ME chests, make sure the advanced stocking input buses see items inserted into the chests. EnderIO conduits and the Ring of Loki can help with automatically inserting the storage cells. |
|
| STEP 5 | |
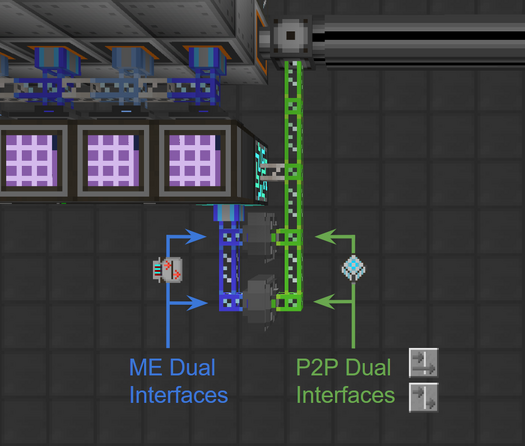
| Place ME dual interface(s) on the AAL subnetwork (blue) and insert an ADVANCED BLOCKING CARD into each one. Sneak right-click with the card in hand for quick insertion.
Place P2P dual interface(s) on the main network (green) facing directly into the ME dual interfaces on the AAL subnetwork. Enable BLOCKING MODE and INSERT SAME RECIPE on each one and then insert any patterns. Power the AAL subnetwork with a quartz fiber cable. Upgrade to a Neutronium-Infused ME Controller later on for better performance in the late game. Also connect the ME output bus to the main network. Only one pair of interfaces is actually necessary. This example uses two pairs just to show that it can scale with the number of patterns. |
|
| STEP 6 | |
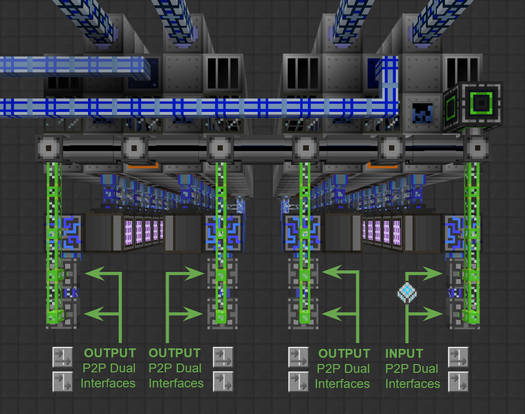
| Scaling this approach is as simple as linking additional P2P dual interfaces (outputs) to the ones holding all the patterns (inputs). Use the basic memory card with the Ring of Loki to set these very quickly.
Do not forget to enable blocking mode and insert same recipe on every P2P dual interface and to insert an advanced blocking card into the ME dual interfaces on the AAL subnetworks. Additional interfaces can be added if more patterns are needed. Also build the Data Bank to use more than 16 data sticks at a time. Always wallshare the data access hatch. Optionally, add an ME IO Port to each AAL subnetwork to easily remove items/fluids when the machine gets stuck. |
|
Method 2: Applied Energistics (Large Form)
The core mechanic behind this approach is using ME chests with set priorities to determine the order in which items are inserted as well as hold hundreds or even thousands of each item. Advanced stocking input buses/hatches pull the items and fluids from the ME chests. Additional Inputs are blocked by an advanced blocking card to prevent mixing. This approach is ideal for bulk items with large pattern sizes and scales well.
| STEP 1 | |
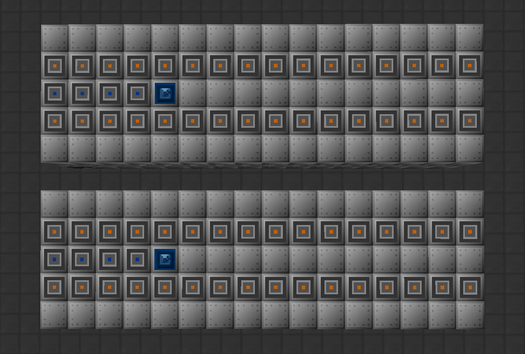
| Build the AALs in pairs. Wallshare the advanced stocking input hatches, maintenance hatches, wireless assembly line reception connectors, and ME output buses.
Set the advanced stocking input buses and advanced stocking input hatches to AUTO-PULL. Use a datastick and the Ring of Loki to quickly copy-paste settings to all buses/hatches, or use the Matter Manipulator to copy the first line including its settings. Place the ME output buses and wireless assembly line reception connectors (not shown) on the last slice facing outward from the machines. If spaced correctly, a single Active Transformer can power up to 8 AAL simultaneously without any laser mirrors. |
|
| STEP 2 | |
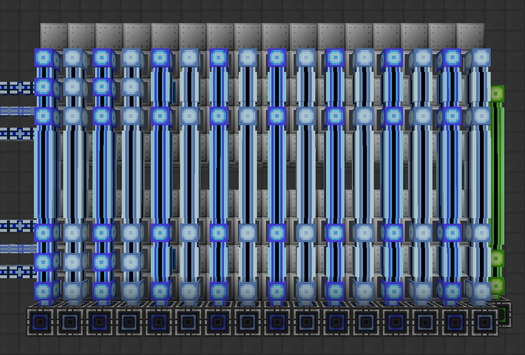
| Place alternating color dense fluix cables vertically along each slice. The image to the right uses blue and light blue, for example.
Place another column of dense fluix cable on the side of the AALs to connect the ME output buses to the main network (green). Place alternating color wireless connectors at the bottom of each column. Use the advanced wireless setup kit to quickly link them all to the wireless connectors in the next step. |
|
| STEP 3 | |
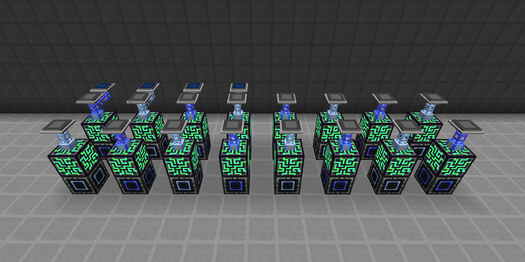
| Build a subnetwork with at least one 1 ME controller and at least 1 wireless connector for each individual slice.
Each wireless connector supports up to 20 AAL. Expand or duplicate as necessary. Place an ME storage bus set to EXTRACT ONLY on each subnetwork, and an ME fluid storage bus set to EXTRACT ONLY on the first four subnetworks. |
|
| STEP 4 | |
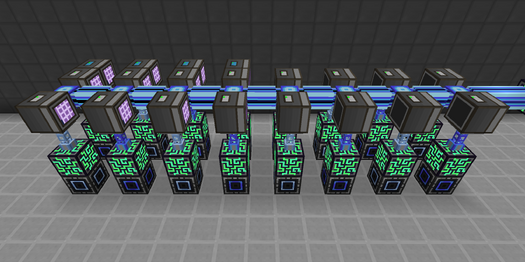
| Place ME chests with DESCENDING PRIORITY from the first slice above the storage buses and fluid storage buses. Connect the ME chests to a single ME controller with dense fluix cable.
Insert a quantum storage cell into each ME chest to limit the slices to ONE type of item/fluid at a time. Optionally, add an ME IO Port to the AAL subnetwork to easily remove items/fluids when the machine gets stuck. |
|
| STEP 5 | |
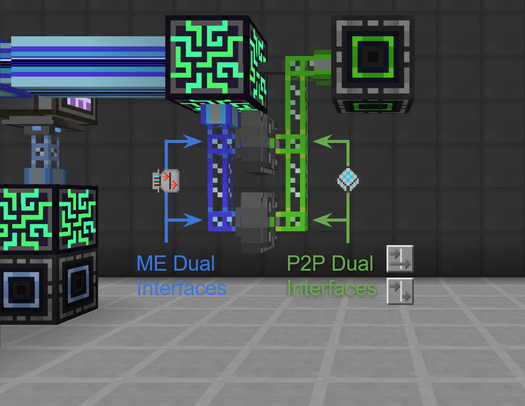
| Place ME dual interface(s) on the AAL subnetwork (blue) and insert an ADVANCED BLOCKING CARD into each one. Sneak right-click with the card in hand for quick insertion.
Place P2P dual interface(s) on the main network (green) facing directly into the ME dual interfaces on the AAL subnetwork. Enable BLOCKING MODE and INSERT SAME RECIPE on each one and then insert any patterns. Only one pair of interfaces is actually necessary. This example uses two pairs just to show that it can scale with the number of patterns. Scaling this approach is as simple as linking additional P2P dual interfaces (outputs) to the ones holding all the patterns (inputs). Use the basic memory card with the Ring of Loki to set these very quickly. Do not forget to enable blocking mode and insert same recipe on every P2P dual interface and to insert an advanced blocking card into the ME dual interfaces on the AAL subnetworks. |
|