GT New Horizons · High Voltage (HV)
Bacterial Vat
The Bacterial Vat (BV) is an HV tier multiblock for mass fermenting fluids. Bacteria contained within the vat break down organic compounds into something new, such as Saccharomyces Escherichia turning grape juice into wine. The species of bacteria, and therefore the recipe, is determined by placing a petri dish with a culture inside the controller block of the machine. All cultures are made in the Biolab singleblock machine. Some more exotic and alien species of bacteria require radiation to survive which is supplied through a radio hatch containing radioactive materials. The fermenting process itself is closely tied to the carrying capacity of the environment, meaning the output hatch should stay as close as possible to 50% capacity for maximum growth and productivity. Although the BV is mandatory for progression in UV, the player can later craft all the necessary fluids in the Quantum Force Transformer.
Construction
The BV has one tiered component. The glass determines the maximum recipe tier, but not the maximum energy hatch tier. Multi-amp and laser energy hatches are not supported, but there can be multiple regular energy hatches for overclocking. Only one output hatch and one radio hatch is allowed. Use the Multiblock Structure Hologram Projector to visualize/build the structure with subchannel "glass" to specify the tier of the glass.
Structure
- Controller: Front bottom center
- 19-45 Stainless Steel Machine Casing
- 32 Any Tiered Glass
- 0-1 Radio Hatch: Any casing
- 1+ Energy Hatch: Any casing
- 1 Maintenance Hatch: Any casing
- 0+ Input Bus: Any casing
- 1+ Input Hatch: Any casing
- 0+ Output Bus: Any casing
- 1 Output Hatch: Any casing
Wallsharing
BVs may wallshare each of their sides to save on glass, casings, and buses/hatches. That includes both the output hatch and the radio hatch which helps simplify automation setups and save on radioactive materials. If sharing between four machines, one hatch can go on top and the other can go on bottom.
Growing Cultures
All BV recipes require a specific petri dish with a culture inside the controller block. Petri dishes are acquired from the Biolab, an HV+ singleblock machine for all biotechnology related recipes. The Biolab has five different operating modes which is determined by the module in the lower right-hand slot of its inventory. If no module is inserted, it attempts to extract bacteria from any input ingredients and place them in a sterilized petri dish as a new culture. It is highly recommended to build multiple Biolabs inside a cleanroom to avoid constantly swapping out modules all the time.
Biolab Modules

|
The DNA Extraction Module (Ex) extracts the DNA of a bacterial culture from a petri dish and places it in a DNA sample flask. This process requires distilled water, ethanol cells, and detergent powder (extracted from vines) to break open the cell membranes. The probability of obtaining a valid DNA sample may vary. |

|
The PCR Thermocycling Module (PCR) reads a DNA sample flask and stores the information digitally within a data orb. This process involves heating the DNA to separate the two strands of the double helix and then supplying polymerase enzymes to rebuild the missing halves out of fluorescent DNA. The digital sequence is then generated by shining a laser on the end of each strand which glows a specific color based on the nucleic acid. The probability of obtaining a valid data orb may vary. |

|
The Plasmid Synthesis Module (PS) writes the gene data from a data orb onto a blank plasmid. Plasmids are small loops of DNA separate from a bacteria's main chromosome, often holding genes that the bacteria would not normally have. This process requires liquid DNA and enzyme solution to create the custom piece of DNA and insert it into the plasmid. A data orb for Beta-Lactamase is required in addition to the data orb with the DNA sample to boost the plasmid's resistance to certain antibiotics. The probability of obtaining a valid plasmid sample may vary. |

|
The Transformation Module (Tr) inserts a plasmid sample into a bacterial culture to provide it with the custom gene. This process involves generating a rapid electromagnetic pulse to open small holes in each of the cell membranes, allowing the plasmid to enter. Cells that do not receive the plasmid lack any antibiotic resistance and are easily killed off by injecting penicillin. The result is a petri dish with a culture where all cells contain the same custom gene. The probability of obtaining a valid petri dish may vary. |
Example Walkthrough
In case the player is not very familiar with modern biotechnology, this subsection walks through obtaining the Xenoxene Xenoxsis petri dish which is needed for producing xenoxene in the BV. Note that many Biolab recipes involving these modules have very low probabilities of success meaning this will take a lot of time and there will be a lot of failed attempts. Good luck.
| Step | Machine (Module) | Instructions |
|---|---|---|
| 1 | Biolab (None) | Obtain a Escherichia Cadaver petri dish from water and rotten flesh. |
| 2 | Biolab (None) | Obtain a TCetiEis Fucus Serratus petri dish from unknown liquid and TCetiE seaweed. |
| 3 | Bacterial Vat | Produce tcetieisfucusserratusfluid from the TCetiEis Fucus Serratus petri dish. |
| 4 | Biolab (None) | Mass produce TCetiEis Fucus Serratus petri dishes from the tcetieisfucusserratusfluid. |
| 5 | Biolab (None) | Obtain a Barnadafis Arboriatoris petri dish from unknown liquid and BarnardaC Wood. |
| 6 | Bacterial Vat | Produce barnadafisarboriatorisfluid from the Barnadafis Arboriatoris petri dish. |
| 7 | Biolab (None) | Mass produce Barnadafis Arboriatoris petri dishes from the barnadafisarboriatorisfluid. |
| 8 | Biolab (Ex) | Extract a Beta-Lactamase DNA sample flask from the Escherichia Cadaver petri dish. |
| 9 | Biolab (Ex) | Extract several Barnadafis Arboriatoris DNA sample flasks from the Barnadafis Arboriatoris petri dish. |
| 10 | Biolab (PCR) | Generate a Beta-Lactamase data orb from a Beta-Lactamase DNA sample flask. |
| 11 | Biolab (PCR) | Generate a Barnadafis Arboriatoris data orb from a Barnadafis Arboriatoris DNA sample flask. |
| 12 | Biolab (PS) | Mass produce Barnadafis Arboriatoris plasmid sample flasks from the Barnadafis Arboriatoris data orb and Beta-Lactamase data orb. |
| 13 | Biolab (Tr) | Create Xenoxene Xenoxsis petri dishes from the TCetiEis Fucus Serratus petri dishes and the Barnadafis Arboriatoris plasmid sample flasks. Repeat as necessary for additional petri dishes. |
Radio Hatch
A few exotic and alien species of bacteria require radiation to survive which is supplied through a radio hatch containing rods or long rods of radioactive materials. A radio hatch is similar to an input bus except it continuously consumes items regardless if a recipe is running or not. Fortunately, the radio hatch can be disabled at any time with a machine controller cover. Enable sound muffling by right-clicking the radio hatch with a hammer.
The radioactive material inside the radio hatch determines the strength of the radiation in sieverts (sv), but the built in radiation shutter can reduce that by a custom amount. There is no benefit to reducing the sieverts other than needing to have an exact amount for a specific recipe. Different materials also have different lifespans, but most are quite short. The following table lists a few of the many radioactive materials by their strength, lifespan, and mass.
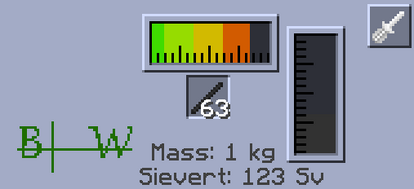
| Material | Strength | Lifespan | Mass |
| Bismuth Rod | 83 sv | 198.80 s | 1 kg |
| Bismuth Long Rod | 83 sv | 397.60 s | 2 kg |
| Thorium Rod | 90 sv | 98.75 s | 1 kg |
| Thorium Long Rod | 90 sv | 197.50 s | 2 kg |
| Uranium 235 Rod | 92 sv | 80.85 s | 1 kg |
| Uranium 235 Long Rod | 92 sv | 161.70 s | 2 kg |
| Uranium 238 Rod | 92 sv | 80.85 s | 1 kg |
| Uranium 238 Long Rod | 92 sv | 161.70 s | 2 kg |
| Plutonium 239 Rod | 94 sv | 66.20 s | 1 kg |
| Plutonium 239 Long Rod | 94 sv | 132.40 s | 2 kg |
| Plutonium 241 Rod | 94 sv | 66.20 s | 1 kg |
| Plutonium 241 Long Rod | 94 sv | 132.40 s | 2 kg |
| Americium Rod | 95 sv | 59.90 s | 1 kg |
| Americium Long Rod | 95 sv | 119.80 s | 2 kg |
| Naquadah Rod | 130 sv | 14.40 s | 1 kg |
| Naquadah Long Rod | 130 sv | 28.80 s | 2 kg |
| Enriched Naquadah Rod | 140 sv | 10.65 s | 1 kg |
| Enriched Naquadah Long Rod | 140 sv | 21.30 s | 2 kg |
| Naquadria Rod | 150 sv | 7.85 s | 1 kg |
| Naquadria Long Rod | 150 sv | 15.70 s | 2 kg |
Output Hatch
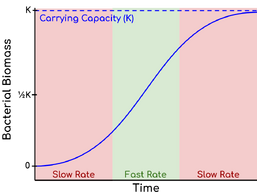
The BV is a closed system with a limited carrying capacity (K) for bacteria to grow. All closed systems follow a sigmoidal population curve meaning the growth rate is initially slow due to a small starting population, increases in rate as the population grows, and then slows down again as the finite resources in the environment become a limiting factor. Maximum growth in a closed system occurs at K/2.
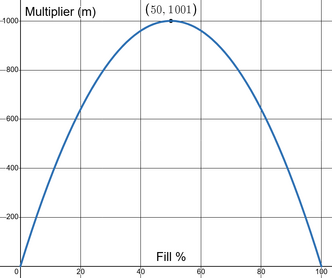
The size of the output hatch on the BV is equivalent to the carrying capacity (K) of the bacterial culture. Very little growth occurs when the output hatch is empty or when the output hatch is close to full. Ideally, the output hatch stays as close as possible to 50% capacity for maximum growth and productivity. More specifically, both the input AND output fluids are multiplied by up to x1,001 based on how close the output hatch is to K/2 or half-full. The solid ingredients and culture are not affected. The multiplier (m) is calculated with the following equation where Fill% is the current fluid level out of the maximum capacity.
This equation is quadratic to reflect the derivative of the sigmoidal population curve. The ceiling operator, however, adds a small buffer around K/2 that rounds up values close to the maximum multiplier, which means the output hatch does not have to be perfectly 50% capacity to achieve the x1,001 gain. Larger output hatches have a larger buffer, but initially require more fluid to reach K/2. It is recommended to start with a very small output hatch and work up to larger sizes as more output fluid is obtained. The following table lists all the different output hatches and their thresholds for earning the maximum x1,001 multiplier (m). The graph visually depicts the general relationship based on the percentage fill level.
| Output Hatch (K) | Minimum | K/2 | Maximum | Range |
| ULV (8,000 L) | 3,874 L | 4,000 L | 4,126 L | 252 L |
| LV (16,000 L) | 7,748 L | 8,000 L | 8,252 L | 504 L |
| MV (32,000 L) | 15,495 L | 16,000 L | 16,505 L | 1,010 L |
| HV (64,000 L) | 30,989 L | 32,000 L | 33,011 L | 2,022 L |
| EV (128,000 L) | 61,977 L | 64,000 L | 66,023 L | 4,046 L |
| IV (256,000 L) | 123,953 L | 128,000 L | 132,047 L | 8,094 L |
| LuV (512,000 L) | 247,905 L | 256,000 L | 264,095 L | 16,190 L |
| ZPM (1,024,000 L) | 495,810 L | 512,000 L | 528,190 L | 32,380 L |
| UV (2,048,000 L) | 991,619 L | 1,024,000 L | 1,056,381 L | 64,762 L |
| UHV (4,096,000 L) | 1,983,237 L | 2,048,000 L | 2,112,763 L | 129,526 L |
| UEV (8,192,000 L) | 3,966,474 L | 4,096,000 L | 4,225,526 L | 259,052 L |
| UIV (16,384,000 L) | 7,932,947 L | 8,192,000 L | 8,451,053 L | 518,106 L |
| UMV (32,768,000 L) | 15,865,893 L | 16,384,000 L | 16,902,107 L | 1,036,214 L |
| UXV (65,536,000 L) | 31,731,785 L | 32,768,000 L | 33,804,215 L | 2,072,430 L |
| Giant (100,000,000 L) | 48,418,862 L | 50,000,000 L | 51,581,138 L | 3,162,276 L |
Note that the multiplier (m) is calculated at the very start of a recipe. This is important when the BV is running continuously because the output from the previous recipe factors into the calculation of the multiplier (m) for the next one. Ideally, the range of optimal production should be greater than the amount of output fluid to guarantee the maximum multiplier.
Automation
The challenge in using the BV effectively is keeping the output hatch around 50% capacity to maximize the multiplier (m). That involves limiting the amount of fluid extracted from the BV every cycle, or even calculating the exact precise amount. Each of the following assumes that the same output hatch and radio hatch is shared between four BV simultaneously, but the steps are exactly the same with only one or two BV.
 Important: | Some of the numbers may vary depending on the exact recipe. Those shown here are for raw growth catalyst medium specifically. |
Method 1: GregTech
The core mechanic behind this approach is using a GregTech fluid regulator to extract a specific amount of fluid every few seconds, which can also be disabled with a machine controller cover and fluid detector cover. This approach is simple, compact, and scales very well.
| STEP 1 | |
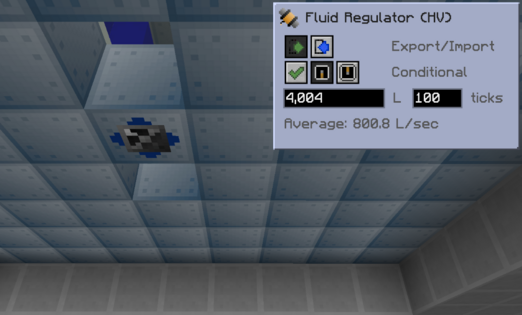
| Place an IV+ output hatch at the bottom center casing of four BVs. Place a fluid regulator on the bottom of the output hatch with the settings shown.
The 4,004L comes from the total combined fluid output of a single iteration and the 100 ticks comes from wanting to save TPS for a recipe that takes longer than 5 seconds. An IV+ output hatch is necessary because that is the smallest hatch with a buffer wide enough for K/2 ± 4,004L to return the maximum x1,001 multiplier. |
|
| STEP 2 | |
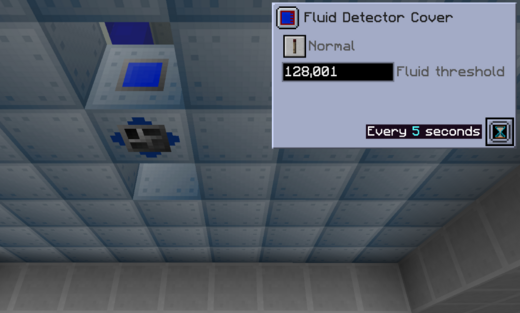
| Place a fluid detector cover on one side of the output hatch with the settings shown. Set the tick rate to 5 seconds to save TPS.
Use a soldering iron on the cover to set the signal strength to STRONG. That allows it to transmit through the casing on the side of the output hatch. This emits a redstone signal when the output hatch is greater than or equal to 128,001L or K/2 + 1. |
|
| STEP 3 | |
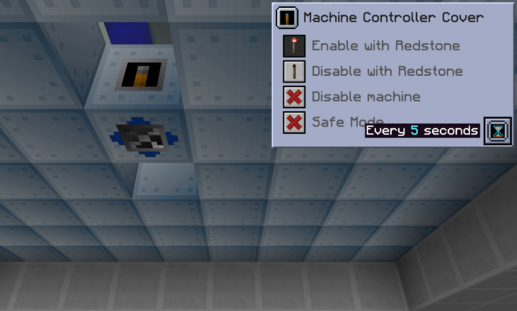
| Place a machine controller cover on the opposite side of the output hatch with the settings shown. Set the tick rate to 5 seconds to save TPS.
This enables the fluid regulator when it receives a redstone signal from the fluid detector cover. |
|
| STEP 4 | |
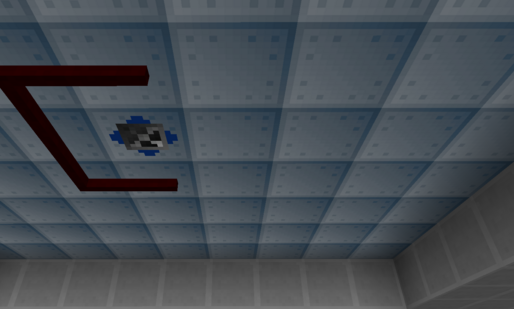
| Place in the missing stainless steel machine casings for the BV's to properly form.
Trace some redstone alloy cable around the edges of the output hatch as shown in the figure. This carries the signal from the fluid detector cover to the machine controller cover. Wireless covers can also be used here, but they are more complicated and take slightly longer to setup. |
|
| STEP 5 | |
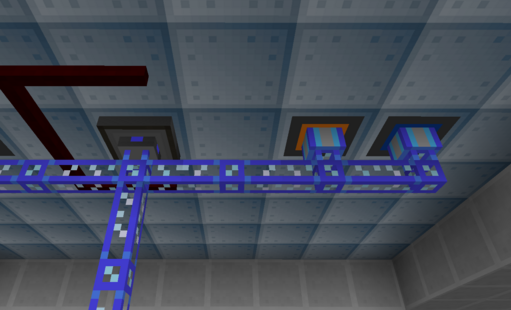
| Place an ME dual interface underneath the output hatch to receive any excess fluid. The red alloy cable can occupy the same space as an AE2 cable (thin or dense).
Lastly, place any required ME stocking buses/hatches and fill the output hatch to exactly K/2 or 50% capacity. |
|
Method 2: OpenComputers
The core mechanic behind this approach is using an OpenComputers (OC) microcontroller to calculate the exact amount of fluid to extract from the output hatch and move the fluid itself--all without any power or additional cabling. The only prerequisite is a working OC computer to flash the EEPROM with the necessary code. This approach is compact and scales well, but could be difficult to implement if unfamiliar with OC.
| STEP 1 | |
In a running OC computer, create a new script by typing edit bacvat5.lua. The name of the script is not important. Copy the code on the right into the script. Use middle-click to paste.
Note that the siding values may be different (0=Down, 1=Up) depending on the setup. The sleep time may also need to be lowered depending on the recipe and number of overclocks. Press CTRL+S to save and CTRL+W to exit. Use the same edit command to change the code at anytime. |
local t = component.proxy(component.list('transposer')())
local max = t.getTankCapacity(1)

-- Minimum fluid amount that guarantees maximum output
local min = math.ceil((1-math.sqrt(0.001))*max/2)

while true do
  -- Extract Fluid (0=Down, 1=Up)
  local level = t.getTankLevel(1)
  if level > min then
    t.transferFluid(1, 0, level-min)
  end

  -- Sleep 5 Seconds
  computer.pullSignal(5)
end
|
| STEP 2 | |
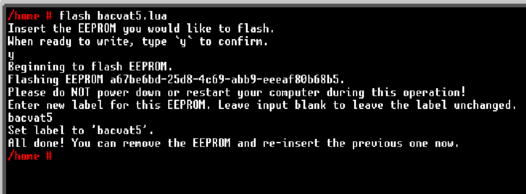
| Take the EEPROM (Lua BIOS) out of the same running OC computer and insert a new blank EEPROM.
Type Combine the flashed EEPROM with another blank EEPROM in a crafting grid to copy the code onto both of them. A flashed EEPROM is needed for every microcontroller or 1-4 BVs. |
|
| STEP 3 | |
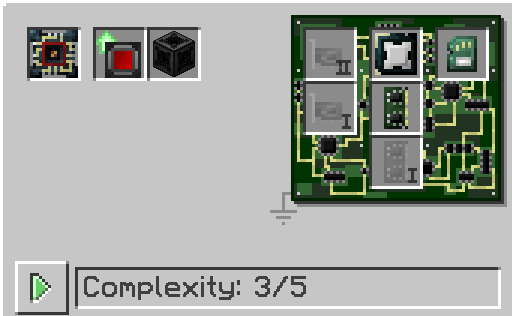
Build the Microcontroller in an OC Electronics Assembler. The bare minimum components:
The RITEG upgrade is not absolutely necessary, but saves from having to run any sort of power cables (ie. quartz fiber) to the Microcontroller. |
|
| STEP 4 | |
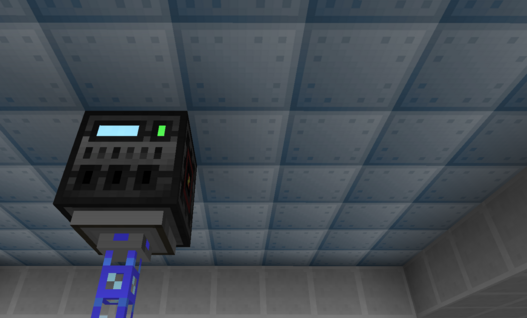
| Place the Microcontroller underneath an IV+ output hatch at the center of four BVs. Right-click the Microcontroller to enable it.
An IV+ output hatch is necessary because that is the smallest hatch with a buffer wide enough for K/2 ± 4,004L to return the maximum x1,001 multiplier. Place an ME dual interface or a large tank underneath the Microcontroller to receive any excess fluid. Again, these sides are configurable in the EEPROM code. Change the EEPROM in a microcontroller by sneak right-clicking it with a new one. |
 |
| STEP 5 | |
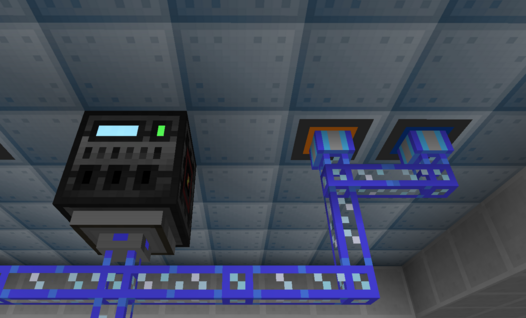
| Lastly, place any required ME stocking buses/hatches and fill the output hatch to exactly K/2 or 50% capacity.
Parallelizing this approach is as simple as building additional Microcontrollers. Sneak right-click the Microcontroller to disable it, if necessary. |
|
Method 3: Steve's Factory Manager
The core mechanic behind this approach is using a Steve's Factory Manager (SFM) script to specify exactly how much fluid should be pulled from the output hatch at a time. This approach is compact, simple, and scales well. The same script can even be extended to any number of BVs but that requires some modification of the script and some basic knowledge of SFM in general. It may be easier to just build additional machine inventory managers and copy-paste the script with a manager duplicator.
| STEP 1 | |
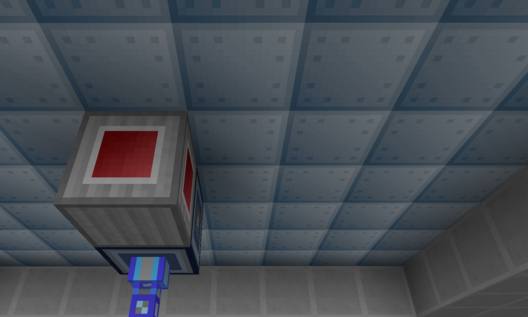
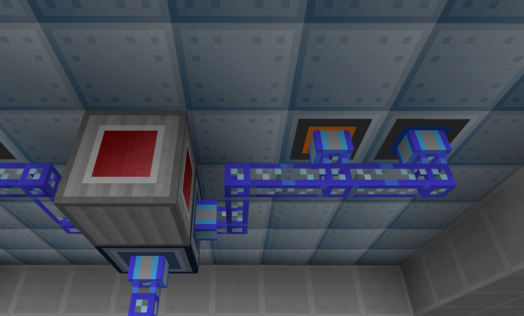
| Place the Machine Inventory Manager (MIM) underneath the output hatch at the center of four BVs.
Place a full-block ME dual interface next to the MIM. The exact location is not important as long as it is touching the MIM. Fluids are pulled from the output hatch once the capacity is above K/2 or 50% and inserted into the ME dual interface for storage. |
|
| STEP 2 | |
| Place any required ME stocking buses/hatches and fill the output hatch to exactly K/2 or 50% capacity.
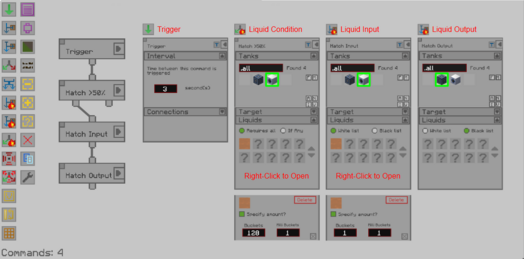
The last step is done within the MIM. The image below is the complete and finished program. Use it as a reference for the commands defined on the right. Click to enlarge the image. If a setting/page of a command is not shown, assume that it is left to the default settings. |
|
| STEP 3 | |
| The program itself executes every 3 seconds although that can be reduced if necessary. The important part is the filter amounts which keep the output hatch at exactly K/2 or 50% capacity.
Notice that this scripts only moves 1,001L per iteration despite the output hatch being shared by four BVs simultaneously. This prevents the script from breaking if only 1-3 BVs are active at a time due to a shortage of resources. |
|
Optional: Limit Radio Hatch
Although not entirely necessary, the following steps are for automatically disabling the radio hatch to avoid excess consumption of radioactive materials while the BV is idle. The core mechanic behind this approach is using level emitters to disable the radio hatch when there are not enough inputs. For versions prior to 2.9, control the behavior with an advanced redstone receiver (internal) instead.
| STEP 1 | |
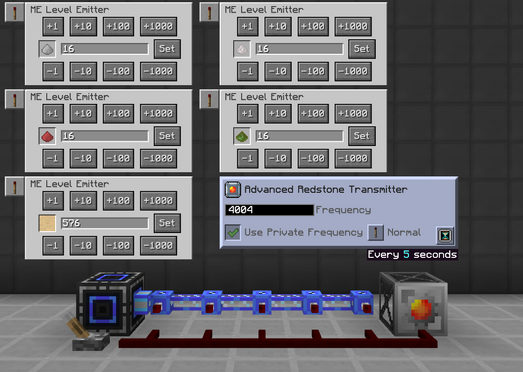
| Place a level emitter for each individual input on the BV subnetwork (blue). Increase the count to at least one recipe's worth of ingredients and set the redstone behavior to EMIT WHEN LEVELS ARE BELOW LIMIT.
Connect the level emitters to an advanced redstone transmitter with red alloy wire. Set the frequency to anything and check the box underneath to make it a private frequency. Also set the tick rate to 5 seconds to save TPS. This transmits a redstone signal when any of the inputs are too low. The lever is a manual override. |
|
| STEP 2 | |
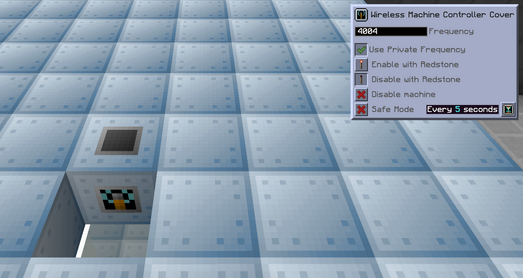
| Place a radio hatch at the top center of four BVs and place a wireless machine controller cover on its side. Set the frequency to the same one in the previous step, check the box underneath to make it a private frequency, and set the redstone behavior to DISABLE WITH REDSTONE. Also set the tick rate to 5 seconds to save TPS.
This toggles the radio hatch whenever it receives a signal on that frequency. |
|
| STEP 3 | |
| Place in the missing stainless steel machine casing for the BVs to properly form.
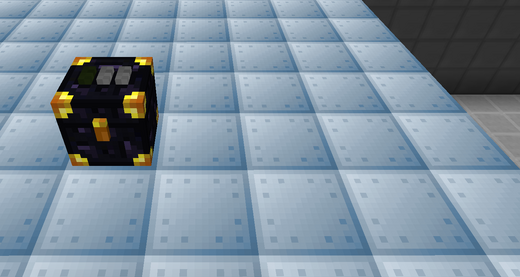
Provide the radioactive material to the radio hatch by any means necessary, such as an enderchest with a conveyor module. Scaling this approach is as easy as adding a wireless machine controller cover with the same settings on other radio hatches. |
|