GT New Horizons · Insanely Ultimate Voltage (UIV)
Semi-Stable Antimatter Stabilization Sequencer
The Semi-Stable Antimatter Stabilization Sequencer (SSASS) is a UIV tier multiblock for creating antimatter from protomatter. Antimatter is used almost exclusively by the Shielded Lagrangian Annihilation Matrix (SLAM) to generate power. The SSASS runs on a fixed 1 second cycle which begins with recording the amount of fluid in each antimatter hatch. All hatches with more than the lowest amount lose half the difference. Next, inputs are consumed which includes the protomatter and up to four different types of stabilization fluids. Although technically optional, the stabilization fluids grant significant bonuses and are highly recommended for increasing the energy efficiency of the machine. Finally, the SSASS randomizes the amount of antimatter to generate in each individual hatch based on the total amount of antimatter in all the hatches.
The power consumption of the SSASS also scales with the total amount of antimatter in the hatches, and it is possible for the SSASS to consume more power than what the SLAM can output--making the entire process power negative. There is a delicate balance between how much antimatter should stay in the hatches and the net power gain. Use the planner linked below to determine optimal setups.
Spreadsheet: GTNH Power Planner 2.9
Construction
The SSASS has no tiered components but several restrictions on the location of buses/hatches. Input hatch(es) are limited to the three casings on the top and bottom of the structure. Antimatter hatches are limited to the 16 casings around the center of the structure. Energy hatches are limited to the three casings on the left, right, and back of the structure. Regular energy hatches are NOT supported, but there can be multiple multi-amp and laser energy hatches for serious power consumption. Right-click the controller with a screwdriver to disable animations. Use the Multiblock Structure Hologram Projector to visualize/build the structure.
Unique to the SSASS is the antimatter hatch which is effectively a UIV output hatch permanently locked to antimatter. The face is the only output side and the rest are input sides. It is fast enough to output its entire capacity within a single tick. All 16 antimatter hatches are necessary for the structure to form. Keep them perfectly balanced every second to maximize output.
Structure
- Controller: Front center, 27th layer
- 2274 Magnetic Flux Casing
- 624-637 Gravity Stabilization Casing
- 514 Antimatter Containment Casing
- 126 Protomatter Activation Coil
- 1+ Energy Hatch: Back, left, or right side of the structure
- 1+ Input Hatch: Top or bottom side of the structure
- 16 Antimatter Hatch: Around the inner ring
Wallsharing
The shape of the SSASS does not allow large-scale wallsharing, but a second one can be built in the same space as another, rotated by 180° and shifted by at least 4 blocks vertically.
Usage
The SSASS runs on a fixed 1 second cycle which begins with recording the amount of fluid in each antimatter hatch. All hatches with more than the lowest amount lose half the difference. Antimatter (AM) is directly proportional to the amount of power generated in the Shielded Lagrangian Annihilation Matrix (SLAM) so the hatches MUST be balanced before the start of each cycle to keep the machine power positive. See the automation section below for more details. Note that completely emptying the hatches is NOT a solution because the SSASS needs at least some antimatter to make more, similar to a Bacterial Vat. The first few drops of antimatter are crafted in a Hyper-Intensity Laser Engraver.
Inputs
The only mandatory input to the SSASS is protomatter which is converted into antimatter at a 1:1 ratio when the change in antimatter is positive, or consumed at the same ratio when the change in antimatter is negative. There is no restriction or challenge with the protomatter so it can be supplied through a stocking input hatch. Running out of protomatter shuts down the machine and voids 10% of all antimatter in the hatches so it is highly recommended to maintain a large surplus at all times. A fluid level emitter facing into a machine controller cover can automatically shut down the SSASS when protomatter is running low to avoid the penalty altogether. There are three options for crafting protomatter in a precision laser engraver, listed below.
| Protomatter |
Converts into Antimatter
|
The optional inputs to the SSASS are the four different types of stabilization fluids. There can only be one of each type at a time and they all have multiple options with varying levels of performance. For example, supply the SSASS with molten shirabon to set C=0.05 OR molten MHDCSM to set C=0.10. Higher is always better, as seen in the equations in the following section. The amount of stabilization fluid consumed per cycle depends on the total amount of antimatter (AM) in the hatches AFTER the rebalancing penalty is applied. These also have no restrictions or challenges and can be supplied through the same stocking input hatch as the protomatter.
| Magnetic Stabilization (M) | Gravity Stabilization (G) | Containment Stabilization (C) | Activation Stabilization (A) |
Reduces Passive Power Cost
|
Reduces Active Power Cost
|
Increases Antimatter Gain
|
Increases Antimatter Gain
|
Output
After rebalancing the antimatter hatches and consuming the input(s), the SSASS then randomizes the amount of antimatter to generate IN EACH INDIVIDUAL HATCH based on the total amount of antimatter in all the hatches, the containment bonus (C), and the activation bonus (A). The last term is a random number pulled from a normal distribution with a mean of 0.2 + A and a variance of 1, which could actually be negative and reduce the amount of antimatter in the hatch. The average is positive so there should always be a net gain in the long run. The ceiling operator rounds up any decimal values to guarantee that the first few runs are antimatter positive. Note that this is equivalent to the amount of protomatter consumed since it is converted at a 1:1 ratio.
This expands on the rebalancing challenge discussed earlier; it is not as simple as using a fluid regulator to remove a fixed amount of antimatter every second. The hatches gain (or lose) a unique amount of antimatter every cycle to force adaptive rebalancing--a method resistant to randomization.
Power
The SSASS has two different power equations, listed below. The first is the passive power consumption, or the amount of EU/t consumed while the machine is enabled. The second is the active power consumption, or the amount of EU/t consumed while actively running. These stack with each other to determine the total power consumption of the SSASS while actively creating antimatter. The passive power consumption decreases by 0.5% every tick when there is no antimatter in the hatches. Improve the energy efficiency of the SSASS increasing the magnetic bonus (M) and the gravity bonus (G).
It is possible for the SSASS to consume more power than what the SLAM can output based on the antimatter being generated, making the entire process power negative. There is a delicate balance between how much antimatter should stay in the hatches and the net EU gain. Use the planner linked at the top to determine optimal setups.
Summary
The output and power consumption of the SSASS scales faster than the power output of the SLAM with respect to the total amount of antimatter. That means the most efficient setups generally have less antimatter in their hatches, despite that producing less antimatter per second. Increase throughput by building more SSASS, not by increasing the amount of antimatter in the hatches.
The following are the most efficient setups for maximizing EU at different stages of the game, assuming only 1 SSASS. Cycle refers to the 1 second between SSASS iterations and burn refers to the 5 seconds between SLAM iterations. It is highly recommended to build more SSASS to reduce the number of cycles per burn and increase the net average EU/t. Using less energy hatches on the SLAM also reduces the number of cycles per burn, but that lowers the overall efficiency of the setup. Stay above five cycles per burn or else an excess amount of antimatter is going to be generated--or build a second SLAM. The final stage 4.5 is the theoretical maximum but the 42 UXV hatches cost 231M (L) of universium in total for only a 13% increase in EU/t. Therefore, it is not recommended and the universium should instead be used towards building the Stargate. Again, use the planner linked at the top for more information and to determine optimal setups.
Stage 1
|
Stage 2
|
Stage 3
|
Stage 4
|
| SSASS | Antimatter | Stabilization Fluid | Power Cost | ||||||||||
| Per Hatch | Per SSASS | Average Gain | Magnetic | Gravity | Containment | Activation | Passive | Active | Total | Per Burn | |||
| Stage 1 | 34,900 L | 558,400 L | 362 L/s | 747 L/s | 747 L/s | 43.9 L/s | 82.4 L/s | -1.76e12 EU/t | -6.79e12 EU/t | -8.55e12 EU/t | -2.06e16 EU | ||
| Stage 2 | 249,000 L | 3,984,000 L | 1,280 L/s | 1,996 L/s | 1,996 L/s | 76.9 L/s | 159 L/s | -3.02e12 EU/t | -3.46e13 EU/t | -3.77e13 EU/t | -3.42e17 EU | ||
| Stage 3 | 984,000 L | 15,744,000 L | 2,726 L/s | 3,968 L/s | 3,968 L/s | 114 L/s | 251 L/s | -1.80e13 EU/t | -6.53e13 EU/t | -8.34e13 EU/t | -3.55e17 EU | ||
| Stage 4 | 4,456,000 L | 71,296,000 L | 15,451 L/s | 8,444 L/s | 8,444 L/s | 175 L/s | 415 L/s | -1.06e13 EU/t | -5.02e14 EU/t | -5.12e14 EU/t | -3.85e17 EU | ||
| Stage 4.5 | 4,880,000 L | 78,080,000 L | 16,317 L/s | 8,836 L/s | 8,836 L/s | 180 L/s | 427 L/s | -1.18e13 EU/t | -5.67e14 EU/t | -5.79e14 EU/t | -4.04e18 EU | ||
| SLAM | Antimatter | Energy Hatches | Stabilization Fluid | Power Gain | |||||||||
| Per Burn | Cycles Per Burn | Amount | Tier | Amps | Total Buffer | Matter | Per Burn | Net Per Burn | Net Average | ||||
| Stage 1 | 43,646 L | 120.55 | 64 | UIV | 1,048,576 | 5.40e16 EU | 362 L/s | 5.40e16 EU | 3.34e16 EU | 1.39e13 EU/t | |||
| Stage 2 | 580,688 L | 453.57 | 64 | UMV | 4,194,304 | 8.65e17 EU | 1,280 L/s | 8.65e17 EU | 5.23e17 EU | 5.77e13 EU/t | |||
| Stage 3 | 580,688 L | 213.01 | 64 | UMV | 4,194,304 | 8.65e17 EU | 2,726 L/s | 8.65e17 EU | 5.10e17 EU | 1.20e14 EU/t | |||
| Stage 4 | 580,688 L | 37.58 | 64 | UMV | 4,194,304 | 8.65e17 EU | 15,451 L/s | 8.65e17 EU | 4.80e17 EU | 6.38e14 EU/t | |||
| Stage 4.5 | 5,693,622 L | 348.93 | 42 | UXV | 16,777,216 | 9.08e18 EU | 16,317 L/s | 9.08e18 EU | 5.04e18 EU | 7.22e14 EU/t | |||
For reference:
- A Dyson Swarm Ground Unit produces up to 3.37e11 EU/t.
- A Large Naquadah Reactor produces up to 6.65e11 EU/t.
- An Eye of Harmony produces up to 1.29e13 EU/t.
Automation
The challenge in using the SSASS effectively is perfectly balancing all 16 antimatter hatches every single second to avoid any penalties. The output of each hatch is randomized so balancing typically involves pulling all the antimatter out of the hatches and equally redistributing it.
Method 1: Applied Energistics
The core mechanic behind this approach is splitting each antimatter hatch into its own subnetwork with a buffer tank and overflow. Fluid regulators pull all the antimatter from the hatches each second and refills them with the perfect target amount. The export fluid regulator is always on the top/bottom of the antimatter hatches because covers on those sides are always executed first, prior to those on the remaining sides. This means the import fluid regulator always occurs second regardless of TPS or server restarts. This approach is simple, robust, and very accurate. However, it does not scale to multiple SSASS very well. The setup can be copy-pasted with a Matter Manipulator, but the entire thing still needs to be rebuilt per machine. It is also difficult to start with since the buffers need to be prefilled with antimatter.
 Caution: | The hatches are NOT filled evenly if any of the buffer tanks are short on antimatter, which can lead to significant penalties until there is no antimatter left. Be very careful and always keep a surplus in each buffer for cycles with a net loss. |
| Caution: | If space-sharing the SSASS with another SSASS 4 vertical blocks apart, ensure that when connecting the new buffer tank to the middle shared subnet that at least one of the tanks is full and the other has more than double of your required hatch level in, otherwise one of the buffer tanks is unable to supply enough antimatter and the automation will fail. |
| STEP 1 | |
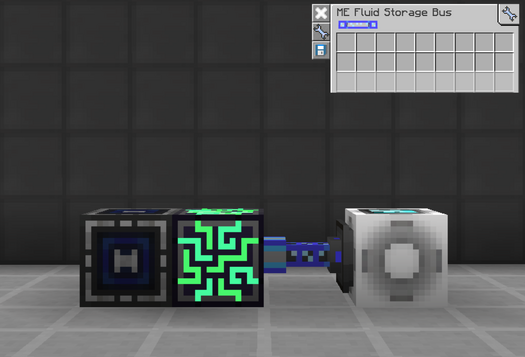
| Build the overflow network (blue) with an ME controller, one or more wireless hubs, and a fluid storage bus set to INSERT ONLY on a quantum tank.
This stores any excess antimatter generated by the SSASS in a tank that is easily accessible for SLAM automation. One wireless hub is required for every four SSASS. This example only has one but it can be easily scaled by adding more wireless hubs to the network. |
|
| STEP 2 | |
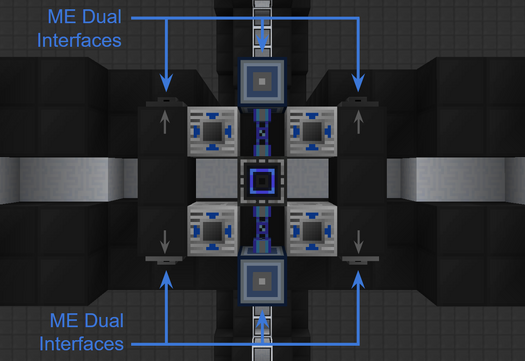
| Rotate all the antimatter hatches on the upper-half of the structure upwards and all the antimatter hatches on the lower-half of the structure downwards. Place an ME dual interface on each of their output sides.
Place a wireless connector at the center of each side of the SSASS and link them to the wireless hub in the previous step. Also add two full-block ME dual interfaces as shown to receive any excess antimatter. Place a buffer tank or input hatch next to each antimatter hatch. The capacity depends on how much antimatter is currently being generated. Use a lower capacity (ie. HV input hatch) when starting and slowly upgrade to larger capacities as needed. The capacity should always be slightly greater than the current target amount to buffer a small excess of antimatter, in case there is a net loss that cycle. |
|
| STEP 3 | |
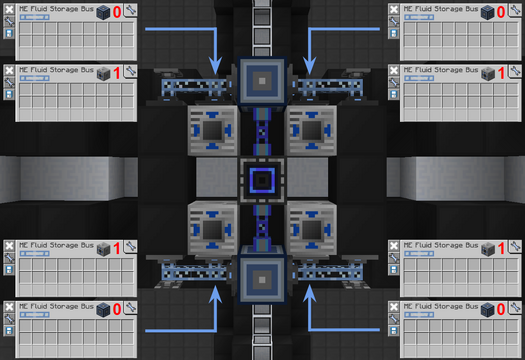
| Build out each antimatter hatch subnetwork (light blue) with a fluid storage bus on one of the full-block ME dual interfaces and a fluid storage bus on the buffer tank or input hatch. Set both to INSERT ONLY.
Increase the priority of the fluid storage buses on the buffers to ensure that they receive antimatter first. The full-block ME dual interfaces should only receive antimatter once the buffers are full because they are the overflow network for the SLAM. Power the antimatter hatch subnetworks with neutronium energy anchors. Quartz fiber cable could also work but its not as good for performance. |
|
| STEP 4 | |
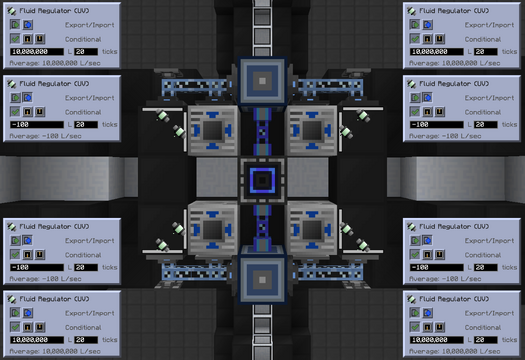
| Add two UV+ fluid regulators to each antimatter hatch. One should export as much antimatter as possible each second to the ME dual interface.
The other fluid regulator should import a specific target amount of antimatter each second from the buffer tank or input hatch on its side. Start with very low amounts and never exceed the current capacity of the buffer or else there will be inconsistencies between the antimatter hatches. For example, start with 8L of antimatter in each hatch and set each import fluid regulator to -5L until there is enough antimatter in each buffer to start importing -10L per second. Slowly increase the amount per second as the buffers fill up until the optimal target amount. |
|
Method 2: Steve's Factory Manager
The core mechanic behind this approach is using Steve's Factory Manager (SFM) commands to pull all the antimatter from the hatches into a large buffer tank, and then refilling them with the perfect target amount. This approach is simple and very accurate. The downside is that it does not scale to multiple SSASS very well. The script can be copy-pasted with a manager duplicator, but the entire thing still needs to be rebuilt per machine. It is also difficult to start with since the buffer needs to be prefilled with antimatter.
| Caution: | The hatches are NOT filled evenly if the buffer tank is short on antimatter, which can lead to significant penalties until there is no antimatter left. Be very careful and always keep a surplus in the buffer for cycles that are a net loss. |
| STEP 1 | |
| Rotate the output side of all 16 antimatter hatches downwards. SFM can be a little particular on siding.
Place a machine inventory manager somewhere near the center of the structure and run inventory cable to all 16 antimatter hatches. The side of the antimatter hatch that the inventory cable touches is irrelevant. |
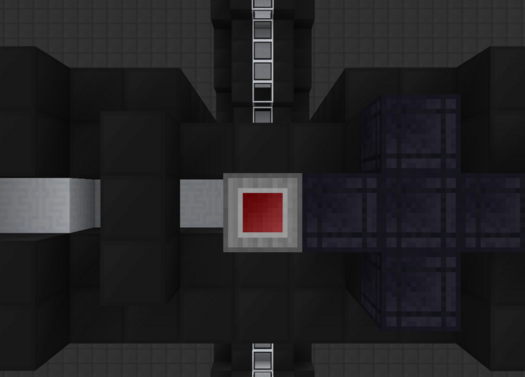
|
| STEP 2 | |
| Place a large buffer tank adjacent to the machine inventory manager or any of the inventory cables. It must be large enough to hold the total amount of antimatter in the SSASS, and some extra.
Place another large storage tank just behind the first one with an ender fluid conduit inbetween. This is to extract any excess antimatter and should be made available to the SLAM to generate power. Place a fluid detector cover on the buffer tank and facing into the ender fluid conduit. Set the threshold to at least 10x the average antimatter per cycle. The more antimatter, the larger the margin of error. The ender fluid conduit is only enabled when the amount of antimatter in the buffer tank is greater than the amount set on the fluid detector cover. |
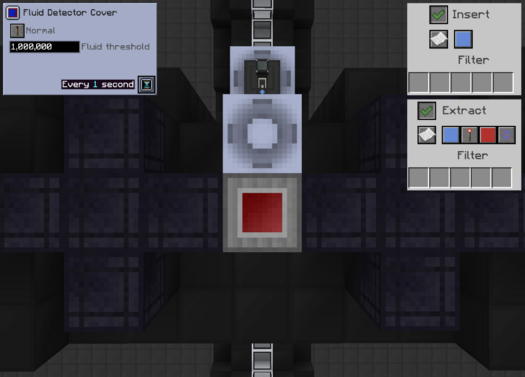
|
| STEP 3 | |
| Place an activity detector cover set to RECIPE PROGRESS on the top or bottom side of the controller. This emits a 15 strength redstone signal once per second near the end of each cycle.
Place a redstone receiver next to the activity detector cover and connect it back to the rest of the SFM components with inventory cable. This is necessary because the fixed 1 second interval of trigger commands is actually 21 ticks which does not line up perfectly with the SSASS cycle. |
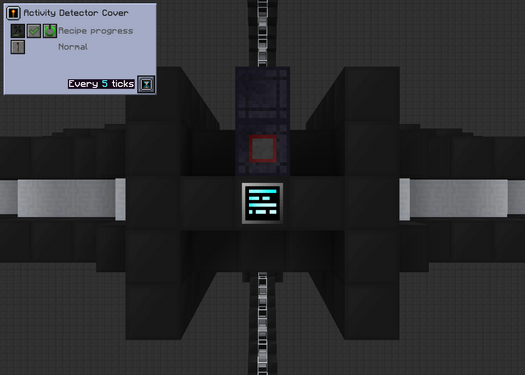
|
| STEP 4 | |
| The remaining steps are all done within the machine inventory manager. The image to the right is the complete and finished program. Use it as a reference for the variables and commands defined in the next few steps. Click to enlarge any of the images.
The program itself is broken down into two separate phases (1=Extraction and 2=Insertion) which are both executed once per second. If a setting/page of a command is not shown, assume that it is left to the default settings. |
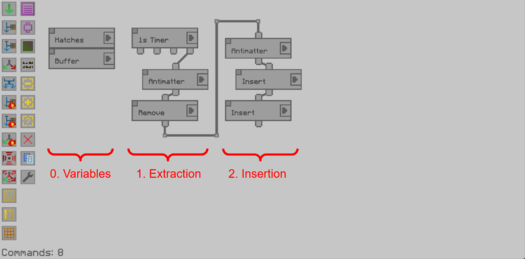
|
| STEP 5 | |
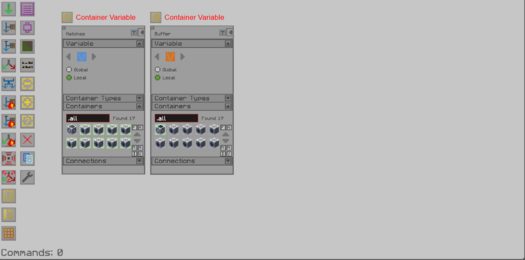
| Define the two container variables. Select ALL antimatter hatches for the first variable and the buffer tank for the second variable.
Use the arrows to scroll down in the selection window when selecting the hatches. |
|
| STEP 6 | |
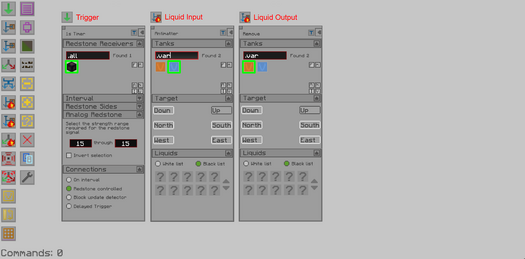
| Define the commands for the extraction. Start with a trigger that activates when the redstone signal strength of the redstone receiver is 15.
Connect the trigger to a liquid input with the hatches variable. Activate every target side except "up" and leave the filter to allow everything. Connect that to a liquid output with the buffer variable. Again, activate every target side except "up" and leave the filter to allow everything. This pulls all the antimatter from the hatches into the buffer tank, but the hatches are never actually going to be empty because SFM does everything in under 1 tick. |
|
| STEP 7 | |
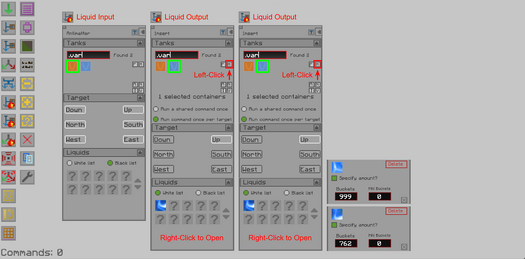
| Define the commands for the insertion. Start with a liquid input with the buffer variable. Activate every target side and leave the filter to allow everything.
The amount of liquid outputs varies with the amount of antimatter needed per hatch since each one can only move up to 999,999L of antimatter per cycle. The example to the right uses two liquid outputs to fill the antimatter hatches to 1,761,000L each. Ensure the multi-selection interaction is set to "run command once per target", the only activated side is "up", and the filter is set to antimatter with the appropriate amount. |
|