GT New Horizons · Crops & farming
IC2 Crops Guide
 | Needs Cleanup! Some of the information is confusing or incomplete. Please help improve this article if able. Missing info on replicating seeds with UU-Matter, Gene Extractor & Synthesizer |
Crops are a mechanic added by IndustrialCraft 2 that allow the player to grow resources in a renewable way, many of which are otherwise limited or difficult to acquire. They are a fast, automatable source of certain resources, such as glowstone, sugar (oxygen), salt (chlorine, sodium), and marble (calcium). Tree bonsais can grow wood in a more compact setup than a full tree farm. Crop breeding can be started in the Steam Age, but it becomes much simpler in late-MV with access to the Portable Scanner.
- For a list of crops, including growth requirements and produce, see IC2 Crops List
- To read about crop mechanics in more detail, see IC2 Crops
Overview
- The item Crop - hereafter referred to as "cropsticks" - are needed to plant crops on.
- Crop growth speed and yield are influenced by their stats and the biome they are in.
- Crops mature through multiple stages and most need to be fully mature to harvest. Exceptions are noted in the IC2 Crops List.
- Weeds can appear in empty cropsticks, and spread destroying adjacent crops.
Tools & Supplies
Seed Bags


Each crop has a "{name} Seeds" item. Some crops like Sugar Cane can be planted on a cropstick by using the plant directly, or a Seeds bag that is obtained from an existing crop of that type. If no placeable item is an option, that crop can only be produced by a random mutation through crossbreeding. Seeds will drop most of the time from crops that are fully grown, but it's not guaranteed. The best way to get them is to left-click without a Spade; this breaks the crop. However, they can also drop from crops at any growth stage, or with a Spade right-click, with a lower chance than breaking. Propagate a desirable crop / new mutation by crossbreeding before attempting to collect it as a seed bag. Seed bags will also mention any special growing requirements if CTRL is held over the tooltip. Any crops that require a specific block within four vertical blocks below the crop to fully mature will be listed on the extended tooltip and IC2 Crops List Notes.
Basic Items

- Dirt (must be tilled and wet, this one gives IC2 crops an environment boost)
- Garden Soil (cannot be trampled, doesn't need to be wet, no boost)
- Fertilized Dirt (cannot be trampled, doesn't need to be wet, no boost)
- Crop (cropsticks, IC2 crops can only grow in these, large quantities needed)
- Required block (some crops need a specific block to grow to max and be harvested, check the seeds tooltip)
Consumables
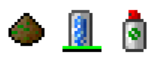
- Fertilizer (boosts growth speed)
- Hydration Cell (also boosts growth speed)
- Weed-Ex (prevents weeds on cropsticks without a crop in them)
Tools

- Hoe (Stone Age, tills dirt to increase growth speed when wet)
- Plant Lens (LV, ID's only the name of the crop with a right-click)
- Weeding Trowel (LV, removes weeds with right-click without destroying cropsticks)
- Spade (MV, infinite durability shovel/weeding trowel/hoe, can drop seeds from crops at any growth stage with a low chance)
- Cropnalyzer - analyzes seeds but not plants, displays plant growth statistics. IC2 Side Inventory keybind (default NONE) while holding brings up a crossbreeding simulator. Seed bags have to be passed multiple times for full identification. (MV)
- Portable Scanner (late MV, needs HV circuits, displays all the stats of a crop with a right-click)
- Dislocation Focus (Thaumcraft item, needs infusion, needs to be placed on wand or staff, consumes large amounts of vis, can move crops from one dirt block to any other)
Machines

- Scanner (Gregtech, LV+, shows crop type and crop stats when scanning a seed)
- Crop-Matron (IC2, waters, fertilizes, and applies Weed-EX to crops)
- Crop Harvester (IC2, harvests crops)
- Crop Manager (Gregtech, LV+, waters, fertilizes, applies Weed-EX and harvests, chance for extra drops)
- Multifarm (Forestry multiblock, waters, fertilizes and harvests)
- World Accelerator (Gregtech, can accelerate crops in Tile Entity mode. For breeding, accelerate the double crop sticks.)
Identifying
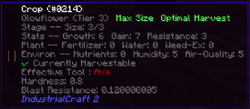
Some crops are identical in appearance until they reach their final stage. WAILA will unhelpfully say only "Crop" when looking at a non-analyzed plant. Crops can be scanned with the Plant Lens (name only) or Portable Scanner to identify it as it is growing, or the Seeds bag can be put through a Scanner / Cropnalyzer.
When identified, WAILA will display the plant type, tier, stats (Growth, Gain and Resistance), environment stats (Nutrients, Humidity and Air-Quality), the plant's attributes and who discovered the plant (fluff). This is very useful if the player is crossbreeding to get new crop types or to increase stats as all the information will be displayed on the crop before it fully matures.
Growing & Harvesting
Right-click to harvest a crop. Right-clicking on an immature plant will do nothing. Left-click will destroy a plant instantly, possibly yielding Seeds and/or its harvest. Weeds can be removed with a Weeding Trowel or by breaking the cropstick they're occupying.
Dangers
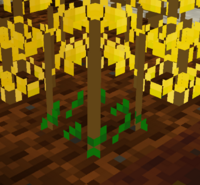
Running near IC2 crops can destroy the plant, so can jumping on them. Other mobs can also destroy crops by jumping or falling into the field, so fence off your crops or mob-proof the area.
Weeds can sprout in cropsticks without a crop inside (double cropsticks too), and if they are allowed to reach maturity they take over adjacent cropsticks and replace the plants inside. Destroy the cropstick if a weed appears, right click with a Spade or use Weed-Ex to prevent the weeds from appearing for a good while. Any crop with Growth 24+ can also spread weeds to orthogonally adjacent spaces (north, south, east or west, same Y level only).
Crops with high stats/higher tiers have greater environmental needs. If crops are dying seemingly at random, it could be a lack of environment quality. Some crops need certain conditions to grow. If the WAILA tooltip says "Can grow: No", there's something wrong. Check the IC2 Crops List or NEI's {type} Seeds item tooltip, holding down CTRL for extended info.
Crossbreeding
Crossbreeding is the process of creating new plant species and mutations through IC2 Crop mechanics. To initiate crossbreeding, double cropsticks must be placed adjacent to at least two mature plants on the same Y level (north, south, east, or west). A checkerboard pattern maximizes the number of potential new plant locations.
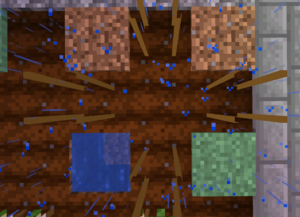
 | Weed Warning Double cropsticks left unattended may spawn Weeds. Monitor crossbreeding plots regularly. |
Breeding for Propagation
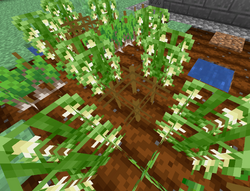
Propagation breeding duplicates an existing plant species rather than creating mutations. This is the simplest breeding task and is essential for expanding a crop farm.
| Parent Configuration | Success Rate |
|---|---|
| Two different species | 20–40% |
| Two identical species | 40–60% |
The exact probability depends on how many possible mutations exist between the two parent plants. When a desirable mutation appears, propagate it immediately before attempting to collect a seed bag.
Tool: Crop Mutation Calculator
Breeding for Mutations
Mutation breeding produces entirely new plant species from existing parents. Which plants are possible depends on plant trait tags and tiers. In practice, mutation outcomes are highly chaotic and unpredictable.
The most effective strategy is to maintain a large field of adult plants and collect whatever mutations appear, rather than targeting one specific plant. The Online Crop Breeding Calculator helps identify parent crops with optimal odds.
| Starting Crop | Common Mutations | Target Crops |
|---|---|---|
| Reed | Stickreed, Ferru | Ore crops |
| Stickreed | Ferru, Aurelia | Metal-producing crops |
| Ore Crops | Higher-tier ore crops | Platina |
Stickreed Example
Stickreed from Sugar Cane is the ideal starter mutation. It grows quickly and produces useful Sticky Resin.
- Craft IC2 Cropsticks and locate Sugar Canes.
- Place cropsticks on wet, tilled soil in a checkerboard pattern.
- Right-click cropsticks with Sugar Canes to plant Reed.
- Wait for Reeds to mature (WAILA: "Stage: 3/3").
- Place double cropsticks in empty spaces between plants.
- New plants appear over time: mostly reeds, some new mutations, or weeds. (~27% any mutation, ~1% specifically stickreed)
- Identify plants with a Plant Lens or Portable Scanner until a stickreed appears.
- Crossbreed Reed × Stickreed to get more stickreed plants (~35% chance with one stickreed parent)
- Harvest seeds once several Stickreeds are established or let them spread into a field.
 Caution: Weeds can spawn in unattended double cropsticks.
Breeding for Stats
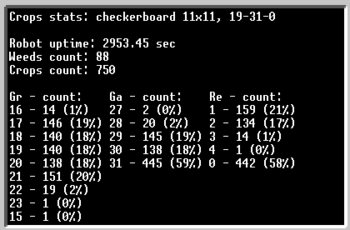
Stat breeding improves the Growth, Gain, and Resistance attributes of crops. Higher stats result in faster growth and better yields which are essential for automated farming.
| Stat | Effect | Target Value |
|---|---|---|
| Growth | Speed of plant maturation | 21–23 |
| Gain | Quantity and quality of harvest | 31 |
| Resistance | Protection against weeds and trampling | 0 |
Crop stats start at 1/1/1 (Growth/Gain/Resistance) for wild or newly planted crops. When crossbreeding, stats change slightly from the parent values at random.
Analysis Tools
| Tool | Availability | Method |
|---|---|---|
| LV Scanner / Cropnalyzer | Early game | Requires harvesting for seed bags |
| Portable Scanner | Recommended | Right-click planted crops directly |
| Scanner | MV | Put seed bags inside of the machine |
Target Stats
| Stats | Purpose |
|---|---|
| 21/31/0 | For spreading high stats to other crops |
| 23/31/0 | For automated harvesting |
Stat Inheritance Mechanics
When crossbreeding crops with different stats, the resulting crop inherits an averaged value with random variation:
Example: Crossbreeding 21/31/1 with 21/31/0:
- Resistance: (1 + 0) ÷ 2 = 0.5 → rounds to 0 → final: 0 ± 2
Progression to High-Tier Crops
While stat breeding, collect and store seeds from different mutations:
- Start with ore crops from crossbreeding Stickreeds.
- Cross ore crops together for higher-tier plants.
- Continue until reaching Platina.
| Platina Growth Requirement Platina crops require Platinum Blocks to mature fully. However, they can crossbreed at growth stage 3 without the block, allowing progression before Platinum is available. |
Stats
There are a total of eight stats that affect how productive a crop is. Three of them are crop stats (Growth, Gain, Resistance), and the other three are environment stats (Nutrients, Humidity, Air Quality). The last two are temporary (Water, Fertilizer) and slowly consumed to speed up maturation. Crop stats can be manipulated by crossbreeding or other methods, and are specific to the seed bag. Environment stats depend on the block where the cropstick is at, boost the growth speed of the crop, and determine if a high stat crop's needs are met or not. Temporary stats (Water, Fertilizer, Weed-EX) are from the appropriate consumable item or an automated farming machine that can apply them.
Growth, Gain and Resistance
- Growth affects how much the crop grows per random growth tick. The higher it is, the faster the crop grows, up to 31. However, if this stat is at 24 or higher, the crop gains weed behavior and will place weeds in adjacent cropsticks, even if there are regular crops in them. To prevent this in your automated farm, make an X formation with no adjacent cropsticks, make a formation with varying Y levels to prevent adjacent cropsticks, or use the Industrial Greenhouse.
- Gain affects how many items the crop outputs, on average, when harvested. This is applied on the default number of drops, which varies from crop to crop, and goes up to 31. There's no penalty to maxing this stat, so 31 is always best.
- Resistance affects the chance of a seed bag drop when the crop is harvested off the cropstick, and also lowers the chance of a weed spawning on the cropstick from adjacent weeds. However, increasing this stat also lowers growth speed slightly, because it makes the crop more demanding of environment stats, which makes them less effective.
These stats can and should be worked on for a fast and efficient automatic farm, focusing on Growth to speed up cycling. For a completely filled farm with the same Y level, the most efficient stat spread is 23 Growth, 31 Gain and 0 Resistance (23/31/0). If you have a setup that doesn't have adjacent cropsticks, the best spread is 31/31/0, which also applies to the Industrial Greenhouse.
Nutrients, Humidity and Air Quality
 | IC2 crops still need wet farmland to grow on, humidity/hydration isn't enough. |
* Nutrients depend on the biome the crop is in, more specifically the "Nutrients" stat of the biome, which maxes out at 10. On top of that, it can be boosted by up to 4 points by having up to 4 Dirt blocks under the cropstick, with a cap of 3 points for the crops that needs a block to grow fully (this block should be at the bottom of the 4). Finally, using Fertilizer also boosts the Nutrients stat: the Fertilizer value of a crop ranges between 0 and 200, and it increases the Nutrients stat by up to 10, but it can only be applied when the Fertilizer value is under 100, which means the baseline for this boost is 5.
- Humidity also depends on the biome the crop is in. To boost it further, use Farmland under the cropstick (+2 points), and make it wet from nearby water (+2 points). Finally, hydrate the crop with an IC2 Hydration Cell or provide water to your machine automation which will hydrate crops automatically (+10 points). Dry farmland will make IC2 crops disappear.
- Air Quality gets higher with a higher y level, up to 4 points at y=124 or above (y=79, 94, 109, 124 for 1, 2, 3 and 4 points), with another 2 points if the cropstick can see the sky (no blocks or only transparent blocks above). On top of that, the 8 blocks that surround the cropstick at the same y level are checked: 8 air blocks means 4 bonus points, otherwise 4 or more air blocks means 2 bonus points.
Based on this, maximizing the efficiency of your farm means choosing the right spot for it. The biome it's in is very important. The biomes with highest stats are Fungi Forest, Lush Swamp, Moor, Rainforest, Tropical Rainforest and Tropics. On top of that, putting the farm at y=128 or above is best. Until you have all of the Farmland blocks occupied, it's also a good idea to scatter the crops, so that they have the highest Air-Quality stats possible until the farm is completely filled.
One important thing to keep in mind is that every crop has a "need" for stats. That means that, depending on what crop it is, its tier and stats, it has a baseline of environment stats that it needs to grow at all. If they are not high enough, the crop can die, and just disappear from the cropstick. The higher the tier and crop stats, the more demanding the crop is of environment stats, so a max-statted tier 12 Transformium, for example, will most likely not survive in a bad biome for crops.
If it survives, however, its growth speed also checks the crop stats, and higher crop stats slow down its growth. However, this decrease is minimal, around a few % per high stat, much lower than the boost that high Growth and Gain can give. This is the reason why 0 Resistance is best for optimal growth in a good farm location, because it doesn't increase the speed of outputs and actually decreases it slightly by adding to the total stat check.
Given all this, it should be noted that the most demanding crops get boosted the most if you optimize your environment stats. Every point increase is a bigger difference for them, and as such you should pay close attention if automating max-statted crops such as Transformium, Stargatium, Space Plant, etc.
- Calculator for Environmental Needs - yellow lines are auto-filled by crop and biome chosen.
High Tiers and Special Behavior
When starting with crops, the player usually plants down Sugar Cane or other simple crops like Carrots, Potatoes or Glowflowers. The IC2 crop mechanics come into play for crops of all tiers, but after some crossbreeding time, higher tier crops will naturally appear and will often have unique mechanics. Many of them won't even grow to their last growth stage by themselves, so here are some things to remember.
To start, many different crops need a specific block under them to reach their final growth stage. This is the case for almost all, if not all ore-related crops, and their outputs cannot be collected without that block, unless they are Oreberries. For highest efficiency, this block should not be placed right under the dirt block where the crop is: instead, you will need to place this block within 4 tiles of the crop, with OreBerries as an example you can place it directly under the crops dirt block. This also works through stacks of crops. Allowing 2 nutrient crops to be stacked on top of each other. Usually, you can use a matching ore as a valid block, but the most reliable alternative is compressing 9 ingots of the material into a block.
If you don't place the correct block for those crops, you won't be able to collect them, but that doesn't mean they're useless! A lot of them can crossbreed at a lower growth stage, which means you can even do this on an automated farm, since they won't ever be harvested. This is a possible way to crossbreed up to the highest tiers without using blocks, although it takes longer to do it this way, simply by breaking the crops with a Spade right-click. Since crossbreeding is effectively random, you can stumble upon higher tier, more valuable crops this way.
On top of this, high-tier crops are more demanding of environment stats. The math to calculate this is very complicated and hard to specify, but the general rule is that they will require those higher stats to grow fast, if at all. High crop stats add onto the pressure of a high tier, and this means that these crops may just disappear if they have high stats when placed in poor conditions. If this happens, it's simply because the random growth tick generated a number that the environment stats could not match up to. With a single failure, the crop disappears.
Aside from crop death, this factor also means that high-tier crops get a bigger boost in growth speed than slow crops, when the farm is switched to a better spot for environment stats. Such developed farms should be placed in the best spots possible, because high-tier crops already have a naturally slow growth speed, and any increases to it can be very harmful to the speed of crop outputs overall.