GT New Horizons · Getting started
Commands and Configurations
Below are some of the things players may want to turn on/off at various points to customize their gameplay experience, or use to fix game breaking issues. This includes game mechanics, such as Taint, Warp and Pollution that may be impacting difficulty. Many of the in-game commands require the player to either have Cheats enabled or be OP'd / have Admin rights for the server. Single Player worlds can be opened to LAN to temporarily enable Cheats if this was not enabled on world creation.
 Important: | This page uses standardized formatting for commands!
Plain commands are spelled out in a code block. Type them exactly as shown.
Menu chains are shown with > in between each step.
Filepaths are shown with |
Overlay Elements
The overlays can get a bit cluttered, but most of its parts can be toggled as needed.
Remove the status icons in the upper left.
Esc > Mod Options… > Adventure Backpacks > Config > graphics > status > enable overlay > false
The map in the (default upper right corner) is JourneyMap. Configure it with (default J), then the Options button.
Options > MiniMap Preset 1/2 > Enable MiniMap(remove checkmark to disable)- Alternately,
CTRL+(default J), orCommand+(default J)on Macs to enable/disable MiniMaps.
The text in the upper left is InGame Info XML. It has a Toggle Overlay keybind in Controls, or you can use the following commands. This also affects the armor/held item display in the middle left edge of the screen.
/igi disableturn off upper left hand corner GUI and armor durability./igi enableturn on upper left hand corner GUI and armor durability./igi configconfiguration options for InGameInfo. Also accessible from Mod Options...
The box in the (default lower right) is WAILA, or ‘what am I looking at’. Configure it with (default NumPad0). Change the keybind under Controls.
Numpad0 > WAILA > Show/Hide WAILA > Hidden
Configure the Galacticraft HUD overlay (oxygen tank, etc.) These two parameters can be combined to put it in any corner.
- Open
/your_instance/config/Galacticraft/core.confB:"Minimap Left"=truechange tofalseto move the HUD to the right side.B:"Minimap Bottom"=falsechange totrueto move the HUD to the bottom.
If a green box is present in the upper left corner with a glass cable frame, this is the HUD from #IndustrialCraft2 & GraviSuite
Main Menu
Silence the main menu song. If you wish to disable temporarily, its volume works off the Music slider. Replace this file (7.2mb) with a renamed copy of any of the other three (blank 4kb files).
/your_instance/config/txloader/load/minecraft/sounds/music/menu/menu1.oggReplace this file with a renamed copy of any of the other three (blanks).- Earlier versions:
/your_instance/resources/minecraft/sounds/music/menu/menu1.ogg
- Earlier versions:
- In 2.9.Beta1+ this is now configuration in this file, just remove the
music.menusection:/your_instance/config/txloader/load/minecraft/sounds.json
Disable the random block background on load screen.
- Open
/your_instance/config/RandomThings.cfg/, changeB:ModifiedBackgrounds=truetofalse.
Location of visual assets
.minecraft/config/txloader/load/mainmenu/textures/Main menu backgrounds.minecraft/config/txloader/forceload/betterloadingscreen/textures/backgrounds/loading screenshots
Accessibility
Unable to see ores, having issues with colorblindness? The Outlined Ores texture pack might help.
Loot Tables
The standard structure loot tables are handled by the Too Much Loot mod.
/your_instance/config/TooMuchLoot/loot/chest1-4 are tables specifically for lootgames dungeons./your_instance/config/EnhancedLootBags/LootBags.xmlthis table is used for reward bags given by the Quest Book.
Basic Commands
Show Chunk borders/boundaries
F9
Show lighting overlay (yellow X's can spawn mobs at night, red X's can spawn mobs at any time of day.)
F7
Toggle show/hide of entity collision hit boxes.
F3+B
Force reload Sound Manager. Can potentially fix a lack of sounds. Check that an output device has been set for the instance at the operating system level if no sound persists.
F3+S
Force reload textures / texture pack. Game screen will freeze temporarily while the reload executes.
F3+H
Show/Hide extended tooltips. (Item IDs)
F3+T
Force reload chunks. Can fix some visual glitches, such as Information Panels not displaying correctly.
F3+A
Keep items on death instead of spawning a grave.
/gamerule keepInventory true
Prevent mobs from affecting blocks. FTBUtilities already has this effect in claimed chunks.
/gamerule mobGriefing falseSet totrueto restore mob griefing.
Disable mob spawning. Similar to Peaceful but does not alter other damage sources.
/gamerule doMobSpawning falseSet totrueto restore mob spawning.
Turn off fire spread.
/gamerule doFireTick falseSet totrueto allow fire spread.
Turn off ALL animations.
F3, thenShift+Ctrl+Nswitches the animations mode on the right of F3 screen.
Share your location in chat
/sharewhereiam
Teleportation
Teleport to other planets.
 Caution: prior to 2.2.9 this command does not have a cancel option once invoked, and will drop the player high up in the sky. Not intended for use outside of fixing game breaking bugs or creative testing.
/dimensiontp <player>
Teleport to other dimensions. The first player name is always the player teleported. The destination can be specified by another player, a dimension ID or coordinates and dimension ID. If no coordinates are given, the player will be teleported to that dimension's spawn.
/cofh tpx <player> <another player>/cofh tpx <player> [x] [y] [z] <dimension ID>
Teleport to set anchors. Requires the GTNH fork of FTB Utilites/Library or ServerUtilities installed.
/sethome <location>Sets "location" as a destination. Can be any string./delhome <location>Deletes "location" as a destination./home <location>Teleports the player to destination "location"/home listList of all the player's sethome destinations./spawnTeleports the player to spawn./backTeleports back to the previous location before using a /home. Only works once.
Debugging and Diagnostics
Display TPS (ticks per second), helpful for diagnosing some lag problems. The numbers appear in the top left corner in the format: Lowest ticktime(highest TPS), average ticktime(average TPS), highest ticktime(lowest TPS) The average tick time and TPS are the important numbers- as long as your tick time is below 50, your TPS should be 20, if it goes above 50, your TPS will decrease.
/xu_tps
Forge's Display TPS, which also lists other dimensions with the average tick time & TPS for each.
/forge tps
Show Overall TPS, tick time, loaded dimensions/chunk counts, and entities/tile entities counts.
/cofh tpsList of loaded dimensions and their TPS. Scroll up in chat to see all./cofh tps aEntity counts / TPS percentages
Bring up Opis, a network and lag debugging tool.
/opis
Show NBT data for the item in hand.
/mt hand/iih
Spawn items, including those that do not show up in NEI. Requires mod ID & namespace IDs or numerical Item IDs and possibly metadata. Replace <player> with a player's name, usually your own. <quantity> is the amount of item given. [metadata] is optional, only needed to specify a subtype of an item. Not every item has metadata.
/give <player> <modID:namespaceItemID> <quantity> [metadata]- Example:
/give Steve gregtech:gt.metaitem.01 64 2500gives a player named Steve a stack of Diamond Dust.
- Example:
/give <player> <itemID> <quantity> [metadata]/give Alex 7195 64 2500does the same thing for player Alex, but using item ID instead of namespace ID.
Delete specified entities amongst those that are loaded.
Caution: This will include villagers, horses and even nodes if the * command is used.
/cofh killallKills all hostiles./cofh killall *Kills ALL entities and tile entities./cofh killall <partialName>kill entities matching <partialName>
Count, replace or remove specific blocks. Can be defined as a set cubic area or as a radius around the player. See CoFH Commands for full parameters. <block ID>, <placed block> and <target block> should be in format mod:block, ex: minecraft:grass. Use # to define a metaID, ex: minecraft:planks#3 is jungle planks. Case sensitive.
/cofh countblocks <player> <x radius> <y radius> <z radius> <block ID>Count blocks of the specified ID around the player/cofh replaceblocks <player> <x radius> <y radius> <z radius> <placed block> <target block>Change the target block into the placed block, in the specified area around the player./cofh replaceblocks <player> <x1> <y1> <z1> <x2> <y2> <z2> <placed block> <target block>Replace blocks inside a rectangular cuboid between the defined coordinates.
Spawn a chest at the player's location using the chosen loot table file.
/loot spawnDebugChest <file name> [x] [y] [z]Replace <file name> with a valid loot table file name, no extension. [x] [y] [z] are coordinates for spawning the chest in locations other than the player's feet.
Delete all loaded item entities on the ground.
/cofh killall item
Kill erroring entities and/or tile entities causing the server to crash. WARNING: Do not leave this enabled, do not invoke without a good reason (entity issue suspected) and make a backup before attempting.
- Open
your_instance/config/forge.cfg, then findB:removeErroringTileEntities=false, change totrueB:removeErroringEntities=false, change totrue
Output a log of all forced chunks to /your_instance/logs/GregTech.log
/gt chunks
Recover items from a player's grave. Requires cheats enabled; open to LAN and turn on cheats if necessary. Tab key can be used to cycle though valid grave file names after entering the player's name. Use the file ending in .grave rather than .death, otherwise baubles will not be returned.
/ob_inventory restore <player> <file>
Force Twilight Forest progression. <player> is the name of the player for whom to adjust progress. For <boss> specify past which boss the progression would be set. List of valid bosses: none, naga, lich, mooshroom, hydra, knights, urghast, yeti, snowqueen, giants, final.
/tfprogress <player> <boss>
Unlock specific achievements.
/achievement give <achievement> <player>finding the achievement ID may be hard.
ServerUtilities/FTBUtilities
Edit NBT data. Also has a keybind option under Esc > Options > Controls > Server Utilities > Edit NBT (Default NONE).
/nbteditdefaults to the block or entity looked at./nbtedit item- Edits the currently held item's NBT./nbtedit block <x> <y> <z>- Edits block at the given X, Y and Z co-ordinates./nbtedit entity <id>- Edits the entity for the provided <id> value./nbtedit player <player>Edits the named player.
Enable creative flight, even in other game modes.
/flytoggles on/off
Heal the specified player. Replace <player> with the player's name.
/heal <player>
Mod Specific
AngerMod
Disable mobs exploding or being angered by mining ores, etc.
/your_instance/config/GTNewHorizons/angermod.cfg, in the sectionmodulecontrol, set the features you want to disable tofalse.
Applied Energistics 2
- The
Pick Blockkeybind (Default: Middle Mouse Button) is also what AE2 uses to enable its "craft more of an item that is already stored" functionality in a standard Crafting Terminal.
AromaBackup
Trigger a manual backup with AromaBackup
/backup
Configure backups kept by AromaBackup.
/your_instance/config/aroma1997/AromaBackup.cfg>- Frequency of backups: find
I:delay=30, number represents minutes, 0 disables backups. - Number of backups: find
I:keep=20, change to 0 to never delete backups.
- Frequency of backups: find
Better Builder's Wands
Undo the last Wand placement of blocks from BetterBuildersWands (does not work with OpenBlocks Wands)
/wandOops
Better Questing
Reload/update the Quest Book. Always use this command after updating the pack (pre 2.4.0). After 2.4.0, this should be automatic but can still be used if new quests are not showing up correctly.
/bq_admin default load/bq_user refresh- manually force a resync of triggers for party progress./bq_user help- spawns the "BetterQuesting Starter Guide" book. Right-click in the air to open.
Fix a broken quest that won’t complete. First check it's not a crafting task you haven't actually crafted, and you have the exact item it wants. If you are on a server try logging out/in again first; repeatable quests sometimes get stuck. Requires cheats enabled. Open to LAN if needed and not on by default.
F3 + HFirst to enable extended tooltips. This will let you see quest ID#s in the quest book, after the name/bq_admin complete <questID> <player>Do not include the # symbol. Replace <questID> and <player> with the appropriate values.- Quest ID's can be shown with F3+H for extended tooltips
- Or in newer versions of BQ, right click a quest to get a "Copy Quest ID" option
/bq_admin editUse this command instead if you have many quests to change./bq_admin reset all <player>Resets ALL quests. Use only if you want to start over!/bq_admin reset <questID>Reset a specific quest. Ensure you have extended tooltips on to see quest IDs. do not include the # symbol./bq_admin hardcoreEnable hardcore mode, starting with three lives.
Caution: Running out of lives deletes your world.
CraftPresence
Rebind the CraftPresence menu key to something other than (default ~).
ESC > Options > Controls > CraftPresence - Controls, changeConfig GUI Keybind
or
- Open
/your_instance/config/craftpresence.json, find"configKeyCode": 41, change it to"configKeyCode": 0for unbound or any other keycode as desired.
Draconic Evolution
Disable Item Dislocator sound while magnetizing items.
- Open
/your_instance/config/DraconicEvolution.cfg, then find:B:"Item Dislocator Disable Sound"=false, change totrue
Blacklist specific items from the Item Dislocator's pickup, in format mod:item|meta, use /mt hand or enable extended tooltips to find the correct designations. One item per line.
- Add items to
S:"Item Dislocator Blacklist"
Change the HUD display location for Draconic items.
- Open
/your_instance/config/DraconicEvolution.cfg, then find:I:"Hud Display X pos"=7I:"Hud Display Y pos"=874
Forestry
Output a log file of all the player's bee breeding statistics to /your_instance/config/forestry/stats/your_player_name-bees.log
/forestry bee save
Delete all butterflies in the world.
/forestry butterfly kill
FTB Utilities (ServerUtilities)
| Important: | As of Version 2.6.0, FTBUtilities has been replaced with ServerUtilities which will be maintained going forward. |
Claim Chunks
Open in-game inventory, click on the map icon ( ) to the left, then left click on chunks to claim. Right-click to unclaim. Claimed chunks are marked with a green border/overlay in FTBU, or the appropriate team color in SU. Click-drag to claim/unclaim multiple chunks as once with SU.
Chunkload Chunks
Open in-game inventory, click on the map icon () to the left, CTRL-left click on a claimed chunk to chunkload it. The border/overlay will turn red. If you're on a GT:NH version of FTB Utilities (after 1.1.1-GTNH) you can CTRL-left click on a chunk directly to claim and load it in one click. For Mac users, try Command+left click. ServerUtilities - use Shift instead. Shift right-click to unclaim. Hold Shift and click-drag to claim and load multiple chunks at once. Chunks can also be unclaimed from within Journeymap.
Chunk Claim data is stored at /your_instance/saves/your_world/LatMod/ClaimedChunks.json
Maximum Chunks
Adjust the maximum number of allowed chunkloaded chunks, claimed chunks and /home commmands per player. Note there are three values for each, admin/OP, VIP and normal player. In single player, the admin values are used.
Make sure to activate ranks, otherwise changing these values has no effect!
- FTBU: Open
/your_instance/local/ftbu/config.json, then"max_loaded_chunks":Change the total chunkloaded chunks per player."max_claims":Change the total number of claimed chunks per player."max_homes":Change the allowed number of /home registrations.
- SU: Open
/your_instance/serverutilities/server/ranks.txt, thenserverutilities.chunkloader.max_chunks:Change the total chunkloaded chunks per player.serverutilities.claims.max_chunks:Change the total number of claimed chunks per player.serverutilities.homes.max:Change the allowed number of /home registrations.
Backups
Trigger a manual backup (admin privileges required)
- FTBU:
/admin backup start - SU:
/backup start
Configure the amount and frequency of backups kept. The oldest backups get automatically deleted as the keep value is exceeded.
- FTBU: Open
/your_instance/local/ftbu/config.json, then- Find
"backup_timer": 2.0,change number of backups per hour. - Find
"backups_to_keep": 3,change number of maximum backups kept.
- Find
- SU: Open
/your_instance/serverutilities/serverutilities.cfg, then- Find
"backup_timer": 2.0,change the number of hours between backups. - Find
"backups_to_keep": 3,change number of maximum backups kept. - Find
"enable_backups", set totrueto enable automatic backups.
- Find
Edit FTB's configuration file from within Minecraft.
- FTBU:
/edit_config ftbu
Edit FTB's Server Information settings from within Minecraft.
- FTBU:
/admin server_info
TP warp and home - see Teleportation
Creative commands - see Debugging & Diagnostics
Bring up a Trash Can GUI. Anything placed in the Trash Can inventory will be permanently deleted when it's closed. Also has a keybind option under Esc > Options > Controls > Server Utilities > Trash Can (Default NONE).
/trash_can
GregTech
Toggle GregTech Pollution mechanic. Be aware this will not remove existing pollution, so let it clear up first. It also disables natural pollution decay and machines that interact with pollution.
/your_instance/config/GregTech/Pollution.cfg> findB:"Activate Pollution"=true, change tofalse
Add or remove Pollution. Positive numbers will increase the current chunk's gibbl, negative numbers will reduce it by that amount.
/gt pollution <amount>Replace <amount> with an integer.
Restore default spawner breaking difficulty. The config has been changed to the second option in later versions.
/your_instance/config/GregTech/GregTech.cfg> findB:harderSpawners=true, change tofalse./your_instance/config/GregTech/GregTech.cfg> findB:hardermobspawners=true, change tofalse.
After v2.8.x it's under:
/your_instance/config/GregTech/GregTech.cfg> findB:harderMobSpawner=true, change tofalse.
Disable machine explosions.
/your_instance/config/GregTech/GregTech.cfg> findmachines {, change any of these:B:explosions_on_nonwrenching=true, change tofalseB:fire_causes_explosions=true, change tofalseB:lightning_causes_explosions=true, change tofalseB:machines_explosion_damage=true, change tofalseB:machines_flammable=true, change tofalseB:rain_causes_explosions=true, change tofalse
After v2.8.x the Parameters names changed a bit:
/your_instance/config/GregTech/GregTech.cfg> findmachines {, change any of these:B:machineExplosions=true, change tofalseB:machineFireExplosions=true, change tofalseB:machineFlammable=true, change tofalseB:machineNonWrenchExplosions=true, change tofalseB:machineRainExplosions=true, change tofalseB:machineThunderExplosions=true, change tofalseB:machineWireFire=true, change tofalse
Remove the automatic aggro of Enderman or Zombie Pigmen when ores are mined.
/your_instance/config/GTNewHorizons/angermod.cfg> find- Enderman >
S:EndBlocks, remove linegregtech:gt.blockores - Zombie Pigmen >
S:NetherBlocks, remove linegregtech:gt.blockores - All Block Break Aggro >
B:BlockBreakEnabled=true, change tofalse
- Enderman >
Space Project - Share multiblock powerfail messages with other players.
/sp invite <player>Replace<player>with the teammate's account name.
Galacticraft
Allow space station to be chunkloaded. Must be run from within the Space Station dimension with admin rights. Still requires some form of chunkloading to remain force loaded.
/gckeeploaded
Allow/disallow players access to your Space Station.
/ssinvite <player>Replace<player>with the teammate's account name. Allows access./ssuninvite <player>Replace<player>with the teammate's account name. Removes access.
See also: Commands - Galacticraft Wiki
IndustrialCraft2 & GraviSuite
| Important: | As of 2.4.0, the keybinds for IC2/GraviSuite are set to NONE by default. |
Keys must be set in Options > Controls > for ALT Key, Boost Key, Hub Expand Key and Mode Switch Key to use IC2 equipment & tools properly.
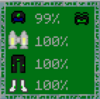
Toggle the green HUD box in the upper left corner. Has three modes, disabled, basic, and extended. Basic lists power charge for a helmet, chestpiece, pants and boots. Extended also has text/tooltip for the held item. Disabled turns the HUD off.
- Press
IC2 ALT Key+IC2 Hub Expand Keywhile wearing IC2 gear to cycle.
Toggle Night Vision, including on the NanoSuit Helmet and QuantumSuit Helmet. Night Vision will take ~10-15 seconds to fade after being turned off.
- Press
IC2 ALT Key+IC2 Mode Switch Keywhile wearing helmet to toggle.
Turn IC2 jetpack engines on and off. Includes QuantumSuit Bodyarmor.
- Press
IC2 Boost Key+IC2 Mode Switch Keywhile wearing jetpack to toggle engines.
Toggle Hover Mode/Levitation for other Jetpacks (including Gravitation Suite's GraviChestPlate)
- While flying/ascending with jump (default Space Bar), press the
IC2 Mode Switch Key
Toggle QuantumShield for Quantumsuit GraviChestPlate. If the message "Can't find Shield relays; Shield cannot be activated" appears, one or more of the Quantum armor pieces are missing (helmet/chestplate/leggings/boots).
- While sneaking (default shift), press the
IC2 Mode Switch Key
Turn GraviSuite's jetpacks on/off (Advanced Electric Jetpack, Advanced NanoChestPlate, GraviChestPlate)
Gravi Fly Key(default NONE)
Toggle Vajra's Silk Touch mode.
IC2 Mode Switch Key+ Right Click
Spawn Seed Bags for specific crops. Use /mt hand with a spawned seed bag from NEI to get the name and owner values. Alternatively, bookmark one or more seed bags, close the game and open the /your_instance/saves/NEI/global/bookmarks.ini text file, edit as desired and relaunch.
/give <player> IC2:itemCropSeed 1 0 {growth:<#>,gain:<#>,resistance:<#>,name:<nameID>,owner:<owner>,scan:<#>}- growth, gain and resistance: must be a number between 0 and 31
- nameID: The in-game name of the plant, e.g.
Red Stonelillyor an ID value e.g.11is stickreed - owner: the associated mod of the plant, e.g.
berriespp,gregtechorIC2 - scan: digit between 0 and 4, inclusive. 0 is unidentified (displays as Unidentified Seeds), 4 is fully identified.
Infernal Mobs
Adjust Infernal Mobs allowed traits.
- Open
/your_instance/config/InfernalMobs.cfg> findgeneral {, choose which traits to turn off by changingtruetofalse.
Disable Infernal Mobs.
- Open
/your_instance/config/InfernalMobs.cfg> findpermittedentities {, and change alltrueentries tofalse
Inventory Tweaks
Inventory Tweaks configuration options can accessed by pressing the [...] button in any inventory. It has a keybind for quick inventory sorting (default R) that often conflicts with NEI and should be disabled or rebound. Its various shortcuts may also cause unintended actions. They can be disabled with Shortcuts: OFF from the [...] menu.
ESC > Options > Controls > Inventory Tweaks, changeInventory Sorting(default R)
| Shortcut | Action |
|---|---|
Shift + click |
Move one stack, Craft all to inventory |
Control + click |
Move one item, Craft to inventory |
Alt + click |
Drop |
Control + Shift + click |
Move all of one item |
Space + click |
Move everything, including hotbar |
0-9 + click |
move to hotbar slot |
| Any shortcut + right-click | Same scope, but drops instead |
Morpheus
Adjust the percentage of players who must be in beds in order for night to pass (Multiplayer only)
/server_instance/config/Morpheus.cfg> findI:SleeperPerc=50and change percentage.
Personal Space
Give a player a personal space portal, should something happen to their original portal block to their Personal Dimension.
/pspace give-portal
Give a player a personal space portal, already set to a specific personal dimension and/or spawn point. Replace <player> with a valid player's name. Replace <dimension> with a valid personal space dimension ID number. [x] [y] [z] should be replaced with valid X, Y and Z coordinates if used.
/pspace give-portal <player> <dimension> [x] [y] [z]
List all personal space dimensions to the console.
/pspace ls
Output the personal space dimension ID a player is occupying. Replace <player> with a valid player's name.
/pspace where <player>
Unlock worldgen settings for Personal Dimension, once. Replace <dimension> with a valid personal space dimension ID number. Must be run by a server admin.
/pspace allow-worldgen-change <dimension>
Change visual settings for a Personal dimension.
- Shift-right-click on an active portal
Teleport to Personal Dimensions. <player> should be replaced with a player's name. [x] [y] [z] should be replaced with valid X, Y and Z coordinates. If omitted the teleport will drop the listed player at the portal's spawn point.
/pspace tpx <player> DIM [x] [y] [z]
Random Things
Adjust Blood Moon parameters; frequency, ability to sleep, visual effects.
- Open
/your_instance/config/RandomThings.cfg/and find:D:BloodMoonChance=0.05, set to a fractional number between 0 and 1 (0=never, 1=every night, 0.05=5% chance)B:BloodMoonNoSleep=true, change tofalseto allow sleeping through Blood Moons.B:BloodMoonRedLight=true, B:BloodMoonRedMoon=true, B:BloodMoonRedSky=true, B:BloodMoonBlackFog=true- change tofalseto disable any of these visual elements during Blood Moons.B:BloodmoonMessage=falsechange totrueto have a chat message on Blood Moon start.I:BloodMoonSpawnLimitMult=2, I:BloodMoonSpawnRange=6, B:BloodmoonRespectGamerule=true, B:BloodmoonVanish=false- adjust the amount, range, and spawn behavior of Blood Moon mobs.
Adjust leaf decay speed.
- Open
/your_instance/config/RandomThings.cfg/and find:B:FasterLeaveDecay=trueToggles fast leaf decay, change tofalseto disable.I:LeaveDecayFuzz=5randomness setting for leaf decay.I:LeaveDecaySpeed=7overall leaf decay speed.
Spice of Life
Toggle Spice of Life's diminishing hunger/saturation when eating food.
/your_instance/config/SpiceOfLife.cfg> findB:food.modifier.enabled=true, change tofalse.
Thaumcraft
List researches needed to unlock Kami.
/iskamiunlocked
Stop Taint spread. This will not remove existing Tainted Land biomes nor stop new ones from being generated in new chunks. (currently does not seem to work)
- Esc > Mod Options… > Thaumcraft > biome_taint_spread > 0
- Alt:
/your_instance/config/Thaumcraft.cfg> changeI:biome_taint_spread=0
- Alt:
Adjust the aspect scanning notification scrolling speed.
/your_instance/config/Thaumcraft.cfg> changeI:notification_delay=5000
Change the number of notifications shown at any time.
/your_instance/config/Thaumcraft.cfg> changeI:notification_max=15
Show all Thaumcraft items in NEI, even if not yet researched.
/your_instance/config/tcneiadditions.cfg, findB:showLockedRecipes=false, change to true- Alt:
Esc > Mod Options > Thaumcraft NEI Additions > Config > general > showLockedRecipes, set totrue
Add/remove unlocked research from players.
/thaumcraft research <player> all- Unlock all research for the listed player./thaumcraft research <player> reset- Removes all research for the listed player./thaumcraft research listlists all the research codes (see Thaumcraft Research Cheatsheet for an easier to search list.)/thaumcraft research <player> <research_code>Unlock a specific research for the listed player.
Add Thaumcraft aspect research points. Change [player_name], [aspect], and [amount] for appropriate values. Research points should not exceed 99,999,999 nor be negative.
/thaumcraft aspect <player> <aspect> <amount>- specific aspect/thaumcraft aspect <player> all <amount>- all aspects
Toggle Thaumcraft Warp.
- Esc > Mod Options… > Thaumcraft > wuss_mode > set to true to disable Warp.
- Alt:
/your_instance/config/Thaumcraft.cfg> changeB:wuss_mode=true
- Alt:
Display player's permanent warp in chat text.
/checkwarp
Add/remove Warp from a player. Each type (normal, temporary and permanent) has its own command. Change <player> and <value> as appropriate. Running all three commands with 0 for <value> removes all current Warp, but does not stop new acquisitions or equipment from applying it. add can be used instead of set to increment a player's Warp instead of making it a specific value.
/tc warp <player> set <value> TEMP- change temporary warp/tc warp <player> set <value>- change normal warp/tc warp <player> set <value> PERM- change permanent warp
Manually alter Warp, research points, or research known. This data is stored in your_instance/saves/your_world/playerdata/player_name.thaum, where your_instance, your_world and player_name are all player specific strings. This file requires an NBT Editor to modify.
Thaumcraft.eldritch: #Permanent WarpThaumcraft.eldritch.counter: #Total current warp, used for warp eventsThaumcraft.eldritch.sticky: #Normal WarpThaumcraft.eldritch.temp: #Temporary Warp
Disable research minigame, making research purchasable directly with points instead.
/your_instance/config/Thaumcraft.cfg> changeI:research_difficulty=1to-1/your_instance/config/ThaumicMachina.cfg> changeI:research.concept.mode=0to1
Tinker's Construct
Level up the held tool by one.
/leveluptool
Traveller's Gear
Set a keybind for toggling a Traveller's Gear equippable item (cloaks, bracers, pauldrons, masks, amulets, belts, rings etc.). With the item in hand, do:
/travellersgear bind <#><#>must be 1, 2 or 3. binds the currently held item to one of the three slots, which must also have a key set:ESC > Options > Controls > Traveller's Gear > Active Ability1, 2 or 3 (default NONE)
Keybind to bring up the selection wheel for all equipped Traveller's Gear items.
ESC > Options > Controls > Traveller's Gear > Active Abilities(default NONE)