GT New Horizons · Insanely Ultimate Voltage (UIV)
Shielded Lagrangian Annihilation Matrix
The Shielded Lagrangian Annihilation Matrix (SLAM) is a UIV tier multiblock that generates power by reacting antimatter with matter. Create antimatter in the Semi-Stable Antimatter Stabilization Sequencer and matter in the Dimensionally Transcendent Plasma Forge. The three supported types of matter are molten copper, molten superconductor base UIV, and molten superconductor base UMV. Each one has a unique energy production boost for determining the total amount of EU generated. The SLAM burns all antimatter and matter in its input hatches every 5 seconds while active, as well as any other fluids that may have entered the machine. The antimatter and matter should be supplied at the exact same rate because an imbalance reduces the efficiency of the machine.
The total power output is based on the input amounts, the energy production boost, and the combined capacity of the laser source hatches. Using superconductor base UMV as matter also unlocks the ability to upload EU to a wireless network directly, but the power generated is still limited by the combined capacity of the laser source hatches. The maximum output of the SLAM is 9.22e18 EU per burn.
Spreadsheet: GTNH Power Planner 2.9
Construction
The SLAM has no tiered components and only two types of hatches. The input hatch(es) located halfway up the sides of the structure are for antimatter and matter, and the laser source hatches around each leg at the base of the structure are for extracting power--wireless or not. Regular and Multi-amp energy hatches are not supported. The glass can only be transcendentally reinforced borosilicate glass and has no effect on the operation of the machine. Use the Multiblock Structure Hologram Projector to visualize/build the structure.
Structure
- Controller: Front center, 2nd layer
- 4127-4128 Magnetic Flux Casing
- 2481-2544 Gravity Stabilization Casing
- 1008 Transcendentally Reinforced Borosilicate Glass Block
- 600 Antimatter Annihilation Matrix
- 292 Naquadria Frame Box
- 209 Advanced Filter Casing
- 32 Protomatter Activation Coil
- 1-64 Laser Source Hatch: Any bottom leg casing
- 1-2 Input Hatch: Either center side casing
Usage
The SLAM runs on a fixed 5 second cycle, or burn rate, which begins with consuming everything in its input hatches. That includes ALL antimatter and matter, as well as any other fluids that may have entered the machine. The antimatter and matter should be supplied at the exact same rate because an imbalance reduces the efficiency of the machine, as seen in the following equation. Fortunately, there are a few ways of accomplishing this--see the automation section below for more details.
Create antimatter in the Semi-Stable Antimatter Stabilization Sequencer and matter in the Dimensionally Transcendent Plasma Forge. The three supported types of matter are listed below with their unique energy production boosts (E). Only ONE type of matter should be supplied at any given time, or else the SLAM consumes everything without outputting any power. The amount of matter required is equivalent to the average antimatter gain per SSASS cycle.
The value of E determines the total amount of EU generated so there is a significant benefit in using the molten superconductors over molten copper. Using superconductor base UMV as matter also unlocks wireless mode, which lets the SLAM upload EU directly to a wireless network. Enable wireless mode in the GUI of the controller or by right-clicking the controller with a screwdriver.
| Energy Production Boost (E) |
Increases Power Gain
|
The total power generated is directly proportional to the amout of antimatter consumed, as seen in the following equation. Note that 1e12 is the EU/L of antimatter and E is the energy production boost from the type of matter being used. The maximum efficiency is 100%.
The SLAM immediately outputs the generated power all at once, splitting it evenly between the internal buffers of the laser source hatches. That means the EU/Burn cannot exceed the total combined capacity of the laser source hatches and they should be emptied immediately to make room for the next burn. This limitation applies to wireless mode too, even though the power is uploaded directly to the wireless network. The SLAM won't explode from too much power, but the excess EU is voided. Upgrade or add more laser source hatches when more power is needed. There is a hard limit of 9.22e18 EU/Burn which is reached with 43 UXV 16M Amp laser source hatches.
Summary
The output and power consumption of the SSASS scales faster than the power output of the SLAM with respect to the total amount of antimatter. That means the most efficient setups generally have less antimatter in their hatches, despite that producing less antimatter per second. Increase throughput by building more SSASS, not by increasing the amount of antimatter in the hatches.
The following are the most efficient setups for maximizing EU at different stages of the game, assuming only 1 SSASS. Cycle refers to the 1 second between SSASS iterations and burn refers to the 5 seconds between SLAM iterations. It is highly recommended to build more SSASS to reduce the number of cycles per burn and increase the net average EU/t. Using less energy hatches on the SLAM also reduces the number of cycles per burn, but that lowers the overall efficiency of the setup. Stay above five cycles per burn or else an excess amount of antimatter is going to be generated--or build a second SLAM. The final stage 4.5 is the theoretical maximum but the 42 UXV hatches cost 231M (L) of universium in total for only a 13% increase in EU/t. Therefore, it is not recommended and the universium should instead be used towards building the Stargate. Again, use the planner linked at the top for more information and to determine optimal setups.
Stage 1
|
Stage 2
|
Stage 3
|
Stage 4
|
| SSASS | Antimatter | Stabilization Fluid | Power Cost | ||||||||||
| Per Hatch | Per SSASS | Average Gain | Magnetic | Gravity | Containment | Activation | Passive | Active | Total | Per Burn | |||
| Stage 1 | 34,900 L | 558,400 L | 362 L/s | 747 L/s | 747 L/s | 43.9 L/s | 82.4 L/s | -1.76e12 EU/t | -6.79e12 EU/t | -8.55e12 EU/t | -2.06e16 EU | ||
| Stage 2 | 249,000 L | 3,984,000 L | 1,280 L/s | 1,996 L/s | 1,996 L/s | 76.9 L/s | 159 L/s | -3.02e12 EU/t | -3.46e13 EU/t | -3.77e13 EU/t | -3.42e17 EU | ||
| Stage 3 | 984,000 L | 15,744,000 L | 2,726 L/s | 3,968 L/s | 3,968 L/s | 114 L/s | 251 L/s | -1.80e13 EU/t | -6.53e13 EU/t | -8.34e13 EU/t | -3.55e17 EU | ||
| Stage 4 | 4,456,000 L | 71,296,000 L | 15,451 L/s | 8,444 L/s | 8,444 L/s | 175 L/s | 415 L/s | -1.06e13 EU/t | -5.02e14 EU/t | -5.12e14 EU/t | -3.85e17 EU | ||
| Stage 4.5 | 4,880,000 L | 78,080,000 L | 16,317 L/s | 8,836 L/s | 8,836 L/s | 180 L/s | 427 L/s | -1.18e13 EU/t | -5.67e14 EU/t | -5.79e14 EU/t | -4.04e18 EU | ||
| SLAM | Antimatter | Energy Hatches | Stabilization Fluid | Power Gain | |||||||||
| Per Burn | Cycles Per Burn | Amount | Tier | Amps | Total Buffer | Matter | Per Burn | Net Per Burn | Net Average | ||||
| Stage 1 | 43,646 L | 120.55 | 64 | UIV | 1,048,576 | 5.40e16 EU | 362 L/s | 5.40e16 EU | 3.34e16 EU | 1.39e13 EU/t | |||
| Stage 2 | 580,688 L | 453.57 | 64 | UMV | 4,194,304 | 8.65e17 EU | 1,280 L/s | 8.65e17 EU | 5.23e17 EU | 5.77e13 EU/t | |||
| Stage 3 | 580,688 L | 213.01 | 64 | UMV | 4,194,304 | 8.65e17 EU | 2,726 L/s | 8.65e17 EU | 5.10e17 EU | 1.20e14 EU/t | |||
| Stage 4 | 580,688 L | 37.58 | 64 | UMV | 4,194,304 | 8.65e17 EU | 15,451 L/s | 8.65e17 EU | 4.80e17 EU | 6.38e14 EU/t | |||
| Stage 4.5 | 5,693,622 L | 348.93 | 42 | UXV | 16,777,216 | 9.08e18 EU | 16,317 L/s | 9.08e18 EU | 5.04e18 EU | 7.22e14 EU/t | |||
For reference:
- A Dyson Swarm Ground Unit produces up to 3.37e11 EU/t.
- A Large Naquadah Reactor produces up to 6.65e11 EU/t.
- An Eye of Harmony produces up to 1.29e13 EU/t.
Automation
The challenge in using the SLAM effectively is preventing the antimatter and matter from entering the machine until they reach the desired target amount, and ensuring they are exactly the same to maximize efficiency.
Method 1: GregTech
The core mechanic behind this approach is using fluid regulators to insert an exact fluid amount every 5 seconds. A pair of fluid detector covers and machine controller covers disable the fluid regulators if either fluid is short. This approach is simple, compact, and scales well. There are no significant downsides.
| STEP 1 | |
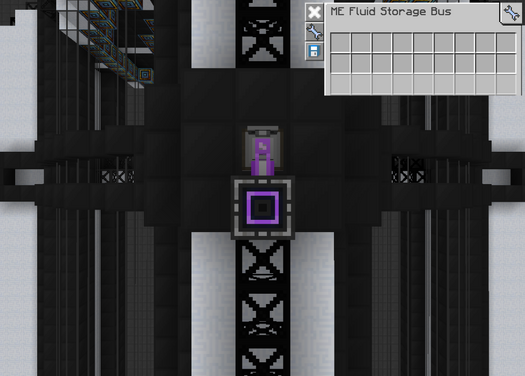
| Place a fluid storage bus set to INSERT ONLY over a quadruple input hatch on the SLAM. Connect the fluid storage bus to a wireless connector.
Power the SLAM subnetwork (purple) with a neutronium energy anchor. |
|
| STEP 2 | |
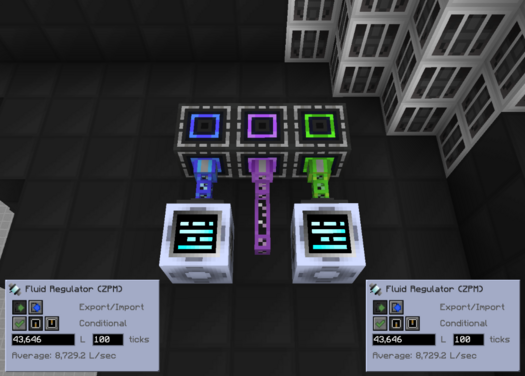
Place a wireless connector from each of the following networks to store the necessary fluids in their own buffer tanks.
Place a fluid regulator on the side of both buffer tanks facing inwards towards each other. Set their redstone behavior to CONDITIONAL and change the fluid rate to the amount of antimatter to burn every 100 ticks. The fluid rates should match so that the antimatter and matter are supplied at the exact same rate. |
|
| STEP 3 | |
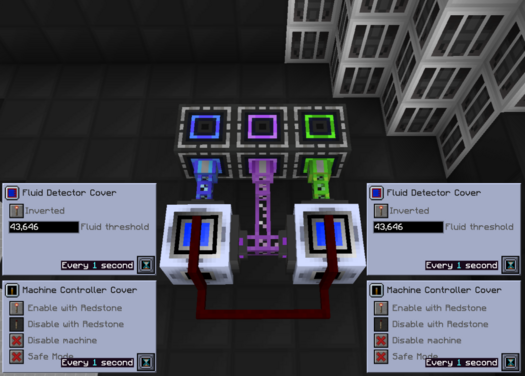
| Place an ME dual interface over both of the fluid regulators to receive the fluids and store them in the quadruple input hatch on the SLAM.
Place a fluid detector cover with INVERTED redstone behavior on both buffer tanks. Set the threshold to the amount of antimatter to burn. This guarantees that anything less than that is NOT inserted. Place a machine controller cover set to DISABLE WITH REDSTONE on both buffer tanks. These disable the fluid regulators when they receive a redstone signal from the fluid detector cover. Connect all four covers with red alloy wire. This disables both fluid regulators if either fluid is short. Optionally, add a lever to serve as a manual override. |
|
Method 2: Applied Energistics
The core mechanic behind this approach is using an AE2 level maintainer to request exact amounts of fluids every few seconds. No crafting requests are made if either fluid is short and the craft is automatically completed by a fake crafting card. This approach is simple and compact, but the level maintainer may take slightly longer than 5 seconds to make crafting requests. However, that is not usually a problem since the optimal cycles per burn is almost always greater than five.
| STEP 1 | |
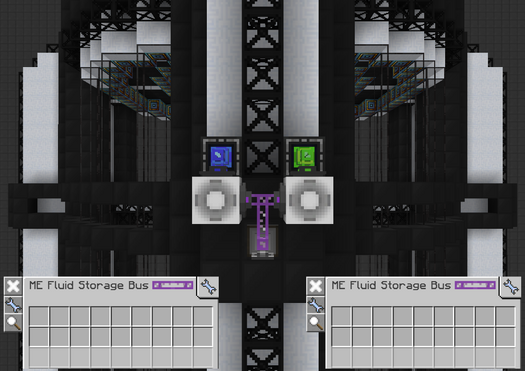
Place a wireless connector from each of the following networks to store the necessary fluids in their own buffer tanks.
Place two fluid storage buses set to EXTRACT ONLY on the SLAM subnetwork (purple) facing into the buffer tanks. This makes the fluids available to the network for crafting requests. Place an ME dual interface over a quadruple input hatch on the SLAM. Power the SLAM subnetwork with a neutronium energy anchor. |
 |
| STEP 2 | |
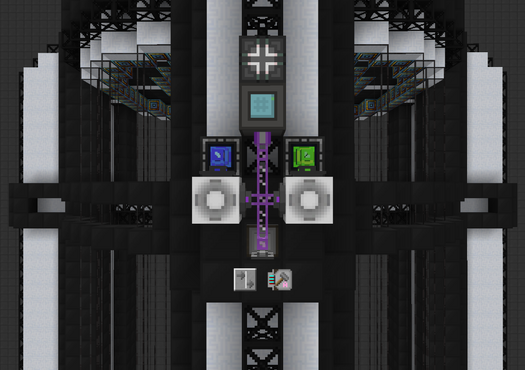
| Add an ME level maintainer and crafting storage on the SLAM subnetwork (purple). The level maintainer automatically makes any crafting requests with the fluids from the buffer tank.
Also enable BLOCKING MODE and insert a fake crafting card into the ME dual interface on the SLAM subnetwork. This prevents crafting requests from stacking on top of each other and automatically completes them as soon as the fluids are inserted. |
|
| STEP 3 | |
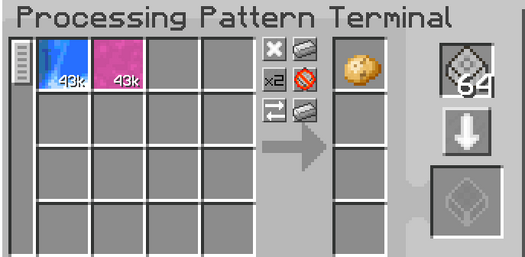
| Pattern a "dummy" item that takes exactly the amount of antimatter and matter needed per burn. The example to the right is for stage 1 or 43,646L of each.
Place the pattern in the ME dual interface on the SLAM subnetwork. This is used by the level maintainer to make automatic crafting requests. The dummy item is not actually needed anywhere on the subnetwork because a fake crafting card completes requests before receiving the final output. |
|
| STEP 4 | |
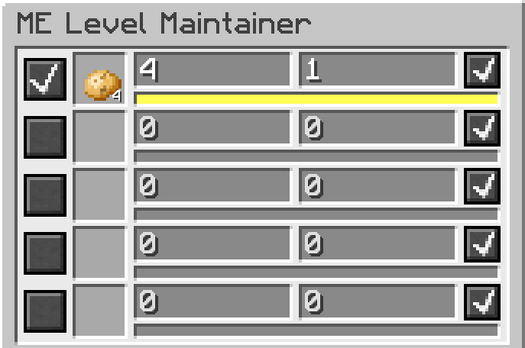
| Make a request for 4 total dummy items in the level maintainer (which it will never obtain) and set the batch size to one.
This requests the exact amount of antimatter and matter specified in the pattern and does not move any fluids until there is enough of both. The blocking mode also prevents it from inserting anything if there are fluids inside the quadruple input hatch already. |
|
Method 3: OpenComputers
The core mechanic behind this approach is using an OpenComputers script to move an exact amount of fluids on a set interval. The script also stops automatically if either fluid is short. Note that a microcontroller cannot be used here because it does not move fluids as quickly as a regular transposer. This approach is compact and scales well. The only downside is that OpenComputers may be slightly confusing if not used before, but the following guide walks through every step of setting it up.
| STEP 1 | |
Place a wireless connector from each of the following networks to store the necessary fluids in their own buffer tanks.
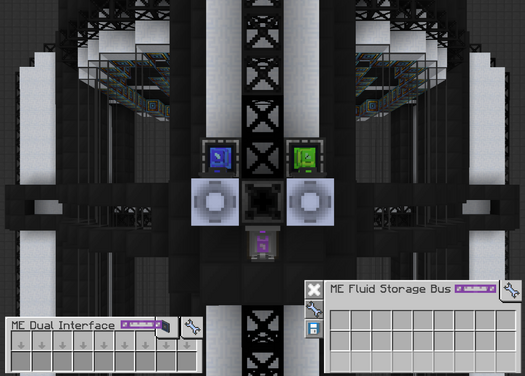
Place a ZPM+ transposer in between the two buffer tanks and an ME dual interface directly underneath. Take note of the cardinal direction (east, west, north, south) of the buffer tanks relative to the transposer. Place a fluid storage bus set to INSERT ONLY over a quadruple input hatch on the SLAM. Power the SLAM subnetwork (purple) with a neutronium energy anchor. |
|
| STEP 2 | |
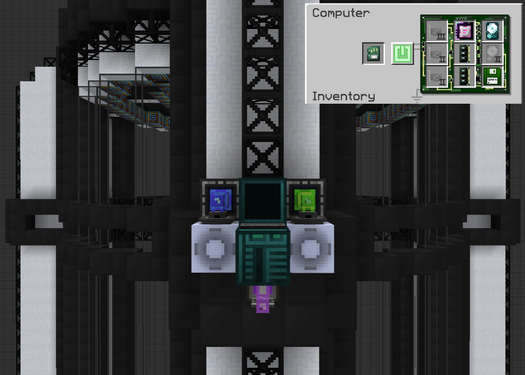
| Place a computer case (Tier 3), a screen (Tier 3), and a keyboard as shown. All the components must be touching to interact with one another.
Insert the bare minimum components into the computer case. These could be even lower tier but there is no reason not to use the best components.
Power the computer with an AE2 cable from the SLAM subnetwork (purple). After booting up, follow the commands on screen to install OpenOS.
|
|
| STEP 3 | |
Create a new script by typing edit slam.lua. The name is not important. Copy the code on the right into the script. Use middle-click to paste.
Edit the side values as necessary. Press CTRL+S to save and CTRL+W to exit. Use the same edit command to change the code at anytime. The only thing that ever needs to change is the target amount, or the amount of antimatter to burn. The example to right is for 43,646L specifically. Launch the script by typing |
local sides = require('sides')
local component = require('component')
local t = component.proxy(component.list('transposer')())
local target = 43646

while true do
  -- Extract Fluid
  local level1 = t.getTankLevel(sides.west)
  local level2 = t.getTankLevel(sides.east)

  if (level1 >= target) and (level2 >= target) then
    t.transferFluid(sides.west, sides.down, target)
    t.transferFluid(sides.east, sides.down, target)
  end

  -- Sleep 5 Seconds
  os.sleep(5)
end
|
Method 4: Steve's Factory Manager
The core mechanic behind this approach is using Steve's Factory Manager (SFM) commands to pull the appropriate amount of antimatter and matter from buffer tanks and inserting it into the SLAM every 5 seconds. This approach is simple and compact but it cannot properly check for fluid amounts greater than 1,000,000L.
| STEP 1 | |
Place a wireless connector from each of the following networks to store the necessary fluids in their own buffer tanks.
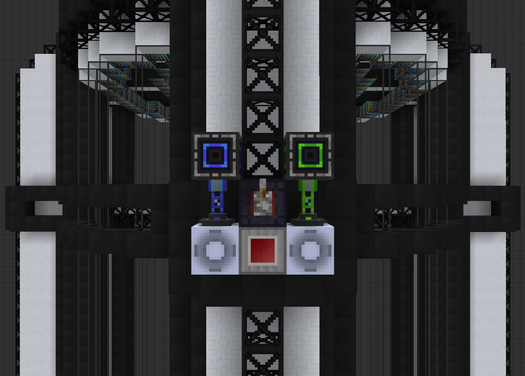
Place a machine inventory manager in between the two buffer tanks and a redstone receiver with a lever on top. There is a quadruple input hatch on the SLAM just behind the machine inventory manager. |
|
| STEP 2 | |
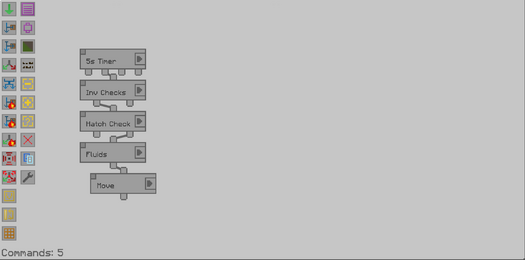
| The remaining steps are done within the machine inventory manager. The image to the right is the complete and finished program. Use it as a reference for the commands defined in the next step. Click to enlarge any of the images.
If a setting/page of a command is not shown, assume that it is left to the default settings. |
|
| STEP 3 | |
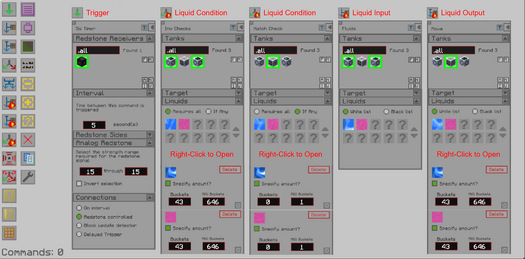
| Define the commands for the insertion. Start with a 5s trigger controlled by the redstone receiver. This allows the lever to serve as a manual override.
The first liquid condition verifies that the buffer tanks have enough antimatter and matter for the next burn. The example to the right is for 43,646L specifically. The second liquid condition verifies that the quadruple input hatch is actually empty. The liquid input and liquid output then move the antimatter and matter from the buffer tanks into the quadruple input hatch. |
|
Trivia
- The maximum output of 9.22e18 EU per burn comes from the maximum value of a signed 64-bit long (263 - 1).
- Scanning one of the laser source hatches may sometimes show a negative value for the energy stored. That is caused by an integer overflow and is automatically corrected at the end of each cycle.
- In the field of robotics, SLAM refers to Simultaneous Localization and Mapping.