GT New Horizons · Stone Age
Food
Food in GregTech New Horizons has been massively overhauled from the traditional vanilla experience. Most basic and raw foods are nerfed to encourage making more complex and advanced meals. The player has five different nutrients (Dairy, Fruit, Grain, Protein, and Vegetable) that they must sustain in order to stay healthy. And eating the same food more than four times out of the last twenty significantly slows eating and reduces the food's nutritional value.
These changes make the Stone Age and Steam Age much more challenging, but there are some benefits. Eating quality foods grants a stackable Well Fed or health regeneration buff. Sustaining all five nutrients at a high level grants strength, resistance, haste, and toughness. And eating many different foods grants up to 64 bonus hearts. It also feels much more rewarding to obtain the Healing Axe, an unbreakable tool that automatically restores hunger and saturation when held in hand.
For early game tips and tricks, skip down to the Early Food section.
Hunger Overhaul
Most basic and raw foods are nerfed to encourage making more complex and advanced meals. A cooked porkchop, for example, only restores two shanks of hunger in GTNH instead of the normal eight. The rate at which hunger drops is also increased by 33%. This makes it much more difficult to sustain a full hunger bar and reshapes most of the early game around food. If managed poorly, the player is going to suffer the severe consequences of being hungry, as listed below in the following table. Always bring a surplus of food when going mining or exploring.
| Hunger Level | Effect |
| 14 Shanks | "Peckish" status alert. |
| 10 Shanks | "Hungry" status alert. |
| 6 Shanks | "Starving" status alert, lose the ability to sprint. |
| 4 Shanks | Slowness I, Mining Fatigue I. |
| 3 Shanks | Slowness II, Mining Fatigue II. |
| 2 Shanks | Slowness III, Mining Fatigue III, Weakness I |
| 1 Shank | Slowness IV, Mining Fatigue IV, Weakness II, Nausea |
| 0 Shanks | Lose 1 heart every four seconds (does not kill). |
Hunger Overhaul also adds the Well Fed buff which boosts health regeneration after eating any type of food. The length of the buff depends on the quality of the food eaten and can stack for an extended period of time. The quality of a food is visible in its tooltip, ranging from unfulfilling snack to wholesome feast.
Getting Seeds
Hunger Overhaul changes how early seeds are obtained in GTNH. Breaking Tall Grass does not drop seeds. Instead, using a Hoe or Tinkers' Construct Mattock on a Grass Block without nearby water turns it into Dirt and has a 1 in 4 chance to drop a random seed from the following list:
- Vanilla Wheat Seeds
- Natura Barley Seeds
- Natura Cotton Seeds
- Witchery Artichoke Seeds
- Witchery Belladonna Seeds
- Witchery Mandrake Seeds
- Witchery Snowbell Seeds
- Witchery Wolfsbane Seeds
- Witchery Garlic Seeds
Nutrition
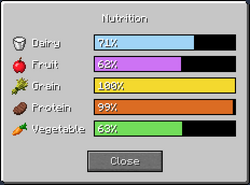
Nutrition is a mod that encourages dietary variety. The player has five different nutrients (Dairy, Fruit, Grain, Protein, and Vegetable) that they must sustain in order to stay healthy. Dropping low on one or more has adverse negative effects, but keeping them all high grants positive effects. Press "N" or click the carrot button inside your inventory to open the nutrition window and see your current nutrient levels. Each one is represented as a percent out of 100, as seen in the image below. New players start with 50% in all nutrients.
Foods with at least one nutrient have it listed in their tooltip along with a percent value, or the amount of each nutrient restored upon consumption. Stuffed eggplant, for example, has dairy, protein, and vegetable (2.1%) which means eating one restores all three of those nutrient levels by 2.1%.
The equation for calculating the amount of nutrients gained is listed below, but there is no reason to ever have to use it. Note that it scales with the total number of shanks of the food and there is a slight penalty for those with more than one nutrient.
Nutrient levels decay slowly over time. They each drop by 0.075% per hunger shank lost, which is approximately 1333 shanks to go from 100% to 0% in any nutrient--more than enough to sustain all five categories if the player is paying attention at all. Death also drops each nutrient by 15%, but does not reduce them below 30%.
Status Effects
Nutrition applies the following status effects based on the player's average nutrient level. These can have significant consequences in the early game while fighting mobs or mining underground.
| Status Effect | Effect(s) | Activation Condition |
| Mining Fatigue | -10% attack speed, mining speed decreased by 70% | Average nutrition is less than 20% |
| Weakness | Decreases melee damage by 2 hearts | Average nutrition is less than 10% |
| Strength | Increases melee damage by 1.5 hearts | Average nutrition is greater than 70% |
| Resistance | Reduces incoming damage by 20% | Average nutrition is greater than 80% |
| Haste | +10% attack speed, +20% mining speed | Average nutrition is greater than 90% |
| Toughness | +2 hearts and +20% knock-back resistance per tier | Each additional nutrient above 90% grants an additional tier |
Commands
Nutrition adds five commands to the game. The nutrient name must be lower case.
/nutrition <get> <player> <nutrient>gets the current nutrient value of a player./nutrition <set> <player> <nutrient> <value>sets the current nutrient value of a player./nutrition <add> <player> <nutrient> <value>adds nutrients to a player./nutrition <subtract> <player> <nutrient> <value>subtracts nutrients from a player./nutrition <reset> <player> <nutrient>resets a nutrient value back to 50%. Leaving nutrient blank resets all five.
Interactions
There are a few items and armor in GTNH that have a unique interaction with the nutrition system.
- Healing Axe - Increases nutrients by 0.4% per shank restored, up to 50%.
- Filled Tin Cans - Does NOT increase nutrients. Only restores hunger and saturation.
- Quantumsuit Helmet - Increases nutrients by 0.2% per shank restored, up to 50%.
- Infinity Helmet - Increases nutrients by 0.2% per shank restored, up to 50%.
Top Foods
|
|
Spice of Life
Spice of Life is a mod that also encourages dietary variety, especially when combined with Hunger Overhaul and Nutrition. Eating the same food more than four times out of the last twenty significantly slows eating and reduces the food's nutritional value. However, by eating many unique foods, players can permanently gain bonus hearts, up to 61, for every 50 shanks worth of food eaten. Spice of Life also introduces a few new items and commands to help carry food around and track player progress. See the spreadsheet below for more information on all the foods available in GTNH and a complete food checklist (organized by difficulty and type) to help those striving for 100% completion.
Spreadsheet: GTNH Spice of Life Tracker 2.9
Items
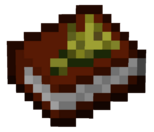
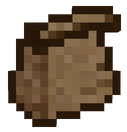
| The Food Journal records information about the player's progress including total shanks eaten, total bonus hearts, and shanks until next bonus heart. It also lists every unique food the player has eaten in alphabetical order. | The Lunch Bag is a quest reward at the beginning of the Stone Age tab in the quest book. It has three slots for three different kinds of food (and only food). Right-click to open and close. | The Lunch Box is a craftable item and an upgraded version of the lunch bag, also available in the Stone Age. It has six slots for six different kinds of food (and only food). Right-click to open and close. |
 |
 |
 |
Commands
Spice of Life adds three commands to the game.
/foodlist size [player]displays a message in chat about a player's food stats including total shanks eaten, total bonus hearts, and shanks until next bonus heart. This basically replaces the need to carry around the food journal./foodlist clear [player]completely resets a player's progress including their food list and bonus hearts. Only use this if absolutely necessary. Fortunately, this command is disabled by default in GTNH./foodlist sync [player]forces a sync of the food list to the client, for when something went wrong and there's a mismatch between the client and the server. This most likely never needs to be used.
Although not technically a command, the player can also search up not yet eaten in NEI to see all the foods that they have not yet eaten. It may be necessary to leave and rejoin a world to re-sync with the client and hide any recently consumed foods. Some foods (ie. Natura stew variations) do NOT appear in NEI with this trick, but they still add to the total shank count--look at the uses for the ingredients.
Eat Everything
This section uses the GTNH Spice of Life Tracker to guide the player through eating every unique food in GTNH, or at least gaining as many bonus hearts as quickly as possible. Increasing your max health significantly helps surviving the early game and highly benefits self-sacrificing in Blood Magic which is required later on. There are 3,201 total obtainable shanks in GTNH for a total of 64 bonus hearts. For organizational purposes, foods are split between four different tiers:
- T1 (Raw) foods are those that are found naturally in the world.
- T2 (Basic) foods are easy to obtain and use simple ingredients such as cooking oil.
- T3 (Intermediate) foods take a few steps to craft and use slightly more complex ingredients such as dough.
- T4 (Advanced) foods take several steps to craft and use fairly complex ingredients such as butter.
There is also an "other" category for foods that are obtained through some niche mechanic from a specific mod. It is NOT recommended to obtain every food in one tier before proceeding onto the next; hearts are gained the quickest by crafting the highest tier foods straight away. For example, instead of hunting down every single raw meat for 51 shanks, concentrate initially on a few fruits and berries to craft jelly sandwiches which have 190 shanks in total.
T1 (Raw) - 337 Shanks
Start as a hunter-gatherer. Collect any gardens, mob drops, and other crops you find as you begin exploring the world. There are MANY different raw foods at this stage of the game and finding them all takes a while. However, priority should be given to Pam's HarvestCraft fruits and vegetables which are the foundation of most basic, intermediate, and advanced foods. You will need a massive farm to hold at least a few of each crop.
The lowest priority should be given to the Extra Trees foods because those require Forestry tree breeding which is difficult, unrewarding, and long. Similarly, the IC2 Crops are very difficult to obtain in the early game and require crop breeding. The Twilight Forest category are foods native to the Twilight Forest, a dimension unlocked in LV.
T2 (Basic) - 663 Shanks
Once you have a solid collection of raw fruits, vegetables, meats, and berries, try cooking as many foods as you can for some easy shanks. The juices and milks are also very easy to obtain early on--simply combine a soft mallet with a raw crop in a crafting grid. Add a snowball to each of the juice recipes to craft smoothies, or add sugar and replace the soft mallet with a sauce pan to craft jellies. Even the yogurts are straight forward if you have a cow farm supplying enough milk and leather.
A lot of the "basic meals" in this tab do not fit any of the other categories, but are simple enough to craft. Most of them are just a combination of raw crops and meats. Try using grapes for vinegar, sugarcane for sugar, and sunflower seeds for cooking oil.
T3 (Intermediate) - 627 Shanks
Bread stuff is one of the easiest categories in the spreadsheet if you have enough wheat/barley because it (mostly) contains foods that consist entirely of dough/bread. The same goes for the potato stuff category. An even easier category is the jerkies which just take a drying rack and some patience. Batch craft some dough for the pies, cakes, and pizzas but know that they are fairly involved. Also batch craft some silken tofu for the ice creams. Lastly, the cookies, muffins, and donuts just require a few obscure ingredients such as cinnamon and nutmeg which only grow from trees.
Most of the "intermediate meals" require some sort of bread or dough, but there are a lot of shanks to be gained from them. The player may want to wait until they have a forestry worktable and an Railcraft Water Tank before running through a lot of recipes involving water buckets. Try using peanuts for peanut butter and mustard seeds for mustard.
T4 (Advanced) - 1,264 Shanks
This is where a large majority of the shanks are earned. Start with the jelly sandwiches which offer a lot of shanks for not very difficult or lengthy crafts. Most of the sandwiches are also fairly simple or easy. There's a fair amount of salads, but they all require similar ingredients much like the soups and stews all taking stock. Some of the bowls are multi-step and have obscure ingredients, but again there are a lot of shanks there. Lastly, batch craft some chocolate for the chocolate category.
The "advanced meals" all take some time to craft. A lot of them take butter which is the most complicated cooking ingredient and most of them take several steps to craft (often a combination of lower tier foods). Furthermore, they take a large variety of raw foods which is why it is helpful to collect as many different types early on as possible. Try using soybeans or carrots for stock and eggs or tofu for mayo.
Other - 310 Shanks
Purchase GregTech ice creams from the ice cream machine for two gold GT credits (32 cupronickel plates) each. However, the type of ice cream is always randomized which can make obtaining the last few very difficult. The GregTech processed drinks are pretty easy to make once the player is at least MV and has access to a mixer, brewery, and distillery. The Forestry foods are all made in a carpenter and take a little bit of honey. The most interesting food on this page, however, is the Dezil's Marshmallow under the Thaumcraft category because it has 50 shanks, the most possible from a single food. It is extremely difficult and expensive to craft, but it can fortunately be obtained from a quest reward.
Early Food
Food is a top priority during the Stone Age but it can be surprisingly difficult to acquire or sustain. The following are a few methods of gathering food at different stages of the game. Every world starts with a hunting and gathering phase which quickly turns into an agricultural revolution and finally ends with an industrial revolution.
Hunting and Gathering
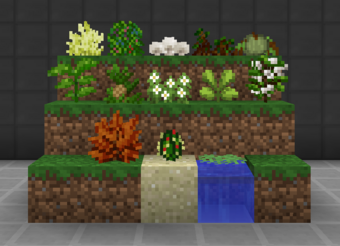
Upon entering a world, the only way to obtain food is through hunting and gathering. Break Gardens, collect berry bushes, harvest fruit trees, kill passive mobs (cows, chickens, pigs, etc.), and loot chests from villages or Roguelike Dungeons. The goal is simply to survive and stay above the minimum amount of hunger required to sprint. Try to save at least a few crops and mobs for farms later on.
Most raw foods restore only one shank (half a hunger) which can be really challenging and time consuming. The following is a few tips and tricks to make the hunting and gathering phase slightly more bearable.
- Cantaloupe from gourd gardens is the only raw crop that restores two shanks instead of one.
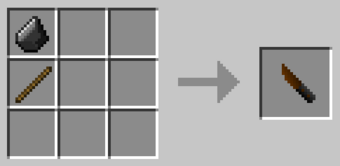
- Craft a GregTech knife with flint and a stick to kill mobs without them exploding, to cut tomatoes, onions, and cucumbers into slices, and to prepare spring or cucumber salads.
- Berry Medley restores three shanks of hunger and only requires three of any type of berry and a bowl.
- Smoothies restore three shanks of hunger and only requires a soft mallet, a berry, and a snowball.
- Roasted Potato on a Stick restores three shanks of hunger and only requires a baked potato and a stick.
 |
 |
Agricultural Revolution
After finding a suitable place for a base, transition to farming as soon as possible. Craft a wooden hoe or a Tinkers mattock for tilling farmland and a clay bucket for moving water around. Crops from Pam's Harvestcraft can easily be turned into seeds by placing them in a crafting grid. It is very important to grow a wide variety of crops to improve Nutrition levels, gain hearts from Spice of Life, and prepare more advanced meals. The following table lists a few recommended foods that are easy to make and restore several shanks of hunger.
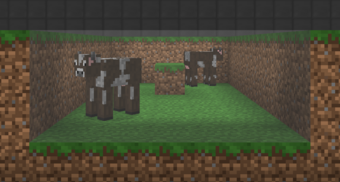
It is also highly recommended to start a cow, chicken, and sheep farm for their meat and animal products. Pigs are not entirely necessary, but they can still be bred for their meat. Fences can be expensive in the early game so it is recommended to build a two block deep hole instead. Exit the hole by placing a dirt block at least two blocks away from the sides; animals cannot sprint-jump so this only lets players escape. Alternatively, place a few Animal Traps and supply them with bait to passively produce the same animal products. Other tips and tricks for this phase include the following.
- Craft Pam's Harvestcraft tools such as a pot, saucepan, mixing bowl, and skillet which all have unlimited durability. Others are unlocked in HV.
- Build a Cooking for Blockheads kitchen which makes all connected inventories accessible from the cooking table, including tools.
- Grind wheat or barley into flour with a mortar and pestle and drop up to a stack at a time into a cauldron filled with water. This immediately turns the flour into dough which can be used in a variety of recipes such as bread, toast, buns, baguettes, etc.
- Use a Forestry worktable for making tofu from soybeans.
|
 |
Industrial Revolution
As technology advances, so does the ability to sustain food and hunger. As early as Steam Age, the player can obtain the Healing Axe from the "Hunger No More" quest to passively restore hunger and saturation while held in hand. It can also be crafted from unstable ingots and obsidian rods after killing a Wither or looting a division sigil from Roguelike Dungeons. Later on in HV, tin cans can be used to automatically restore a player's hunger while in their inventory. The only downside is that it creates empty tin cans which occupy a second inventory slot. Much later on in ZPM, the Personal Healing Nanobooster can be worn as a necklace within baubles to automatically restore health, hunger, and saturation at the cost of EU.