GT New Horizons · Ultimate Voltage (UV)
High Energy Laser Purification Unit
The High Energy Laser Purification Unit (LPU) is a UV tier multiblock used for the sixth step of the Water Line. It uses different wavelengths of photon beams to purify water, by alternating between a set of colored lenses.
Construction
The LPU has no tiered components or energy hatches because it receives power directly from the Water Purification Plant once linked with a data stick, like the rest of the Water Line multiblocks. Use the Multiblock Structure Hologram Projector to visualize/build the structure.
Structure
- Controller: Front bottom center
- 144-153 Naquadria-Reinforced Water Plant Casing
- 144 Electron-Permeable Neutronium Coated Glass
- 56 Stellar Alloy Frame Box
- 29 High Energy Ultraviolet Emitter Casing
- 1 Lens Housing: Top center casing
- 1 Lens Indicator: Top back casing
- 1+ Input Hatch: Any bottom side casing
- 1+ Output Hatch: Any bottom side casing
Mechanics
See More: Waterline#Shared Mechanics
The LPU periodically requests for the lens in the Lens Housing to be swapped with the next one by emitting a signal through the Lens Indicator. Lenses are always requested in the same order, as noted in NEI, starting with the Orundum Lens. The interval between swap requests is random, and can range from three seconds to fifteen. Removing a lens before a swap is requested immediately fails the recipe. Inserting an incorrect lens or an item that is not a lens in the Lens Housing does NOT fail the recipe. The LPU only requests each lens once per run, meaning that the last lens is left in the Lens Housing at the end of the recipe, ready to be swapped out at the next run.
Every time a lens is successfully swapped with the requested one, the success chance increases by 10% additively; successfully swapping all nine lenses therefore results in a success chance of 90%. This can be further improved to 100% by feeding Grade 6 water back into the LPU, which does not give more Grade 6 water than it takes on average, but it does guarantee the output.
Dilithium ore is gated behind the Mothership. That means the player only has access to eight of the nine lenses required when they first unlock the LPU, bringing down the success chance to 80%. This can be boosted to 95% in the same way as stated above and increases the average yield by more than it costs.
Automation
There are many methods of automating the LPU, the first being the simplest and easiest to implement and the second being an alternative to EnderIO conduits.
Method 1: Item Conduits
This approach works because when an item is taken out of an input bus via the conduit it always takes the FIRST item in the bus, when an item is inserted into the input bus it will end up at the LAST position. Using the "Sort Stacks" feature of input buses we can create a clean loop where a lens gets taken and put into the lens housing and the old lens gets put back over and over.
Additionally, EnderIO Item Conduits will attempt to extract 4 items once every 10 game ticks (half a second), but if we use Speed Downgrades on the conduit, it will only extract 1 item every 10 ticks instead of 4 items. The Lens Indicator Hatch will update every tick, so when a Lens is taken out of the bus and a new one is placed in, the Indicator Hatch will have turned off before a second swap.
A dummy item can be used in place of any missing lenses HOWEVER the order must be the same as if you had those missing lenses.
| On the Lens Indicator Hatch place a Red Alloy wire. Trail the Red Alloy wire to the side of the Input Bus. | 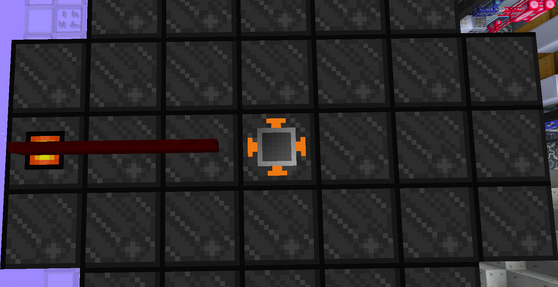
|
| Place an EnderIO Item Conduit on top of the Lens Housing, and place a MV input bus (or higher) behind the Conduit. | 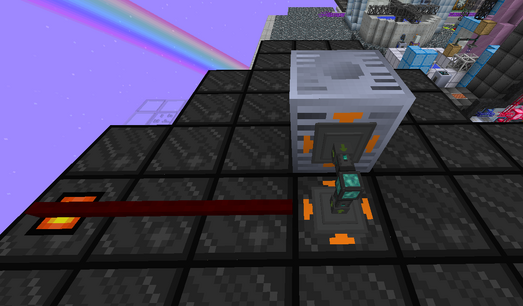
|
Configure the two faces of the EnderIO Conduit as follows:
|
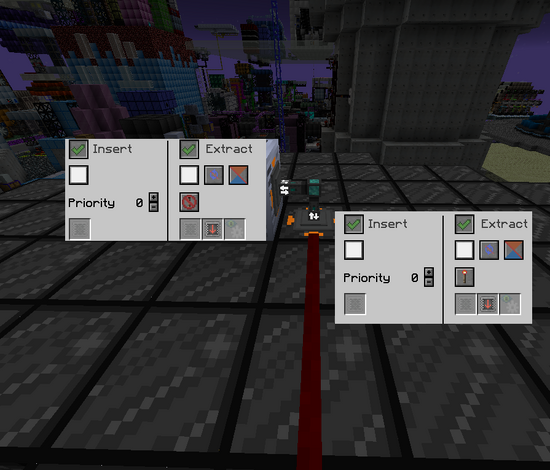
|
| Place the Orundum Lens into the Lens Housing. Then, in the Input Bus insert the rest of the lenses in order: Amber (orange), Aer (yellow), Emerald (green), Mana Diamond (light blue), Blue Topaz (blue), Amethyst (purple), Fluor-Buergerite (grey), Dilithium (white). | 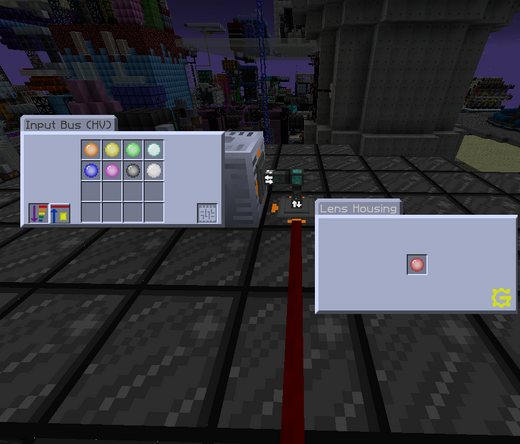
|
Finally, to make sure you have built this correctly make sure that:
- The Lenses are inserted correctly and in correct order.
- Sort Stacks is on in the Input Bus.
When done, turn the machine on. It should end at Dilithium Lens at the end of a cycle and swap to Orundum Lens at the start of a cycle.
Method 2: SFM
The method presented here requires 0 knowledge of SFM as the steps will guide you through it. It works by reading the output of the lens indicator hatch, turning the signal into a single pulse, and then turning off the emitter. It does rely on an interval timer rather than using the redstone signal, I found that the behavior was more convenient and easier to manage than the signal alone. This method will require 1 Machine Inventory Manager, 1 Redstone Emitter, 1 Redstone Receiver, 1 Machine Controller Cover, 1 Chest Buffer, and 2 conveyors (IV minimum as we're working with single tick pulses and operations).
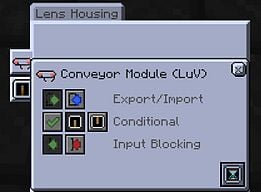
| Place a Machine Controller Cover on the face of the Lens Housing facing the Lens Indicator Hatch and place 1 conveyor on the Up side of the Lens Housing. Next wrench the Lens Indicator Hatch to face Up. Adjust the Conveyor to Export, Use Machine Processing State, Allow Input, and set the tick rate for every 1 tick. | 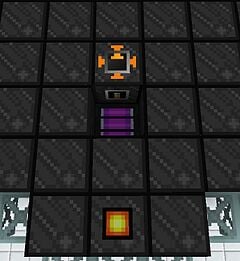
|
|
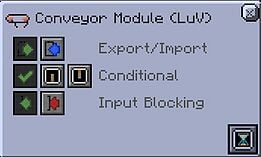
| Place the Chest Buffer over the top of the Lens Housing, and place 1 conveyor on the Down side of the Chest Buffer. Adjust the Conveyor to Export, Always On, Allow Input, and set the tick rate for every 1 tick. Additionally ensure that the output of the Chest Buffer is facing towards the Lens Indicator Hatch. | 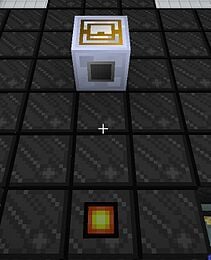
|
|
| Place the following blocks from left to right starting with the first above the Lens Indicator Hatch: Redstone Receiver, Machine Inventory Manager, Redstone Emitter. | 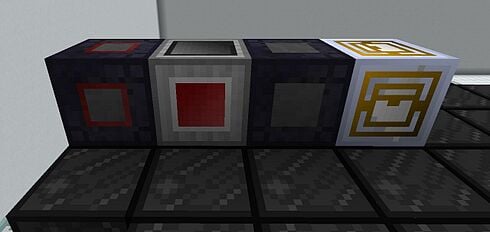
|
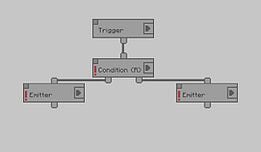
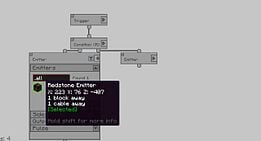
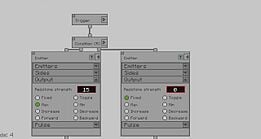
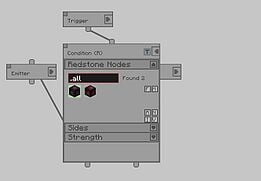
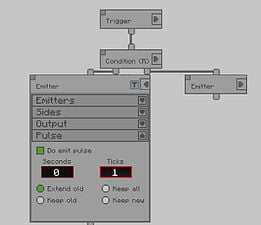
| Right click on the Machine Inventory Manager block to bring up the Command Window. On the left side of the panel select the following nodes and place them in the work area in the greater right side and connect them as shown roughly in the 1st Step 4 image: Create Trigger, Create Redstone Emitter x2 (Make two Redstone emitter nodes, I will refer to them by the relative area they are in the screenshot provided; Left Redstone Emitter Node and Right Redstone Emitter Node), and Create Redstone Condition. Apply the following unique settings to the listed nodes:
Redstone Condition Node: Select Redstone Nodes, Select Redstone Receiver. Left Redstone Emitter Node: Select Emitters, Select Redstone Emitter, Select Sides, Select Strong Power, Select Output, Select Max, Select Pulse, Select Do emit Pulse, Set Ticks to 1. Right Redstone Emitter Node: Select Emitters, Select Redstone Emitter, Select Sides, Select Strong Power, Select Output, Set Redstone Strength to 0. |
|
|
| Place your Dilithium Lens in the Lens Housing, and place the remaining lenses in the Chest Buffer in this order (It's the order shown in NEI for the grade 6 water recipe from left to right starting with the Orundum lens) and make sure to select 'Sort Stacks'. If you can't get a hold of one of the lenses replace it with a dummy item, make sure the dummy item is unique to every other item in the Chest Buffer. | 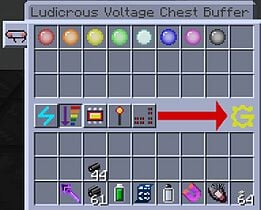
|