GT New Horizons · Getting started
Beginner Tips
Welcome! So you heard about this "really hard" modpack that takes GregTech to the Nth degree and want to join in on the fun? Well first let's sit down and talk about what GTNH is and isn't, and how to get started!
Philosophy
GTNH is about taking the usual modball of magic and tech mods and making all the recipes Greg-ified. This means there's really nothing easy anymore. All recipes are gated and modified - even vanilla ones. Even a door will need advanced tools you won't get until the Stone era at least. That means lots of hard work.
It also means a major sense of accomplishment when you open that gate to the next stage. Getting ingredients to make your first decent food. Making your Electric Blast Furnace. Your first Thaumcraft wand. Launching your first rocket. Building a full scale chemical refinery. Instead of simply being a minor event in a game, each of these becomes moments of joy that you have now reached the next level.
 Caution: | This pack requires lots of reading, and being able to understand what you just read. The quest book is word heavy and content dense. Failure to read and more importantly, understand, will result in having a frustratingly bad time. |
Target Audience
As stated above, this modpack is for people who enjoy hard challenges, and are willing and able to commit serious amounts of time to them. At the beginning, this may mean hours of searching for the right ores. Later on you'll spend time building and rebuilding your technology infrastructure to handle the latest resource demand. By the end, you'll practically have degrees in GregTech chemical and electrical engineering--even a mage needs a technological base to supply resources!
By its nature, this pack works best on servers, where players can work together to search for resources and share information. Playing SP is inherently more difficult since every orevein must be found solely by you. You are welcome to come to the Discord and commiserate with all the other players who have spent hours searching for that one redstone/lapis/mica/nickel vein. Here's a handy list of commonly used acronyms and nicknames so you won't be lost.
With over 15 tiers worth of progress and hundreds of mods to utilize, the average estimate for completing GTNH is 1,600 hours for a team and 2,500 hours for an experienced solo player. There are a lot of helpful resources to assist you on your journey, but it is still highly recommended to have a basic understanding of modded Minecraft and/or GregTech before starting GTNH. Otherwise, there is a high risk of burnout from progressing too slowly. Experience from other modpacks (i.e. Nomifactory) is invaluable for sustaining an enjoyable pace.
The vast majority of players don't have the time or inclination to reach the Stargate and that is expected. GTNH is about the journey, not the destination. There is content to enjoy at every tier including the Stone Age. Here is how to get to the fun stuff as quickly as possible.
General Tips
GTNH is an automation modpack. As such, the game will not directly tell you when you are doing something wrong. Instead, it will just become more tedious or time-consuming. This can be frustrating for new players that aren't used to automation games, so here are some general tips on how to deal with this:
- When some task seems unproportionally hard, tedious, time-consuming, or expensive, it is usually a sign that you should upgrade your tools and infrastructure instead of blindly grinding through it. Some very early-game examples are:
- If finding cows for leather takes too long in the Stone Age, build a cow pen and breed them until you have around thirty cows. If that takes too much wheat, make your wheat farm bigger.
- If you keep needing to put new items into your furnaces or macerators and take out the results, automate that part with hoppers.
- If the Bricked Blast Furnace takes too long to make steel, build more furnaces.
- If mining is too tedious, see if you can get better tools (Haste and Fortune modifies, Hammers, backpacks, item magnets, voiding drop filters, etc.).
- Do multiple things at once to combat the long recipe times. While you're waiting for your ores to process, you can read the questbook or do crafting or building.
- Do not always use the first crafting recipe you find for a given item, and periodically check if you unlocked more efficient recipes. When checking for recipes, do not only check the input items, but also the count of output items you get, and check both the result item and its subcomponents. For example, you won't get a better recipe for LV circuits themselves until you have MV circuits, but you quickly unlock more efficient recipes for their components like circuit boards, resistors, and vacuum tubes. Many of these recipes have similar input items, but some metals or fluids result in more output items per recipe than others.
- Do tedious crafting chains in batches (or make use of NEI's autocrafting).
- The classic slogan is, "If you need one, make a stack. If you need a stack, automate it." However, you should also keep the previous point in mind and not make a stack of an item using an inefficient recipe if you're about to unlock a more efficient one.
- Keep in mind that (at least until you unlock AE2 in EV) there are many intermediate steps between doing something fully manually and fully automating it:
- Simply automating a single machine with hoppers and large input and output chests is already much better than manually filling it every time, even if you do not have fully automatic item routing yet.
- Carrying a barrel back and forth once every few hours may be simpler than running pipes everywhere.
- How strongly you automate something will depend on the complexity of the task and how often you need the output. Some ubiquitous fluids and gases like Oxygen, Nitrogen, Hydrogen, and Polyethylene may be nice to have fully passive around the end of LV, but fully automating LV circuits in LV may not be worth it since you unlock more efficient recipes later on and can just craft them in batches when needed. Once you've unlocked AE2, automation will get a lot easier, so you should fully automate almost everything at that point.
- Read the questbook and wiki to know which upgrades and infrastructure you should be working towards.
Starting the Game
GTNH is very well optimized compared to other mod packs and even runs on Java 25, but it still has a lot of content to load on startup. Expect GTNH to take 1-2 minutes to launch on high-end PCs and 4-5 minutes to launch on low-end PCs. If Minecraft looks like it has locked up, wait a few more minutes. MultiMC, ATLauncher, Technic, CurseForge and Prism are all viable options as launchers.
For more general information on which specific Java Instance to run and tips with setting up your first instance, see:
Main Article: Installing and Migrating
If after reading through the Installing and Migrating page, your lower end system still runs into performance issues, see:
Main Article: Low End PCs
| Caution: | GTNH updates regularly. Use the latest STABLE version for the best performance. All Dev Builds, Beta Versions, and Release Candidates (RC) are for testing purposes only and may have game-breaking bugs. |
Tiers
GT: New Horizons is broken into Tiers or ages. Each one represents a significant milestone in technology progress and has its own chapter in the Quest Book (other than UXV and MAX tier, which are grouped in the "Endgame Goals" chapter), from the Stone Age up through MAX. From LV and beyond, tiers correspond to a level of power that is four times that of the previous tier. Some mods are gated to specific tiers, due to needing resource(s) only available after a certain point of progress.
Locations to Note
Use your JourneyMap to set waypoints.
- Villages - Source of some Pam's Harvestcraft vegetables, Tinkers Tools parts, wool, bookshelves, Witchery books, Smeltery blocks. Note any interesting trades for later. Once you can make Golden Lassos in LV, you can bring back villagers to your base. Note that if you skip the quests for the Smeltery (and don't craft it), you'll lose out on some quest rewards.
- Stone Circles - Can have chests or droppers with good loot. Beware of witch spawners!
- Obsidian Totems or Obelisks - 1x1 spire of obsidian or floating pillars in an obsidian circle - avoid these. May be surrounded by difficult to kill mobs.
- Zinc Gravel - Used for brass, which makes reusable molds for the smeltery.
- Rubber Trees - Source of Sticky Resin and Raw Rubber Dust. Gather saplings to bring back to your base. Appears frequently around rivers. Look for trees that have a 3 leaf tall spire at the top, or a brown spot on the side.
- Clay - Source of Bricks for Steam Age Machines, Grout for the Smeltery, and Firebricks for the Bricked Blast Furnace. Often found in rivers and lakebeds.
- Gravel - Source of flint for crafting tables, furnaces, chests, and early GT tools and mortars. Gravel is also used in Grout for the Smeltery.
- Stained/Hardened Clay - Source of clay dust in higher quantities than regular clay. Mountains and layered mesas have clay; mesas have more but with larger color variety. Initially used for Firebricks, save these locations for a MV source of Alumina and Silicon Dioxide.
- Silverwood Tree - Source of later-game wand core material. Have a thick white birch-like trunk with blue leaves. Very rare, spawns 6x the rate in the Thaumcraft Magical Forest biome. May also be more common in Cherry Groves or Sacred Springs. Seed 4292492439225141544 begins with 4 in view.
- Slime Islands - Source of Slimy Trees which provide Congealed Slime for Raw Rubber Dust, Glue, and Slimeballs. Appears on JourneyMap as a minty green oval. Do not pick up the slimy blue water in buckets, they can't be placed down. King Slimes rarely spawn here.
- Roguelike Dungeons - Some variants are a source of Bricks for Steam Age machines and Firebricks for the Bricked Blast Furnace. They also hold loot.
- Gardens - Source of some Pam's Harvestcraft crops. 8x each are required to be submitted for the Healing Axe (passive hunger/saturation regeneration axe) quest. Don't break them, gather them instead (right click). Naturally spread over time wherever they are planted. Once you have 3-4, then you can break excess.
- Bee Hives - Save for later. Forestry's Beealyzer is gated behind Polyethylene and Aluminium ingots.
- Meteors - Source of Applied Energistics 2 Inscribed Presses. Source of Sky Stone and Sky Stone Chests, which have some blast resistance. The chest can be opened even with a block above it.
- Marble - Source of Magnesium and Calcite
- Snow - For smoothies
- Lootgames dungeons: Minigame single-room dungeons. Provides LV-MV loot.
- Tainted Land - Purple, slimey and covered in fibrous taint. Spreads rapidly, only halted by water or air, and hazardous to cross. Avoid building near this biome, and/or turn off taint spread in the Thaumcraft configs. It's exceedingly hard to clean up early game.
- Mystic Grove - Source of Glowflowers. Watch out for poison water pools.
Food
See More: Food
Food is going to be one of your first concerns. Almost every early game food is heavily nerfed in hunger/saturation value. No longer can you dine indefinitely on steak or golden carrots. Spice of Life means that you have to obtain and eat a variety of foods or suffer diminishing returns. Eating new foods will gain points towards permanent HP increases, so it's worth the effort to try as varied a diet as possible. The Quest Book eventually unlocks a collection task for expensive foods and Pam's Gardens that will reward a Healing Axe, automatically filling the hunger and saturation bars while held.
- Early quests often have a food reward, which can tide you over until you make a decent farm.
- Till non-hydrated grass blocks for a chance of Wheat, Barley, Cotton and various Witchery seeds. Cotton isn't edible but you'll want lots of it anyways, for string and woven cotton.
- Pam's Harvestcraft Gardens - these can be broken for 3 random food item drops, or right-clicked to be picked up for replanting elsewhere. Gardens will slowly spread to nearby empty grass/dirt blocks if left alone. Pam foods can be converted into their seed form in a crafting grid and planted on tilled farmland. Must be within 4 blocks of water to till soil. Soybeans in particular are very versatile, substituting for both milk and meat in most recipes.
- Fishing is gated behind iron and while there are a large variety of fish, none of them are particularly high value except for the HP bonus.
- Squids drop edible calamari as well as ink sacs.
- Natura Berry Bushes - Blueberry, Raspberry, Blackberry and Maloberry bushes are found in the wild. Look for slightly lighter, brighter green spots on your map. The bushes can be broken and moved and grow up to three blocks tall.
- Fruit Trees - Pam's Harvestcraft adds edibles to some trees, which may spawn with one, two or three types of produce. Harvested tree produce can be crafted with an appropriate vanilla sapling to make a new fruit tree. Immature fruit nodes can be broken to drop their produce, but this is both very slow and permanently removes that fruit generating block. Two bonemeal will instantly grow both fruit and fruit tree saplings. Most fruit trees spawn in temperate to warm/humid biomes. Farmer villagers will also sell assorted fruit tree saplings for one Emerald.
- Animals - meat isn't a good food source on its own, but combined with other edibles it can make good sandwiches, soups and meals. Animal Traps are a lag-friendly way of getting various animal drops without needing a large farm (and with 100% less explosions). Natura's Barley can be used to breed animals and will not cause them to crowd/follow.
- Most fruits can be turned into juice, yogurt, smoothies, jam and sandwiches. Mortar sugar canes for sugar.
- Iron and GT tools unlocks the Pot, Skillet, Sauce Pan, and Mixing Bowl. The Pot is the most versatile, as many soups don't require any other tools and only 2-3 ingredients. Flint + stick gives a knife, which can make bowls.
- Soft Mallet substitutes for juicer/press, knife substitutes for Cutting Board, GT mortars substitute for Mortar and Pestle, Rolling Pin subs for Baking Dish, though once you unlock Stainless Steel, the Pam's tools are worth eventually upgrading to as they have unlimited durability.
- Flour can be thrown in a water filled cauldron to turn the entire stack into dough at once, using only 1/3 a bucket.
- Tinker's drying racks can be used to make jerky out of most raw meats, including rotten flesh.
- Foods that don't require any special tools beyond flint/wood include berry medley, beef wellington, raw meaty stew, the various salads, potato on a stick, and any doughs/breads. GT dough recipe is easier since it doesn't require salt, though edible salt can be obtained with a Pot and water.
- Food recipes that require Milk or Water can instead use Fresh Milk or Fresh Water, of which 4 can be made with a single iron bucket of milk or water.
- If you get the GregTech dyes from a loot bag, they can be used to make Epic Bacon.
Tinker's Construct
See More: Tinkers Tools
- A shovel, hatchet/mattock and pickaxe will all come in handy.
- The mattock functions as a hatchet but can also till soil and easily break dirt/grass blocks. It does not mine sand/gravel.
- Right-click while holding a Tinker's tool to place the item/block directly to the tool's right on the hotbar.
- Remember you have to level up your pickaxe's mining level again each time you switch heads.
- Tools must be fully repaired to swap out parts.
- Carry a Crafting Station to craft items anywhere and repair materials for on-the-go tool fixes.
- Iron - the Quest Book will give you your first iron pickaxe head. Ensure you have access to an iron vein before attaching it, as you will need more iron ingots for repairs.
- Poorer quality tools level up faster, as Tool XP is determined by mining speed. Netherrack parts are commonly used for speed levelling. They can be swapped out for better parts once the desired number of modifiers is reached.
- Mining XP and Tool XP are different. Only mining tools have Mining XP, which you stop earning as soon as you reach the "Boosted" marker. This increases the tier of materials that can be harvested to the tool head's full potential - when replacing a tool head on a mining tool the initial harvest level is one step lower, and it must be levelled up again.
- Tool XP grants a modifier every few levels. Modifiers can be used to add new traits to tinker's tools such as haste, luck, sharpness, unbreaking, etc. See Tinkers Tools for advancement suggestions.
- Post Tinker's Forge, the Hammer and Lumber Axe are the most useful tools for mass-collection of ores and wood respectively.
- Excavator (for dirt/gravel) and Scythe (clear cuts flowers/grass/crops/mob AoE) are also helpful but not necessities.
Crafting
A key concept and sanity saver for this pack is batch crafting. As you may have noticed, most recipes have multiple steps and a lot of ingredients to juggle. Making an entire stack of screws or multiple mortars will make later crafting much less of a hassle.
- Craft multiples at once, as resources allow. Certain tools and parts are used often in many recipes.
- Once you have iron, upgrade to a Crafting Station. It will connect to an adjacent chest and allow you to pull items into the crafting grid with NEI as well.
- With a wrench, collect bookshelf blocks from villages/dungeons. These can be used to get an early Forestry Worktable. The worktable can remember up to nine recipes and has its own internal inventory. Right-click on a remembered recipe to lock it. Caution: breaking the worktable erases all recipes.
- Bibilocraft's Fancy Workbench can record recipes to books and has slots for up to nine such recipes, but does not have an internal inventory.
- Run multiple furnaces/machines in parallel whenever possible to reduce processing time.
- Chunkload your base to keep machines running while you're out exploring. You'll need to configure ServerUtilities, in which chunkloading is disabled by default.
Always check and recheck common recipes as you get new machines and advance in tech. Something annoying now (like circuit boards) may become much easier with just the right machine (like an assembler). Even recipes like chests have an assembler version to save on resources. In fact, it has two! So be sure to check recipes often.
| Caution: | NEI sometimes lies when it comes to the amount of a Vanilla resource needed in a machine crafting recipe. If your recipe isn't working and you're sure you're giving it the right materials, try adding a bigger stack. Look at Reinforced Glass for an example. |
Transportation
Horses are actually very useful early/mid game. Find or craft a saddle and lead per the quest in Transportation. If you can, craft a Golden Lasso as well - horses don't do well crossing water.
Make paths going the cardinal directions from your base. Smooth them as much as possible, and use stairs to go up/down. Upgrade the paths with Concrete later to go faster.
Once you have your first Bricked Blast Furnace, you can make a Hang Glider which helps with exploring and travelling long distances, especially when paired with Piston Boots/Slime Boots and a Slimesling. Setup a tall launch tower at home base. Later the Jetpack (ProjectRed), Copter Pack or Coal Jetpack can be used to fly high into the air before switching to the glider to go long distances. Hold down Sneak (default Shift) to glide faster and use Jump (default Space) for altitude whenever needed.
Hearing a weird noise whenever you use your glider? Vario is enabled (default V), which changes pitch as you encounter thermals. Change the keybind under ESC > Options > Controls > OpenBlocks > Vario on/off.
Storage and Hauling
Like all large modpacks, there are a multitude of items you'll want to bring home - more than can easily fit in your inventory. Early game options for extra portable storage include the Forestry backpacks, and ModdedNetwork’s Backpack if you luck into a single steel ingot from looting. Lunch Bag/Lunch Box is for food items only, and Seared Tanks for liquids. Players are strongly advised to organize early and stay organized because the automatic search/sort/craft technologies are many hours distant. Rushing an AE2 system in this pack is not feasible.
Forestry’s Backpacks have set lists of themed items they can each accept. The most useful for early game are Digger’s (dirt, gravel, cobblestone, etc.), Miner’s (ore blocks, dusts, and crushed ores) Forester’s (plants and tree products), and Hunter’s (mob drops). Each can hold 15 stacks of items, and be upgraded later on for more space. If you use your Forestry backpacks, they cannot be upgraded later in the Carpenter without putting the empty backpack in your crafting grid and clearing the metadata. Note that they have different modes and you may want to put them in a chest when working in base as they take items you pickup by default.
ModdedNetwork's Backpacks are the first option available to store anything, gated behind a steel ring. Steel ingots or blocks can sometimes be found in loot chests, otherwise this option isn’t available until you build a Bricked Blast Furnace. Remove any keybind conflict, then hold down Shift + (default B) to open the Backpack GUI. A backpack can be placed in the top slot in order to access it with the assigned key. Specific pickup items can be added to the bottom row. You can only carry up to four backpacks from this mod at once.
One of the early quests gives you a Lunch Bag (3 food slots), and access to iron will unlock the Lunch Box (6 food slots), both from Spice of Life. The Tinker’s Construct Seared Tank holds four buckets of most liquids and will retain its inventory when broken. Identical empty or full tanks stack, making carrying a large quantity of lava feasible. The quests hint at it but lava carried in a backpack won’t burn you.
For at-base Item Storage, the Quest Book will point you at the Iron Chest mod, JABBA barrels and Storage Drawers. JABBA Barrels or Storage Drawers? Barrels can be locked without any special items, shift-right-click. Drawers are more flexible in configurations per block and can be chiseled into many colours or made framed for maximum customization. Barrel upgrades require both structural items and the actual upgrades, but have more options than drawers. Neither is strictly better than the other, and both are worth using. The Drawer Controller is limited to a 4 block radius and 50 connected drawer blocks in GTNH.
- Bibliocraft's Shelf can hold any four items, useful for stashing backpacks between mining trips or other items like drawer keys you want easy access to. It cannot easily hold the dolly or wrenches as they will interact with the block.
- Bibliocraft's Bookcase holds up to 16 books, including Enchanted ones.
- Iron Chests / Gold Chests will be your largest single inventories until you get a Lathe and Basic Cutting Machine.
- Cooking for Blockhead's multi-block kitchen offers cabinets, counters, fridges and other blocks that can both store and automate food production.
- Adventure Backpacks are gated behind Aluminum in early MV.
Exploration & Resources
In early game, you should have at least the surface 256 blocks around you explored. Once you get a horse, explore further out. Once you can craft pistons, do try to make Piston Boots as soon as possible for the step assist effect and after you get steel, you can make a Hang Glider and quickly explore thousands of blocks away from home.
- Watch out for Blood Moons! If this occurs, you cannot sleep through the night. If the torches in your area start looking reddish, IMMEDIATELY stop and build an emergency fort.
- Lava flows faster than you'll expect. Keep blocks and a water bucket handy at all times when working around lava!
- Spawners are incredibly slow to break, even with tools. Don't try to rush a spawner thinking you can smash it.
- Sleeping gives random buffs the next day for a little while. If you randomly have Speed, Haste, Regen, Water Breathing, Fire Resistance, Strength or another buff, that's probably why. Sleeping can also cure negative buffs.
- Animals can rarely explode when killed. They also take damage if too many are crowded into a small space.
- Don't fall into quicksand. It spawns in dry/sandy areas and looks like slightly darker sand. Keep a shovel handy to dig yourself out. You can also slowly walk towards an edge, but jumping is disabled while stuck.
- Thorns and Tiny Cactus will hurt you or your horse if you touch them, just like cactus.
- Spiderwebs on a Greatwood tree mean there's a cave spider spawner under one of the bottom four logs with a loot chest.
- If you see blocks being destroyed/sucked towards a point, do not approach. This is a Hungry Node from Thaumcraft, and if you are caught in it, it will kill you. Hungry Nodes cannot consume obsidian, so if one is holding your grave hostage that is an option for building a barricade to approach safely.
- If you die, your items will (usually) be placed in a grave. Bring a shovel to break it faster, though you can still do so with a bare hand.
Preferred Processing Paths
Early game you will be limited in your processing methods. The first upgrade comes after iron, when regular furnaces can be turned into the slightly faster (Vanilla) Blast Furnace. Saws can be used to double the output for planks and sticks, but may not be worth the cost early game. The first ore doubling option is the Steam Macerator, which gives two crushed ores per block. The Steam Forge Hammer can make two plates out of three ingots, vs. the four needed with a regular hammer. Steam machines otherwise do not have secondary byproducts, you'll have to get into LV tier for those.
- Multiblock Steam Grinder processes recipes faster for less energy, and does 8x items at once. It's as efficient as a HV Macerator but without any secondary outputs.
- Once you get to MV, there are some minerals that benefit from chemical baths vs orewashing/thermal centrifuging/centrifuging. (Needs checking)
- Iron ore - Chemical bath with Sodium Persulfate to get additional Nickel
- Copper ore - Chemical bath with Sodium Persulfate to get additional Copper
- Gold - Chemical bath with mercury to get additional Gold
- Silver - Chemical bath with mercury to get additional Silver
- Lead - Chemical bath with mercury to get additional Silver
Once you hit HV, you should be using an HV Macerator to get additional byproducts, both with the ore block and after thermal centrifuging.
Smeltery Tips
The Tinker’s Construct multiblock Smeltery cannot make most blocks - the casting basin is used for glass, rough brownstone, seared stone and not much else. The Smeltery can create Brass alloy for making casts using Zinc and Copper. It also does not double ores. Impure, purified, centrifuged and crushed ores cannot be melted in the smeltery - use a standard Furnace, IC2 Iron Furnace, or Steam Furnace. If you end up with steel dust (for example, from the lathe) the Smeltery can make it back into ingots. You can use this for early recycling chains of chainmail armor dropped from mobs where the BBF is not available, like in Nether-only or Garden Of Grind GTNH runs.
With a basic redstone clock (torches/dust) or Extra Utilities Redstone Clock block, the Smeltery can batch process iron ingots into iron nuggets for making wrought iron. Use a Thaumcraft gold coin or a nugget from furnace processing Crushed Gold Ore or Crushed Iron Ore to get your first nugget for the cast.
You can store the molten metal for casting in a pipe by putting a pipe under the seared faucet on the smeltery and right-clicking it once. The metal will fill the pipe till it has reached its capacity and the pipe will automatically transport the molten metal to a casting table connected to it. This is useful if you do not want to make a redstone setup or store the molten metal for later usage.
Oreberries
Oreberries offer a passive, renewable source of metals. Plant oreberries on IC2 Crop (sticks) above hydrated tilled farmland. Do not walk across, because oreberries hurt the player like a cactus. Other than XP berries, all must have a low light (<10) level to grow. Oreberries can be bred together for better stats like other IC2 Crops.
Plants can be harvested at stage 3 for 0/2 oreberries (average ~1.75), which are one nugget of metal each. Stage 4 full-grown plants require an ore block underneath and harvest for 0/6 berries (average ~5). Gold can be scarce and may be worthwhile farming with oreberries, particularly once gold blocks can go under the crop. Metal blocks are gated behind the Steam Compressor (most metals) or LV (aluminum).
How Do I Get
| Resource | Acquisiton |
|---|---|
| Aluminum | Aluminum Oreberry farm. Grows slowly, but provides passive income of metal nuggets. |
| Blocks of metal | Gated behind the Steam Compressor. More advanced metals, notably aluminum, require even more advanced infrastructure. |
| Diamonds | Diamond veins, Small Diamond Ores & Diamond Ore in Abyssal stone geode formations from Railcraft. Non-block drops are affected by Fortune, and 64 GT Diamond ore can be swapped for MC Diamond Ore which can also be Fortune'd. There is no easy way early game to turn diamond dust back into diamonds, so be careful processing your ore. |
| Emeralds | Trade 16x Pam's crops to Farmer villagers, pen villagers near a Vacuum Hopper to collect their rarely shed Emeralds, Emerald ore in Abyssal Stone geode formations, Small ores in Twilight Forest or Beryllium veins in the Nether. |
| Experience | XP Oreberry farm. Grows slowly, but provides a risk-free passive source of levels. Unlike other oreberries they have no light level restrictions. Mob farms are also viable, but build them away from your main base from durable materials, as Infernal mobs can be quite destructive. |
| Flowers (for Rainbow Curry) | Bees with the 'Flower Type: Flowers' trait, which is most of the mundane species you'll find in the wild, will slowly spawn flowers around their Bee House/Apiary while the Queen is working. Lavender can be found in quantity in the Lavender Fields biome, Burning Blossoms are exclusive to the Nether. Blue Orchids are found in swamp tagged Biomes, Poppy, Dandelion and grass can be grown with bone meal. |
| Glass | Mortar sand into quartz sand, combine with flint dust into glass dust. Melt glass dust in the Tinker's Smeltery, chisel it into vanilla glass if needed. Saw glass blocks to get panes. Tinker's Construct Clear Glass can be broken and replaced without losing the glass block. |
| Glowstone (renewable) | Glowflowers on IC2 Crop (sticks). 2 Glowflowers in the Steam Extractor yields one glowstone dust. Glowflowers can be found in Mystic Grove biomes, or randomly spawn from an active Forestry bee that prefers flowers (any basic bees). |
| Lava | Craft multiple Seared Tanks, carry them down to a lava pool. Load them with an iron bucket. Full tanks will stack, and can be safely carried out all at once. Lava tanks/buckets stored in a backpack won't burn you. |
| Magnetic Iron Rod | Combine 4 redstone dust and 1 iron rod in a crafting grid. Useful for making your first Ore Finder. |
| Paper | Mortar four wood logs to get eight wood pulp. Combine with a water bucket to get two paper. Combine one paper with a jungle sapling for a paperbark tree and easier, renewable paper for the future. |
| Normal Dust from Purified | A Cauldron filled with water will wash both Impure and Purified dusts into their normal form, just drop them in. |
| Obsidian | Requires steel pick with fully levelled Mining XP. Or left-click with a chisel. Obsidian dust can be bought with XP buckets, useful for that first few Obsidian Glass for BC Factory tanks. |
| Red Alloy | Combine 1x copper and 4x redstone dust in the Tinker's Smeltery. |
| Redstone Dust | Hit placed Redstone Ore blocks with a GT Hammer, then combine Crushed Redstone with a GT hammer in crafting grid. Finally throw Impure Redstone Dust into a Cauldron filled with water. |
| Reinforced Glass | Combine 1x Advanced Alloy and 3x glass dust / 3x glass blocks in the Steam Alloy Smelter. The NEI recipe is bugged and does not show the correct amount for some Vanilla materials, including this one (1x glass block). |
| Rubber | Raw rubber dust obtained from sticky resin, slime or rubber tree logs in the Steam Extractor, with sulfur from the nether. Combine 3:1 in the Steam Alloy Smelter. Both are also purchasable with EXP buckets. |
| Slabs | Requires a saw, gated behind iron. |
| Slime | Slimy saplings, from Slime Islands. Look up, way up, and get lucky. Islands are quite rare. |
| Steel | Requires the Bricked Blast Furnace (BBF). Save up plenty of coke, coal, or charcoal. |
| String | Set up a Natura cotton farm early. Hoe grass blocks away from water to get random seeds; cotton seeds are pink. You'll go through a lot of wool and string in the early game for beds, ladders, bait, backpacks and woven cotton. |
| Water (infinite) | Cactus can be grown on IC2 Crop (sticks), and eight cactus juice yields one bucket of water. Post iron, the Railcraft Water Tank passively generates water, dependent on the biome's relative humidity. |
| Wool | Sheep farm is an option, though shears are gated behind iron. Wool can also be crafted out of cotton & string. |
| Wood | 2x2 jungle trees are efficient and grow their own ladders. Once the Tool Forge is unlocked, Rainforest Oaks are an ideal tree to cut down with the lumber axe. Biomes o' Plenty's Bamboo grows quickly, can be used as a stick substitute and requires no tools to break. |
| Vanilla Saplings | GregTech's Branch Cutter can be made with four plates, two rods and a screw of most metals. Iron will be the first you can access. The branch cutter gives a 100% drop rate on leaves for vanilla saplings only. Does not work on rubber trees, silverwood/greatwood, or any other modded leaf block. |
Learning to Use NEI
See More: Not Enough Items
Not Enough Items (NEI) is the mod that adds the search bar at the bottom of the inventory screen, and a list of matching items on the right while the inventory is open. When typing in the search bar, double-click it to turn the outline yellow. This will dim the GUI and highlight any matching items, which can be useful to find a specific ingot or dust in a large inventory. Double click again to remove the highlighting. Right-click the search bar to clear text.
When using a crafting GUI while hitting R or U, click the [?] button to populate the grid with an outline to fill manually, or shift-click [?] to auto-fill it with available items. Click on the (x/y)[#] at the top left to toggle bookmarks between full page and single column. Items in the Quest Book can be bookmarked or recipe checked directly with NEI shortcuts.
NEI also has numerous keybinds that can be used while hovering over items in inventories, and offers many features beyond these basics. See Not Enough Items for a more complete tutorial.
| (default) Key | Action |
|---|---|
| R | Recipe to make this item. |
| U | Recipes that use this item. |
| A | Bookmark this item. Hold down Shift then click-drag to rearrange bookmarked items. |
| T | Smoke from chests & other containers nearby that have this item. Doesn't search backpacks. |
| O | Toggle NEI visibility on/off. Useful if the overlay is blocking parts of another interface. |
| B | Toggle NEI bookmarks on/off. Also shows Item Subsets menu drop-down when off. |
| Backspace | Go back to the previous item looked at. |
Looking at how to create an item or resource can be confusing due to a large number of options. When looking at how to make an alloy ingot, here are some tips:
- Focus on certain creation methods, in this order: Shapeless (dust), Mixer (dust), Alloy Smelter (ingot), Blast Furnace (ingot/hot ingot), Vacuum Freezer (ingot).
- When looking at a long list of recipes in a specific machine, click the left arrow on the bottom to go to the last recipe. That is typically where you can find the basic ingredients recipe.
- If an alloy has two ingredients, the alloy smelter is usually the fastest way to make it. For example, cupronickel can be made with dust or ingots of copper and nickel directly in the alloy smelter instead of mixing the dusts in a mixer and then smelting.
Base Building
When building your base, there are a couple of primary concerns; safe from mobs, space for storage, farming and machinery, and proximity to key locations. With how quickly darkness falls and the heavily limited availability of non-flammable blocks in the first few days of playing and scarcity of lighting, digging into a hill or cliff may be the safest choice for a first home.
Construction & Lighting
- Ladders are only needed every second block in 1.7.10.
- The Chisel can be used to get more block textures from common materials. One is given to you as an early quest reward.
- Tinker's Construct Clear Glass will drop as a block when broken, unlike most glass.
- Brownstone Roads (tin in the Smeltery poured over gravel blocks) let you walk faster but do not handle curves/changes in direction well. Plan for straight roads whenever possible if using this block. A hopper can auto-load gravel into a casting basin while a redstone clock pulses the faucet to automate production. Chisel the Rough Brownstone into roads.
- Use F7 to see the lighting overlay. Yellow X's are dark enough to spawn monsters at night, red X's can spawn at any time.
- Glowstone can be cut down with a Forge Microblocks Saw, which will not shatter into dust when broken. Even nooks, the smallest block, provide the same amount of light as a full block. Use Covers where a full flat block is desired, such as in the middle of a path.
- Bibliocraft offers many decorative storage blocks. Once you have iron, look into the Shelf, Potion Shelf, Tool Rack, Label, and Bookcase.
Machinery
- Steam machinery is extremely loud. Turn down "Blocks" under Music & Sounds, or mute individual machines with the volume icon in their GUI.
- Connect boilers to water FIRST before allowing them to heat up. Particularly solars! Water + hot boiler = boom.
- Boilers take some time to build up enough to actually output steam. Make sure the pipe is connected, and wait.
- Boilers will continue to eat fuel even when full of steam, releasing the excess.
- Use a Railcraft multi-block Tank or large pipes to serve as a steam buffer.
- Railcraft Water Tanks and Solar Boilers need access to the sun, so plan your steam room(s) accordingly. Glass can be used to cover indoor solar installations.
- Chunk boundaries: It is safe to build multiblock machines across chunk boundaries, as long as all the occupied chunks are chunkloaded. Press F9 to see chunk boundaries.
- Cover your machines: Rain on or next to a GT machine will cause it to explode. Be careful when setting up machines away from your base - don't forget to cover them up!
- Recipes are tiered, but show for all machines of a given type. Check that your machine is good enough to craft the recipe before attempting.
- Wrenches can adjust the output port of machines as well as connect pipes. Click on the corner of a machine to put the output on the opposite face, the center to put it on the current face, and one of the four side rectangles to move the output to the closest side face.
- Any LV+ machine hooked up to power can charge items/batteries of its tier.
- Most secondary outputs from processing in machines (ex. Macerator) are gated to HV.
- Take a look at a general overview on GT Electricity. For the purposes of being "safe", never, ever over-volt your machines or your cables. Over-volting machines result in explosions, and over-volting/over-amping your cables and wires result in fires, which in turn may lead to more explosions. This not only applies to cables and machines, but also to energy and dynamo hatches. Plan your machine layout and designs thoroughly (preferably in single-player first!).
- Certain multiblocks have their own set of rules, some of which may not be fully documented in the tooltip shown in NEI. Following the multiblock's rules could save you from an explosion. For every new multiblock you build, it is best to either check this wiki for documentation on how that multiblock works, look it up on the FTB Wiki, or ask the friendly people over on the Discord help channel.
- Spread apart: GT power generation and smelting will generate pollution. Mostly it's not enough to matter, but when you have multiple blast furnaces operating continuously it can really build up. Put them a chunk or two away from the rest of your production and/or house unless you like wearing hazmat suits. Worst pollution sources are EBF, Pyrolyse Oven, Implosion Compressor.
- Blast proofing: Everybody eventually does something to cause an explosion. Mis-wiring a transformer, forgetting to cover a machine, putting water into a hot boiler, etc. Try and localize the damage by using tougher, more blast proof materials. Marble, basalt, granite, concrete help.
- Be sure to read the electrical guide for more information on base building requirements.
Automation
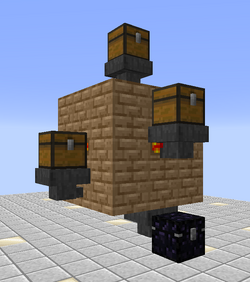
Early automation is scarce, mostly limited to hoppers pre-Steel. GT machines cannot be input/output from their front faces, including from hoppers. While item pipes are technically available earlier they cannot be removed without a Steel Wrench or better.
A Better Coke Oven
Two hoppers, two chests and fluid containers are all that is required to make a Coke Oven self-sufficient for a long time. While not completely automated as it must be fed logs and have the Creosote emptied occasionally, a simple setup similar to the picture on the left will make charcoal easier. Note that only one input chest is needed - any side or the top will feed the Coke Oven, while a hopper anywhere on the bottom pointing into a chest will remove filled fluid containers and charcoal. The Coke Oven will stop working if it becomes full of Creosote. A small stack of Seared Tanks will keep it running longer until proper fluid handling is available. Voiding the creosote manually in the Coke Oven is also possible by breaking one of the structure blocks on the bottom, however this will waste a lot of valuable creosote which can be used for power or lubricant later on. A seared faucet can be put on the coke oven to let the creosote flow out into any pipe to be moved into a large fluid storage such as a Railcraft Iron Tank.
Later one or more Coke Ovens can be connected to automated wood production such as the Crop Manager, and fluid can be pumped into Super Tanks or voided with Void Fluid Pipe / Trash Can (Fluids) for truly automatic charcoal.
Bricked Blast Furnace
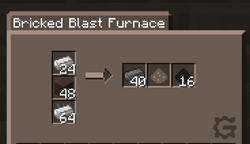
The Bricked Blast Furnace (BBF) cannot truly be automated, by design. It can be made less labor intensive for Steel production by using Charcoal or Coal Coke Blocks instead of single pieces. This processes 10% more iron but more importantly allows the furnace to hold 9x more fuel at once, and output full Dark Ashes instead of Tiny Piles. An accumulation of Tiny Piles of Dark Ashes is normally what stops the BBF from running first. This recipe makes five steel at a time, and thus takes much longer to show any visible progress in the arrow bar.
Charcoal/Coal Coke Blocks can be made in any Compressor; Steam Compressor is the first available.
Fluids
Railcraft Water Tanks auto-pump from any side except the top. Railcraft Multi-Block Tanks auto-output from valves only, which must touch one of the bottom layer empty spaces inside the tank. Tinker's Construct Seared Faucets work on other liquid containers, not just the Smeltery. A redstone clock, either vanilla style with torches/dust, OpenBlocks Redstone Clock can be used to pulse a faucet. Bibliocraft's Clocks can be configured with shift right-click and are useful for slower actions in half-hour intervals or greater.
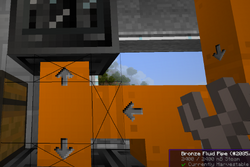
GT Pipes do NOT work on their own. They require a pump or a block that auto-outputs fluids, like Boilers. Fluid pipes can be broken with a Wrench; hold down left-click. The throughput of a pipe is half its capacity. Fluids will slosh back and forth inside pipes. While holding a Wrench and looking at a pipe, shift right-click on the rectangular 'x' areas to disable input for that side of the pipe. This stops fluids from flowing back into that section of pipe.
Nice to Have
The following list includes some quality of life items you might want to aim towards in the early game. Italicized items are featured in the Quest Book, so ensure the associated quest is available and registering your progress before making that item unless you're okay with potentially having to craft it twice.
| Item | Gated At | Utility |
|---|---|---|
| Iron Chests | Iron | Iron and Gold chests will be the only two large inventories accessible to you early on. The Iron to Gold Chest Upgrade uses half as much gold, so make those over crafting Gold chests directly. |
| Scaffolds | Iron & Steam Compressor | These blocks are like ladders that don't need to be attached to a block. Destroy the bottom block and the whole thing falls to the ground. |
| Hang Glider | Steel | Useful for getting off high places, traveling long distances, avoiding fall damage and crossing chasms. Build a tall launch platform at your base in order to travel easily to more distant resources. Hold down the sprint key to glide faster at the cost of more altitude. |
| Piston Boots | Rubber | This pair of footgear will let you jump higher, fall further without damage, sprint faster and walk up one block inclines without jumping. |
| Dolly | Rubber | The JABBA Dolly can move inventory blocks without breaking them. Great for rearranging your storage room, relocating BC Factory Tanks or hauling chests to processing machines. Gives Slowness II and Mining Fatigue II while full. Cannot be placed in backpacks. |
| Monster Repellator | LV Circuits & Certus Quartz | Once you get to LV, you can build these to keep monsters from spawning - they can still walk/teleport into your base. Without power, they work a reduced distance, and higher tiers also work better. |
| Golden Lasso | LV & Assembler | Pocket your horse, easily bring home animals, and move passive entities around the world without the hassle of leads or minecarts. |
| Item Dislocator | LV, Lead, Canning Machine | A Magnet to make item collection less of a hassle. No more dipping into holes and ponds trying to scoop up all your goodies. |
| Big Backpack | Stainless Steel | The first upgrade to Backpack's tier 1 Backpack. Holds 63 items. |
| Vacuum Hopper | LV & Cutting Machine | Automatically collects items and XP orbs in a 7x7x7 area centered on it. |
| Elevator | Aluminum | Teleports the player up or down to a matching colored elevator block. Placed elevators can be recolored with most dyes. |
| Adventure Backpacks | Aluminum | A double chest worth of storage that can be accessed via hotkey and worn, also comes with 8 buckets worth of fluid tanks, a crafting table, and a sleeping bag. Highly customizable with lots of cosmetic and a few utility variants. Of note are the Zombie Pigman and Bat variants, providing fire resistance and night vision respectively. |
The Naga in Twilight Forest is probably the first boss fight you'll do. It's gating Thaumcraft, so if you want to become an archmage, you'll need to kill it and gather the scales.
Getting to the twilight forest will require building a portal generator in the assembler. While the surface of the TF is "safe", the frequent caves and canyons will spawn monsters who can walk onto the surface at any time.
Having a Hang Glider makes exploring the forest much easier and safer.
Once you find the nearest Naga area, bring a decent crossbow. You can probably win with a bow and arrow
Multiplayer Tips
- To share an item in chat, open your inventory and click on the book icon between your helmet slot and player model. CTRL right-click on an item to display its popup description box.
- Coordinates can be shared in chat by opening the JourneyMap waypoints menu and clicking "Share" next to a waypoint.
- To show nearby players a location of interest, aim at the location you want to highlight and press INSERT to create a temporary beacon effect at that location. This will be visible to all nearby players for a few seconds.
- Players can share their JourneyMap ore vein data by crafting a Prospector's Log, using it and giving it to another player.
- To share a JourneyMap waypoint (perhaps for a vein near spawn), click the 'Share' button on the waypoints menu to print a link in chat.