GT New Horizons · Insane Voltage (IV)
Assembly Line
The Assembly Line (assline or AL) is an IV tier multiblock for crafting LuV+ tier components. The machine is built as a series of slices and inputs must be inserted in the exact order in which they appear in NEI. Recipes are also NOT implied and must be explicitly shared with the AL via data sticks. This is unlike any multiblock in GTNH and requires more advanced techniques for automation. For normal assembler recipes, see the Precise Auto-Assembler MT-3662. The AL is generally superseded by the Advanced Assembly Line with its parallel processing and support for multi-amp and laser energy hatches, but it is not recommended to switch right away because the power demand is much higher, the automation is more complex, and it cannot tier skip.
Construction
The AL is built as a series of slices with an input bus at the bottom center of each one to hold a single unique input. The total number of slices required therefore depends on the total number of inputs in the recipe. For example, the LuV motor has five solid inputs and therefore needs at least five slices to craft. The order in which the ingredients are inserted is the same order in which they appear in NEI.
The AL can be built left-to-right or right-to-left. The direction only affects the ordering of the input buses. The slice with the controller is always the front and therefore the location of the first input. The glass can be any tier and has no effect on the operation of the machine. Multi-amp and laser energy hatches are not supported, but there can be multiple regular energy hatches for overclocking. However, the AL can only tier skip ONE time (e.g. IV energy hatches can only run up to LuV recipes). Use the Multiblock Structure Hologram Projector to visualize/build the structure with subchannel "glass" to specify the tier of the glass and subchannel "length" to specify the number of slices ().
The input buses can be any tier but it is recommended to use ULV input buses because their limited capacity is very useful for automation. Advanced stocking input buses set to auto-pull and linked input buses do NOT work if they make more than one item type visible per slice. At max length, the output bus should replace a solid steel machine casing on layer 1 of the last slice instead of replacing the final input bus. Only four input hatches are required because no recipe uses more than four fluids. Quadruple input hatches do NOT work, but there can be gaps between the input hatches if necessary.
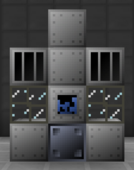
Base Structure
- Controller: First slice, 3rd layer
- 10 Any Tiered Glass
- 8 Grate Machine Casing
- 4-8 Solid Steel Machine Casing
- 5 Assembly Line Casing
- 5 Assembler Machine Casing
- 1+ Energy Hatch: Any layer 4 casing
- 1 Maintenance Hatch: Any layer 1 side casing
- 1 Data Access Hatch: Any grate machine casing NOT on first slice
- 5-16 Input Bus: Bottom center of each slice
- 1-4 Input Hatch: Any layer 1 side casing
- 1 Output Bus: Any layer 1 casing on last slice
Each Additional Slice
- Layer 4: Empty, Solid Steel Machine Casing, Empty
- Layer 3: Grate Machine Casing, Assembler Machine Casing, Grate Machine Casing
- Layer 2: Any Tiered Glass, Assembly Line Casing, Any Tiered Glass
- Layer 1: Solid Steel Machine Casing, Input Bus, Solid Steel Machine Casing
Wallsharing
ALs may wallshare each of their sides to save on casings, glass, and buses/hatches. That includes any input hatches, maintenance hatches, data access hatches, and output buses. Sharing a data access hatch is particularly valuable for saving TPS and reducing the amount of data sticks needed.
Usage
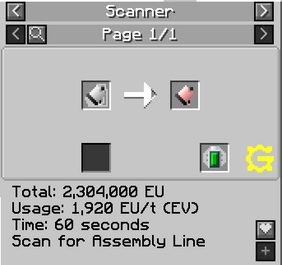
Scanning Recipes
Simply inserting the inputs of a recipe into the AL (and in the correct order) is not enough for the machine to start processing. Recipes must be explicitly shared with the AL via data sticks scanned with the necessary information in a singleblock scanner.
To scan the recipe for an LuV motor, for example, insert both an IV motor and data stick into a scanner, as seen in the image to the right. The output is a data stick specifically for LuV motors and goes in the data access hatch on the AL. The IV motor is consumed in the process. All data stick recipes and the items to scan for them are visible through NEI. Note that recipes may change with updates of GTNH and would require the player to update their data sticks.
Later on, the scanner is replaced by the Research Station and Quantum Computer. These two multiblocks work together to unlock the recipes for some of the most advanced items in GTNH.
Data Access Hatches
There are four types of data access hatches, listed below. There can only be one per AL but they can be safely wallshared between machines.
- Basic Data Access Hatch - Holds up to four data sticks
- Advanced Data Access Hatch - Holds up to sixteen data sticks
- Automatable Data Access Hatch - Holds up to sixteen data sticks and allows for input/output of data sticks (not as good as it sounds).
- Assembly Line Reception Connector - Reads any number of data sticks from a Data Bank (ZPM multiblock).
Troubleshooting
1) No Valid Recipe Found. There are numerous reasons for this error such as missing items, missing fluids, ingredients in the wrong order, more than one output bus, etc. Check that all items are in the correct input bus/hatch.
2) No Data Sticks Found. The controller cannot find any data sticks. Either the data access hatch is empty or the data sticks are not scanned with a recipe. Holding shift shows what item the data stick is scanned with, similar to an AE2 pattern.
3) Recipes keep overlapping. You likely forgot to either insert a blocking card or enable blocking mode on an interface that stores patterns.
Automation
The challenge in using the AL effectively is inputting both items and fluids in the correct order and limiting each slice to a single item/fluid type. Additional inputs must also be blocked to avoid mixing recipes. Patterns with more than nine inputs require a processing pattern terminal.
Renaming Items
Some recipes in the AL have duplicated items but in different slots. For example, the Fusion Reactor Mk-I takes four ZPM circuits to craft but needs them in four different slices. This typically breaks any sort of automation method as it is incredibly difficult to know ahead of time whether to stack the circuits (as in other recipes) or not. The solution is to rename any duplicate items so that they do not stack. Consider patterning the recipe for the Fusion Reactor Mk-I as an example:
1. Start by building an Industrial Forming Press (IFP) and crafting a few name molds. Rename the molds to something like “Helper1”, “Helper2”, etc. 2. Place the molds inside their own input bus on the IFP and cover each one with an ME interface. 3. The patterns in the ME interfaces should have the original item (ZPM circuit) as an input and the renamed item (Helper1) as the output. Rename the output directly in the ME pattern terminal by pressing CTRL + Middle Mouse Button on it, instead of having to craft one manually first. 4. Finally, pattern the Fusion Reactor Mk-I with a ZPM circuit, Helper1, Helper2, and Helper3 instead of four ZPM circuits.
| Pattern for Helper1 | Pattern for Fusion Reactor Mk-I |
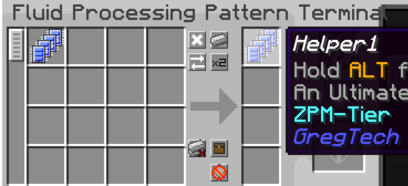
|
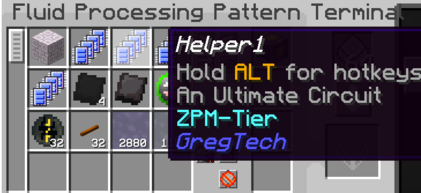
|
Method 1: Applied Energistics
The core mechanic behind this approach is using AE2 storage buses with set priorities to determine the order in which items are inserted. An advanced blocking card prevents recipes from being mixed. This approach is simple, compact, offers high throughput, and scales well. It also transitions well to the Advanced Assembly Line later on. The only downside is that it uses many AE2 components so idle power consumption is a little higher.
| STEP 1 | |
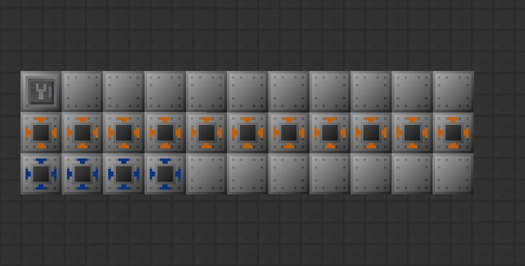
| Build the AL with ULV input buses, an input hatch on each of the first four slices, a maintenance hatch somewhere on the first layer, and an ME output bus on the last slice facing outward from the machine.
The ULV input buses limit each slice to a single item slot, preventing multiple items from going into the same one. |
|
| STEP 2 | |
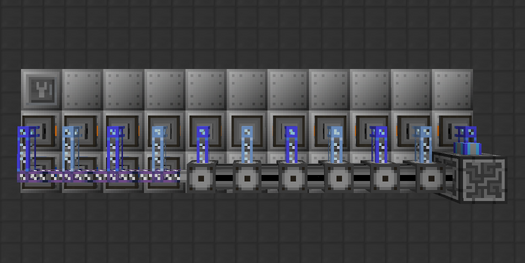
| Place an ME storage bus on each input bus with DESCENDING PRIORITY from the first slice. Use the priority card to set these very quickly.
Place an ME fluid storage bus on each input hatch with DESCENDING PRIORITY from the first slice. Connect the buses to a dense fluix cable that leads to an ME controller at the back of the AL. Use alternating color cables on the storage buses and fluix cables on the fluid storage buses. |
|
| STEP 3 | |
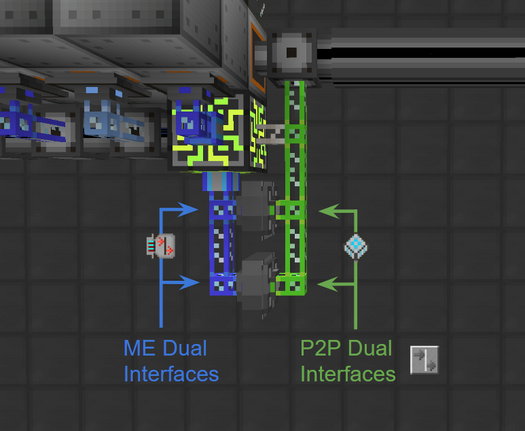
| Place ME dual interface(s) on the AL subnetwork (blue) and insert an ADVANCED BLOCKING CARD into each one. Sneak right-click with the card in hand for quick insertion.
Place P2P dual interface(s) on the main network (green) facing directly into the ME dual interfaces on the AL subnetwork. Enable BLOCKING MODE on each one and insert any patterns. Power the AL subnetwork with a quartz fiber cable. Upgrade to a Neutronium-Infused ME Controller later on for better performance in the late game. Also connect the ME output bus to the main network. Only one pair of interfaces is actually necessary. This example uses two pairs just to show that it can scale with the number of patterns. |
|
| STEP 4 | |
|
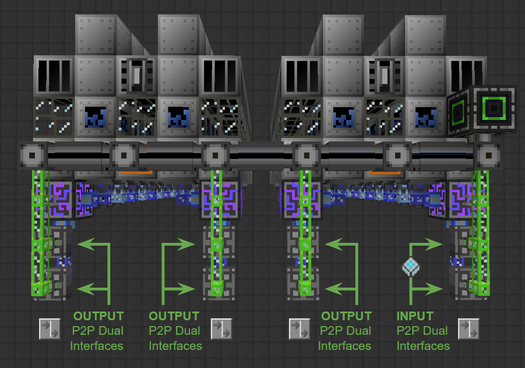
Scaling this approach is as simple as linking additional P2P dual interfaces (outputs) to the ones holding all the patterns (inputs). Use the basic memory card with the Ring of Loki to set these very quickly. Do not forget to enable blocking mode on every P2P dual interface and to insert an advanced blocking card into the ME dual interfaces on the AL subnetworks. Additional interfaces can be added if more patterns are needed. Also build the Data Bank to use more than 16 data sticks at a time. Always wallshare the data access hatch. |
|