GT New Horizons · ProjectRed
ProjectRed Transportation
 | Needs Cleanup! Some of the information is confusing or incomplete. Please help improve this article if able. - Tutorial step images missing alt text, some of them could do with cropping. |
Introduction
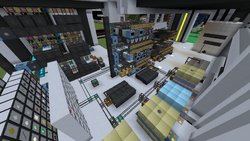
Project Red: Transportation (PRT) is the earliest available option for automated storage, logistics, and crafting. While its components are craftable in early LV, a basic circuit assembler (which requires an electric blast furnace) will make them much cheaper.
What can you do with it?
- Find and pull items from any connected storage by name
- Deposit items into drawers or barrels automatically
- Craft items and their components automatically
- Keep a fixed number of items in a chest or machine, crafting it if necessary
Setting up a storage system with PRT is relatively cheap. Auto-crafting is cumbersome, buggy, and a bit more expensive, but works for small automation lines or making sure you always have the components for hand-crafting.
Yes, it is 2-3x worse than AE2. If you are EV or almost EV, it is worth it to simply rush AE2.
If you take your time with this modpack, and progress through tiers slowly, setting up PRT during late LV or early MV helps tremendously with microcrafting and storage, and is just a general quality of life boost to your base. However, you shouldn't use it for all your crafting, and you should switch to AE2 as soon as it's available.
Inventory Search System
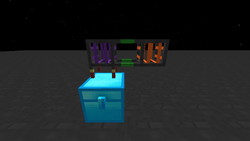
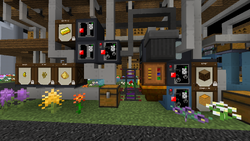
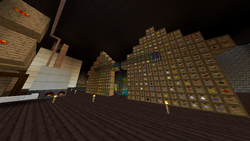
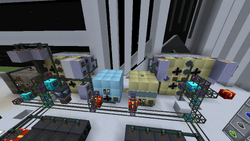
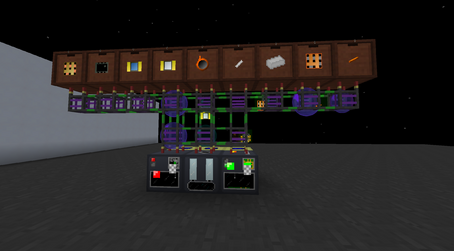
PRT makes a searchable / requestable storage easy to set up. It requires only these things:
- The biggest chests you can make (diamond, compressed, etc.)
- One item broadcaster chip per chest
- One routed interface pipe per chest
- One routed request pipe (in total)
- (Optional) One more chest for output (routed request will throw items on the ground if you don't do this)
You can see an example setup in the image on the right.
Make sure you add an item broadcaster chip above each chest or the system will not function. Configure the card first by opening it with right click, then closing it (the default is empty blacklist, which is what we want). Then right click on the routed interface (purple) pipe to place it inside. You can right click on the routed interface pipe to see all cards placed inside.
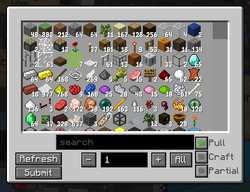
When you want to request something, right click on the orange pipe. This will open a UI that looks like the image on the right.
Now you have a fully searchable storage! You can integrate this with PRT autocrafting later.
Storage System (And its weird bugs)
Currently there is a bug where items stuck in a pipe (for example when sending so many items to a chest it overflows) can't be picked up by an overflow chip, and thus are permanently stuck in the pipe, needing manual removal to unstick the items. This is the case for all storage blocks, but drawers and drawer controllers have so much storage capacity that this is usually not an issue.
There are two ways to implement a storage system that handles both input and output: drawers and chests.
For the drawer system, you need:
- Drawer Controller(s) (Used to link every drawer together into a single I/O node, instead of having to connect every drawer to a pipe, just link it with this)
- Drawers (Preferably 2x2) (Used to store the items)
- Pipes (Routed interface, Routed request) (used to link the pipes together and transport the items)
- Chips (Item Responder, Item Broadcaster, Dynamic Item Responder, Item Extractor) (used to handle input/requests)
Drawer Controllers can only register 54 drawers, and have a range limit of 4 (9x9) (This is a direct and targeted nerf to "Storage Cubes", large amounts of I/O with them puts significant strain on the world thread). This means unless you plan on upgrading your drawers, you need hundreds of drawers and at least two (probably more) drawer controllers. Setup your drawer controllers by placing the drawers around the controller (the drawers must be touching each other or the controller), then link it up with to your system with a routed interface pipe, and throw in an item responder, an item broadcaster, and a dynamic item responder. Now setup a chest with a routed interface and an item extractor in the pipe, and throw your items in it. The items will get sent to the drawer controller, and it will place it in a drawer. This setup is highly scalable, and the only problem with it is the space it takes up compared to chests. Remember to link it up with a routed request pipe, and you should see all the items in the drawers.
Chests are a bit easier to set up, but they have the problem of not being able to handle large stacks of items or lots of unique items without quickly overflowing and needing you to manually reset the pipes. If the bug is fixed, using chests will be the cheapest and easiest option.
How PRT Works
PRT links inventories of items (machines, chests, etc.) with pipes. You use chips to configure what items a particular inventory sends or receives to other inventories and when.
Pipes
PRT has four kinds of pipes:
- Item Transport Pipe: A basic, cheap pipe that cannot connect to inventories. Don't use it for junctions.
- Routed Junction Pipe: A more expensive pipe to place at junctions of one or more pipes. It routes items that pass through it to their intended destinations.
- Routed Interface Pipe: A pipe that can connect to machines and chests. It can also route items that pass through it, just like a junction pipe.
- Routed Request Pipe: Used with broadcast chips, described later.
The routed interface pipe has no special behavior on its own, but by right-clicking on the pipe, you can add chips to configure its behavior.
Routed interface pipes generally won't work if they're connected to the face or output side of a machine. You can use the wrench to change the face of a machine with Shift+RMB.
Conceptually, PRT has two distinct "sets" of chips: extractor/responder chips, and network chips. Chips from one system do not interact with the other system, but a full logistics or storage system uses both.
Extractor Chips and Responder Chips
You can set up simple logistics with Extractor Chips and Responder Chips. Extractor chips actively send items from their connected inventory to responder chips in the network, which store the items in their connected inventory. Extractor chips have a filter on what items to send, and responder chips have a filter on what items they want to receive.
A Dynamic Responder Chip has no set filter, but uses the items in the connected inventory to make a filter. This is useful for drawers and barrels. The Item Overflow Responder Chip will take anything, but only if no responder chips want it.
Extractor chips and responder chips do not interact with network chips directly. However, network chips have broadcast chips and stock keeper chips, which are similar, and one pipe can mix and match chips.
Network Chips and Routed Request Pipes
The other chips in PRT interact with a system-wide "storage network" of real and craftable items.
The Item Broadcaster Chip tells the network that items can be pulled from the inventory it's connected to.
The Item Crafting Chip is for on-demand crafting. From PRT's perspective, crafting machines are inventories that pull items from the network and then put out some number of one item. Each chip only holds one crafting "recipe". Crafting chips can pull from broadcaster chips or other crafting chips, creating a chain of crafts.
The Routed Request Pipe is a pipe that lets the player search the network for items and send them out the pipe. You can also initiate crafts here, sending the result out the pipe.
The Stock Keeper Chip pulls items from the network to keep its connected inventory stocked with some number of items. It will auto-craft items with crafting chips in other pipes if it needs to.
Item Crafting Extension Chip
By default, crafting chips assume that the inputs and outputs of a crafting operation come from the same pipe. However, most multi-block machine split their inputs and outputs between multiple blocks. To handle this, PRT uses the horribly unintuitive Item Crafting Extension Chip.
With extensions, the crafting chip is placed in the pipe connected to the machine's output hatch. Each crafting extension chip (up to 9) is placed in a pipe connected to input hatches. The configuration of the crafting chip determines which crafting ingredients go to which extension chip's pipe.
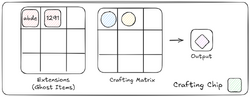
- Put a routed interface pipe on each input and output of the multiblock machine. Connect them all to the network.
- Configure the crafting chip's inputs and outputs as usual. Keep track of what input slots you used in the chip.
- For each input hatch on the physical machine, make a crafting extension chip. Give each chip a separate ID by configuring it and clicking on "randomize".
- Configure the crafting chip again and open "Extensions". Move the extension chips into slots matching the crafting matrix. The extension chip's ID determines which inventory the ingredient in that slot goes to. (This will not consume the extension chips.)
- Put the crafting chip in the pipe connected to the machine's output hatch, and the extension chips on the pipes connected to the input hatches.
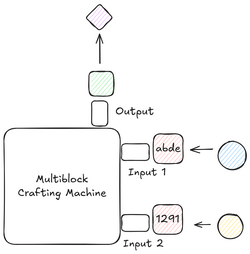
Many multiblocks have only one input hatch. In this case, you only need one extension chip, and you can use the same chip on multiple slots in the crafting chip extension configuration to send every input to the same pipe.
Useful Chip Configurations
Routed interface chips support up to four chips, and putting multiple chips in one pipe can be very useful.
- Extractor Chip (no filtered items + "blacklist"): send every item in this inventory to responders. Great for putting items into your storage network.
- Dynamic Responder Chip + Broadcast Chip: Store items in this inventory, but make them available for auto-crafting and requesting. Great for chests, barrels, drawers, etc.
- Crafting Chip + Extractor Chip: crafting chips only support one output. You can use an extractor chip to get rid of "side products", like dust from a lathe.
- Responder Chip + Extractor Chip: a pseudo-crafting chip, with crafting inputs in the responder chip and outputs in the extractor chip, that works with other responder/extractor chips.
How do I get PRT Ingredients?
Rule 1 of any autocrafting system - the first system you set up should be making more of the autocrafting system. So make sure you have chips and circuits automated first.
Now, looking at specific items:
- Illumar
- You only need three total illumar colors: magenta (item broadcaster), lime (crafting chip), and blue (stock keeper).
- Blue can be easily obtained from lapis lazuli.
- Lime can be obtained from cactus + bone meal.
- Magenta needs lapis, bone meal, and red dye, which can be obtained from roses. IC2 crops will let you grow and breed roses, but in a pinch, use bone meal on some grass.
- Bones are easy to obtain from GT++ fish traps, which also outputs a small amount of diamonds for later.
- You can also use bees or Thaumcraft rainbow cactus for dyes.
- Gold / Redstone / Glowstone Dust / Silicon
- All of these are byproducts of glowstone dust producing flowers like glowflower or glieonia (from Thaumcraft). Set them up - you're going to need them anyway for chrome for HV.
- You can also directly get redstone from redlon (Thaumcraft) or redwheat.
- Cobblestone -> gravel -> sand -> glass -> glass dust -> silicon dioxide is a great source of silicon.
- Diamond
- GT++ Fish traps are a renewable early game source of diamonds.
- Alternatively, you can dig up a diamond vein.
- Glass
- Sand + Oxygen -> 2 Glass (MV Arc Furnace)
PRT's Sharp Corners
PRT is not the best option one should consider when setting up a dynamic item logistics system. This section explains why. It is still viable in isolation due to its extremely early tier availability, but consider jumping to Logistics Pipes (Late LV/Early MV) or even Applied Energistics 2 (EV) as soon as able.
- Inventories/machines cannot send items to the same pipe section they started in
- Each Routed Interface Pipe can only reliably interact with one adjacent inventory/machine.
- For some reason processes which send to themselves are disallowed. For example, 1 wiremill cannot do ingot -> fine wire - the intermediate wire needs to be sent to another wiremill.
- Additionally, you cannot connect a machine directly to the same routed interface the input items are on as the Interface Pipe is directional (like Chassi Pipes from Logistics Pipes)
- (Note that the sided access on crafting chips is *solely* for which direction it acts like it is accessing the connected machine from. It does not specify the direction of the inventory it is using.)
- Limited machine reuse
- When a craft request is sent, PRT dumps all items at once into the relevant machines. It will wait outside machines with full inventories, so it is ok to reuse machines which cannot conflict like bending machines, wiremills, etc.
- However, machines with large inventories and easy-to-conflict recipes like assembling machines cannot be reused (unless you are sure you will avoid a conflict).
- This makes cleanroom automation basically not viable with PRT. The difficult parts are needing multiple circuit assembling machines (due partially to self-sending restrictions as well) and not having a clear way to swap out lenses.
- However, you can automate all circuit subparts like SMDs.
- Hard to cancel crafts
- Unlike AE2, there is no listing of active crafts. Instead, active machines are shown with a pulsing sphere overlaid on the pipe.
- To cancel a craft, you need to slot out chips or break pipes for all involved machines. (Doing it partially may cause the craft to recover and keep requesting.)
- You will also need to take the items out of machines so it doesn't block future crafts.
- No crafting table crafts without external machines
- You can use the Auto Crafting Table, Auto Workbench, or Molecular Assembler combined with a crafting chip.
- Crafting extension cards are finicky and unintuitive
- You need crafting extension cards to get crafting chips to work with multiblocks, but they're not super easy to set up.
- Instead of crafting extension cards, Gregtech filters and pipes can "split" one PRT pipe into multiple slots.
- Routed interface pipe chip limit
- Each crafting chip is only for one recipe, and each pipe can only take four chips, so making a machine do everything you want is difficult.
- Requesting fluids
- Unlike AE2 or even Logistics Pipes, there is no way to send fluids natively through the system.
- Some alternatives are:
- EnderIO ender fluid conduits
- Quad/nonuple GT pipes and GT fluid filters
- Packing fluids into cells with fluid canners or tanks (may have problems extracting cells)
- Laggy at mega-scale
- Unlike logistics pipes and AE2, PRT can become quite laggy at scale, especially with auto-crafting and stock keepers.
PRT Example: Passive crafting LV->MV circuits using Stock Keeper Chips
Note that the following example uses Stock Keeper Chips, but the same general rules apply to an Item Crafting Chip.
However, unlike the Stock Keeper, the Crafting Chip will not pull/push items for the craft until something else on the network requests them, like a Routed Request Pipe.
| STEP 1 | |
| Six inputs leading into a Circuit Assembly Machine. No chips are inserted yet - just the pipes, drawers, and machines added. | 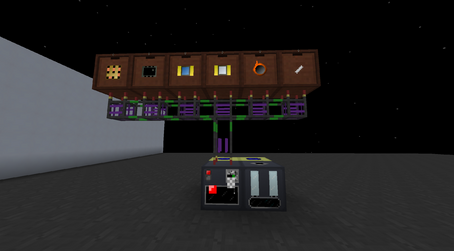 |
| STEP 2 | |
| Set up broadcast items for all inputs. Once the chip is programmed, add it to the pipe adjacent to the relevant drawer. (For this example I'm using drawers, but this isn't very Item Broadcaster Chip efficient. Consider using 2x2 drawers or another more compact solution you come up with (filing cabinets?). As long as the network has access to the items, you're good. | 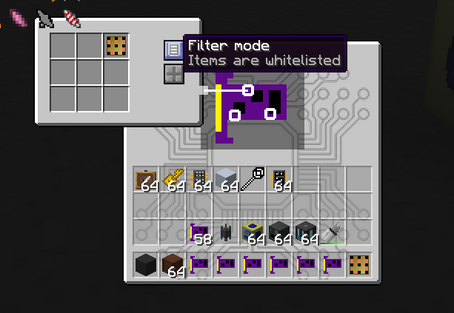 |
| STEP 3 | |
| Sanity check your chip to make sure it has what you want. You can do this by pressing shift while hovering over the programmed chip. Once it looks good, put it in the pipe adjacent to the relevant drawer. | 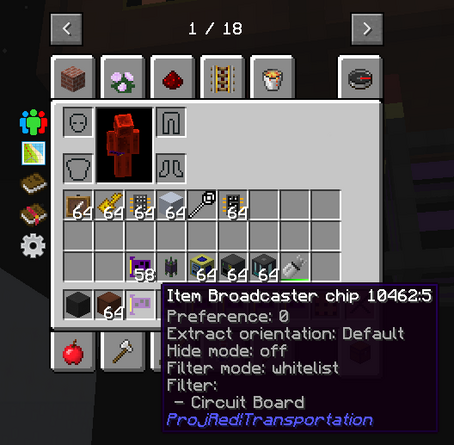 |
| STEP 4 | |
| Now program the final LV circuit recipe onto an Item Stock Keeper Chip. Put this into the pipe adjacent to the circuit assembly machine. (To get >1 input item, like the 2 in this case, you can click multiple times on the slot.) Be sure to set up to "refill when items empty" so it only uses as many resources as it needs for the recipe. | 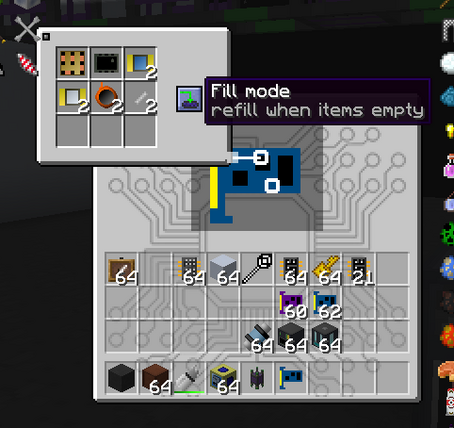 |
| STEP 5 | |
| Assuming you did everything correctly, you should be done with the first part! The system is now passively crafting LV circuits. However, it is only requesting what it needs, and the system can be reused for other crafts. Let's move on to fully automating LV->MV circuits. | 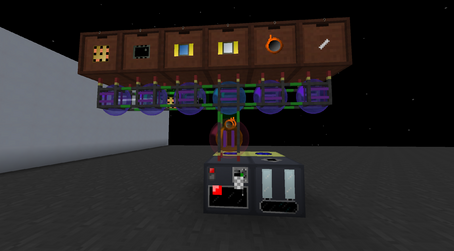 |
| STEP 6 | |
| Set the fluid extractor to infinitely refill tin ingots. This will ensure that the tin fluid never runs out. Note that the fluid extractor is between the two circuit assembly machines so that both have access to its fluid. | 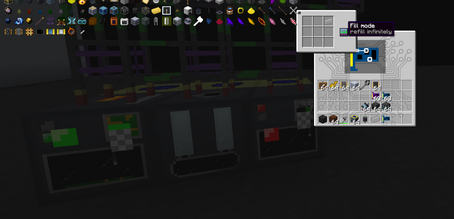 |
| STEP 7 | |
| Remember that the Routed Interface Pipes can accept up to 4 cards. Because of this, you can put an Item Broadcaster Chip onto the first circuit assembler's adjacent pipe set to the LV circuit, making LV circuits now available to the network. | 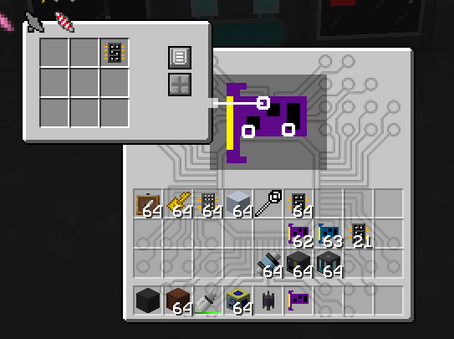 |
| STEP 8 | |
| Now program an Item Stock Keeper Chip with your MV circuit recipe. Remember to set it to only refill when empty so it only uses what it needs. Put it next to the second circuit assembler. | 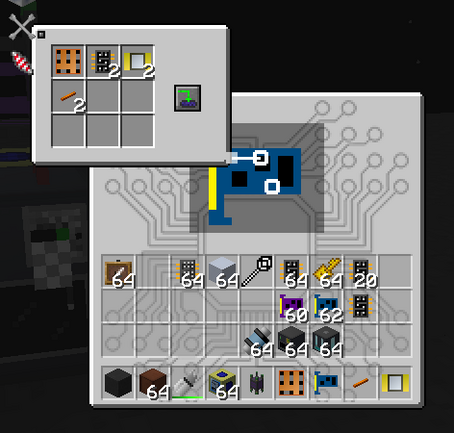 |
| STEP 9 | |
| You're done!
The system will now automatically pull crafting materials for LV circuits and MV circuits. If you want to turn a particular craft off, you can either remove the adjacent chip or hit the machine with a soft mallet - which will cause the chip to fill items once to satisfy the chip "when empty" rule but not actually use the materials since the machine is off. |
 |