GT New Horizons · Extremely Ultimate Voltage (UEV)
Residual Decontaminant Degasser Purification Unit
The Residual Decontaminant Degasser Purification Unit (DPU) is a UEV tier multiblock used for the seventh step of the Waterline. Each cycle, it outputs a control signal that indicates which of seven different fluids must be inserted to remove decontaminants from earlier Waterline steps, and thereby create Grade 7 water. It is required in early UEV for the Optical circuit line, needed for all UIV and above circuits.
Construction
The DPU has no tiered components or energy hatches because it receives power directly from the Water Purification Plant once linked with a data stick, like the rest of the Water Line multiblocks. Use the Multiblock Structure Hologram Projector to visualize/build the structure.
Structure
- Controller: Front center, 2nd layer
- 780-800 Heat-Resistant Trinium Plated Casing
- 622 Omni-Purpose Infinity Fused Glass
- 124 Bedrockium Frame Box
- 1 Degasser Control Hatch: Any casing
- 1+ Input Hatch: Any casing
- 1+ Output Hatch: Any casing
Mechanics
See More: Waterline#Shared Mechanics
At the start of its cycle, the DPU will select a random control value between 0 and 15, which determines the fluids that the recipe will require for that cycle. The recipe will always succeed if all fluids are inserted in the exact quantities specified, and will always fail if any fluid is missing or any extra fluid is inserted. The fluids requested can be determined by converting the control signal into a 4-bit binary number, and looking at the value of each bit:
- If bit 4 (the most significant bit) is on, the recipe will request no fluids at all, regardless of the value of any other bits.
- If bit 3 is on, the recipe will request 4,608 L of Molten Neutronium, equivalent to 32 ingots.
- If bit 2 is on, the recipe will request 1,440 L of any Molten Superconductor Base of at least UV tier, equivalent to 10 ingots. Each tier above UV increases the output by 25% additively: 1.25x for UHV, 1.5x for UEV, 1.75x for UIV, and 2x for UMV.
- If bit 1 is on, the recipe will request a noble gas. The exact gas and amount are determined by interpreting the middle two bits as a 2-bit binary number:
- If the middle two bits are 0, it will request 10,000 L of Helium.
- If the middle two bits are 1, it will request 7,500 L of Neon.
- If the middle two bits are 2, it will request 5,000 L of Krypton.
- If the middle two bits are 3, it will request 2,500 L of Xenon.
- If none of the bits are on, the recipe will request 10,000 L of Super Coolant.
The chance of each signal being produced is not equal: there is a 10% chance for each value from 0 to 7 inclusive, and a 2.5% chance for each value from 8 to 15 inclusive (20% in total). This is to prevent players from skipping the automation challenge entirely and still getting 50% output.
| Signal | Bit 4 | Bit 3 | Bit 2 | Bit 1 | Fluids Needed |
| 0 | 0 | 0 | 0 | 0 | 10,000 L Super Coolant |
| 1 | 0 | 0 | 0 | 1 | 10,000 L Helium |
| 2 | 0 | 0 | 1 | 0 | 1,440 L Molten Superconductor Base |
| 3 | 0 | 0 | 1 | 1 | 1,440 L Molten Superconductor Base and 7,500 L Neon |
| 4 | 0 | 1 | 0 | 0 | 4,608 L Molten Neutronium |
| 5 | 0 | 1 | 0 | 1 | 4,608 L Molten Neutronium and 5,000 L Krypton |
| 6 | 0 | 1 | 1 | 0 | 4,608 L Molten Neutronium and 1,440 L Molten Superconductor Base |
| 7 | 0 | 1 | 1 | 1 | 4,608 L Molten Neutronium, 1,440 L Molten Superconductor Base, and 2,500 L Xenon |
| 8 | 1 | 0 | 0 | 0 | Nothing |
| 9 | 1 | 0 | 0 | 1 | Nothing |
| 10 | 1 | 0 | 1 | 0 | Nothing |
| 11 | 1 | 0 | 1 | 1 | Nothing |
| 12 | 1 | 1 | 0 | 0 | Nothing |
| 13 | 1 | 1 | 0 | 1 | Nothing |
| 14 | 1 | 1 | 1 | 0 | Nothing |
| 15 | 1 | 1 | 1 | 1 | Nothing |
Automation
There are many methods of automating the DPU, but only one is discussed in detail here due to its simplicity and ease of implementation.
Method 1: Bus Converter
The core mechanics behind this approach are that the ProjectRed Bus Converter can be used to convert each numeric redstone signal into a unique binary signal, and that Fluid Regulators can be used to send a precise amount of fluid into an input hatch upon receiving a redstone signal. This can be easily used to select which of the seven fluids are necessary and insert them into the machine correctly.
| STEP 1 | |
| Place a Wireless Activity Detector Cover on the controller, and set it to "Recipe progress". Give it a distinct (optionally private) channel. | 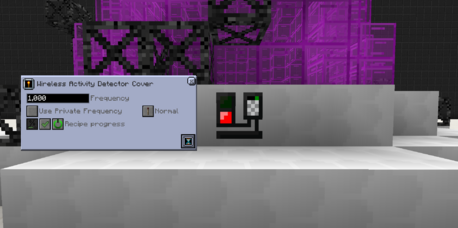
|
| STEP 2 | |
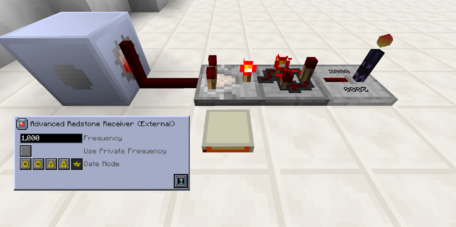
| Place a Machine Hull somewhere else, and place an Advanced Redstone Receiver (External) on it, set to the frequency from before. Set it to "Analog" for its Gate Mode.
Connect the Receiver to the back of a vanilla Redstone Comparator set to subtraction mode, and place a Draconic Evolution Potentiometer set to 1 on its side. Connect the output of the Comparator to a Pulse Former, and connect the Pulse Former's output to a Wireless Transmitter from WR-CBE with a distinct channel. |
|
| STEP 3 | |
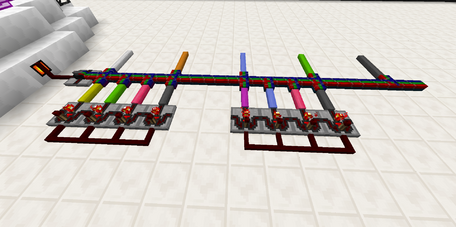
| Connect the Degasser Control Hatch on the multiblock to the input of a ProjectRed Bus Converter, and run a line of Bundled Cable from its output. In some cases, the Bus Converter can fail to work depending on the exact length of Red Alloy Wire from the Degasser Control Hatch; if this happens, try the following:
- Use exactly 1 or exactly 2 wire segments between the hatch and the bus - Use exactly 1 redstone dust between the hatch and the bus - Place the bus directly next to the hatch The bus converter activates one out of 16 lines based on the analog input signal: 0 white, 1 orange, 2 magenta, 3 light blue, 4 yellow, 5 lime, 6 pink, 7 gray, 8 light gray, 9 cyan, 10 purple, 11 blue, 12 brown, 13 green, 14 red, 15 black. Branch colored Insulated Wire off of this Bundled Cable as shown for the fluids only used by one signal: white for Super Coolant, orange for Helium, light blue for Neon, lime for Krypton, and gray for Xenon. Branch more colored Insulated wire off the Bundled Cable as shown for the fluids used by multiple signals: yellow, lime, pink, gray for Molten Neutronium, magenta, light blue, pink, gray for Molten Superconductor Base. Use a Buffer Gate after each Insulated Wire to prevent the signal from feeding back in, with some Red Alloy Wire connecting the output of each Buffer Gate into a single signal. |
|
| STEP 4 | |
| At the end of each segment of wire, place an AND Gate and shift-right click it with a Screwdriver to reduce it to two inputs. One input should be drawn from the Insulated Wire, while the other should be a WR-CBE Wireless Receiver on the same signal as the Transmitter from step 2. Place a Wireless Transmitter on a unique signal for each fluid on the output of each AND Gate; they will send a redstone pulse only once per cycle when the relevant fluid is needed. | 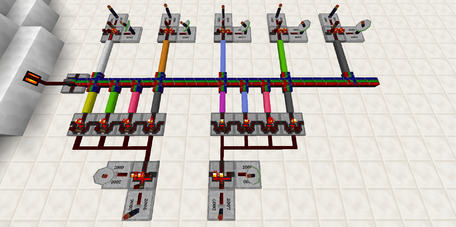
|
| STEP 5 | |
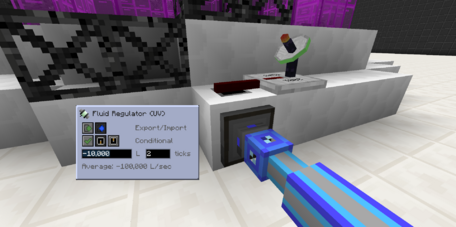
| For each fluid, place an Input Hatch on the multiblock with a Machine Controller Cover and a Fluid Regulator. Connect the Machine Controller Cover to a Wireless Receiver for the relevant signal. Set the Fluid Regulator to import the needed amount for that fluid once every 2 ticks, and set it to "Use Machine Processing State".
Place a Dual Interface on the input face of the Input Hatch, set it to stock the relevant fluid, and connect it to AE2. Repeat this process for the other six fluids. |
|
Method 2: OpenComputers/AE2
The core idea behind this approach is using OpenComputers to read the the redstone signal from the Degasser Control Hatch, convert it into a 4 bit value, and use it to decide a list of actions that the current cycle requires. The OC script interfaces with Applied Energistics to request the necessary fluids, using a single dual interface and quad input hatch to inject the correct fluids. This script is available for 2.8.x and future/developmental 2.9.x builds.
| STEP 1 | |
| Nearby the Degasser Purification Unit, place a screen (Tier 3), computer case (Tier 3), keyboard, adapter, and a neutronium energy cell. Next to the adapter, place a neutronium-infused ME Controller. If neutronium AE2 energy sources aren't unlocked yet, it can be substituted with a quartz fibre.
The OC computer can be powered directly by an AE2 cable or neutronium energy cell. On the ME controller network, attach 4 separate crafting storages, the size doesn't matter. If playing on 2.8.x builds, a fluid discretizer must also be added to the G7 OC subnet. Lastly, place an ME output hatch to send G7 water output into the desired storage location. Insert the bare minimum components into the computer case. These could be even lower tier but there is no reason not to use the best components.
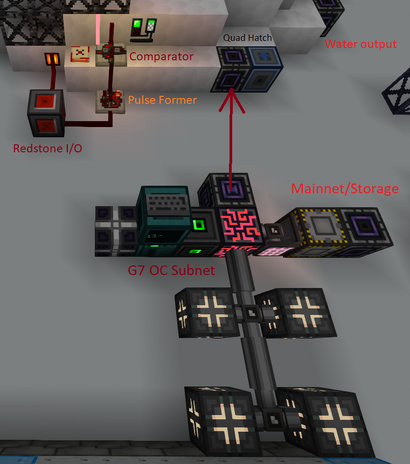
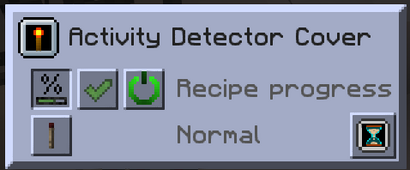
Near the degasser control hatch, place an OC Redstone I/O with a red alloy wire connecting it. Ensure that the Redstone I/O is connected to the OC computer via an OC cable. Additionally, connect an activity detector cover to a comparator on compare mode, with a draconic evolution potentiometer set 8. Use a red alloy wire to connect the comparator output into a pulse former, into a different side of the Redstone I/O than the degasser sensor side. Ensure the activity detector cover is set to "Recipe Progress" and "Normal". |
|
| STEP 2 | |
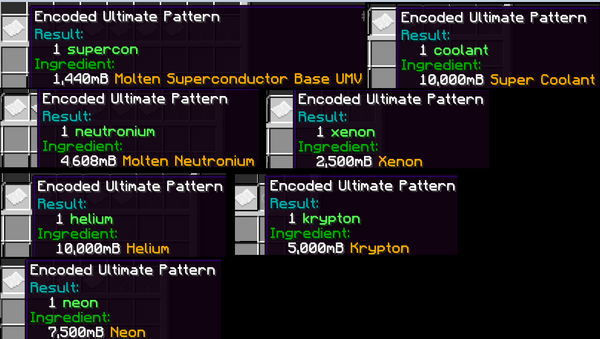
On the degasser multiblock, place a quad input hatch with a dual interface facing the hatch. There must be 7 manually created patterns placed in the dual interface alongside a fake crafting card. The input for each pattern will be a specific quantity of fluid, set to an output of paper, which is renamed to the following names and inputs. Rename the paper to these specific names, this is possible with ctrl-middle mouse on the output item of the pattern terminal:
The order of these in the dual interface does not matter, as long as the names match correctly. The superconductor base pattern may be set to UV, UHV, UEV, UIV, or UMV molten superconductor, depending on your tier/choice of fluid.0 Connect this dual interface via cable or wireless connector to the G7 OC subnet ME controller. |
|
| STEP 3 | |
| On this subnet, attach a fluid storage bus set to extract on an AE2 Super Stock Replenisher connected to your storage. Insert a fluid storage cell and partition it to at least 1ML of the aforementioned fluids described in Step 2. This is to supply the G7 OC subnet with the necessary fluids that may be used in each cycle. | 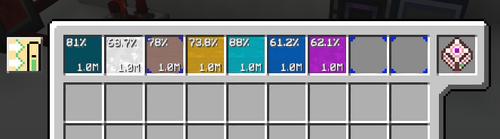
|
| STEP 4 | |
| After booting up the computer, follow the commands on screen to install OpenOS.
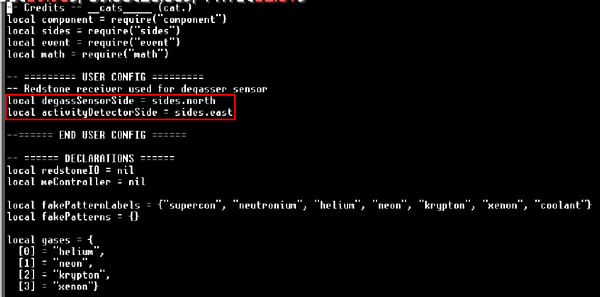
Create a new script by typing local degassSensorSide = sides.north
local activityDetectorSide = sides.east
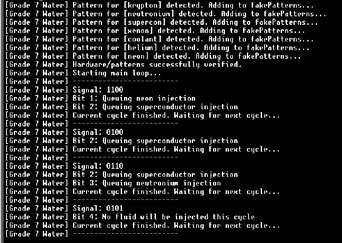
grade7.lua. If it is setup correctly, it will list the detected patterns, whether the ME controller and Redstone I/O were found, and finally declare "Main Loop Starting..."
This setup can be scaled to a higher tier superconductor by replacing the "supercon" paper pattern with the same quantity of the relevant molten superconductor base. The script will print the current cycle's 4 bits and the list of decided actions to correct the relevant bits. |
|
-- Credits -- __cats_____ (cat.)
local component = require("component")
local sides = require("sides")
local event = require("event")
local math = require("math")
-- ========= USER CONFIG =========
-- Redstone receiver used for degasser sensor | side options: {north, east, south, west, top, bottom}
local degassSensorSide = sides.north
local activityDetectorSide = sides.east
-- These sides must be configured for this script to work as expected.
-- The setup requires exactly one Redstone I/O and ME controller. It will not function if there is more than one connected to the OC computer.
-- Its proxy is used for both the 4-bit signal and Activity Detector.
--====== END USER CONFIG ======
-- ====== DECLARATIONS ======
local redstoneIO = component.redstone
local meController = component.me_controller
local fakePatternLabels = {"supercon", "neutronium", "helium", "neon", "krypton", "xenon", "coolant"}
local fakePatterns = {}
local gases = {
[0] = "helium",
[1] = "neon",
[2] = "krypton",
[3] = "xenon"}
-- ====== END DECLARATIONS ======
local function decimalToBits(value)
local bits = {}
for i = 0, 3 do
bits[i + 1] = math.floor(value / (2 ^ i)) % 2
end
return bits
end
local function generatePatternMap()
local craftables = meController.getCraftables()
local stack = nil
local label = nil
for i, pattern in ipairs(craftables) do
local success
success, stack = pcall(pattern.getStack)
if not success then success, stack = pcall(pattern.getItemStack) end
if not success then error("Item Stack retrieval failed. This has likely occured due to an unexpected API change. Reminder that this script is intended for 2.8.x and 2.9 only.") end
label = stack.label
print("[Grade 7 Water] Pattern for [" .. label .. "] detected. Adding to fakePatterns...")
fakePatterns[label] = pattern
end
end
local function checkBits()
local degassReading = redstoneIO.getInput(degassSensorSide)
local bits = decimalToBits(degassReading)
return bits
end
local function determineActions(bits)
local actions = {}
-- Bit 4 overrides EVERYTHING - Override/No injection
if bits[4] == 1 then
print("[Grade 7 Water] Bit 4: No fluid will be injected this cycle")
return nil
end
-- No bits enabled - Supercoolant injection
if bits[1] == 0 and bits[2] == 0 and bits[3] == 0 then
actions["coolant"] = fakePatterns["coolant"]
print("[Grade 7 Water] No bits enabled. Injecting super coolant")
return actions
end
-- Bit 1 = Inert Gas Injection
if bits[1] == 1 then
local gas = bits[2] + bits[3]*2
local gasName = gases[gas]
if gasName then
actions[gasName] = fakePatterns[gasName]
print("[Grade 7 Water] Bit 1: Queuing " .. gasName .. " injection")
end
end
-- Bit 2 - Superconductor Injection
if bits[2] == 1 then
actions["supercon"] = fakePatterns["supercon"]
print("[Grade 7 Water] Bit 2: Queuing superconductor injection")
end
-- Bit 3 - Neutronium Injection
if bits[3] == 1 then
actions["neutronium"] = fakePatterns["neutronium"]
print("[Grade 7 Water] Bit 3: Queuing neutronium injection")
end
return actions
end
local function verifyCraftCompletion(trackers)
for source, tracker in pairs(trackers) do
if tracker.isCanceled() then
print("[Grade 7 Water] Crafting request canceled for pattern: " .. tostring(source))
print("[Grade 7 Water] Please ensure the ME network has valid crafting storage and enough fluids for a cycle")
trackers[source] = nil
elseif tracker.isDone() then
trackers[source] = nil
end
end
end
local function processCycle()
local bits = checkBits()
print("[Grade 7 Water] Signal: " .. table.concat(bits))
local actions = determineActions(bits)
if actions ~= nil then
local ongoing_crafts = {}
for source, action in pairs(actions) do
local progress = action.request(1)
ongoing_crafts[source] = progress
os.sleep(0.1)
end
for i = 1,5 do
verifyCraftCompletion(ongoing_crafts)
os.sleep(0.2)
end
end
print("[Grade 7 Water] Current cycle finished. Waiting for next cycle...")
print("[Grade 7 Water] -------------------------")
end
local function verifyHardware()
if meController == nil then
error("[Grade 7 Water] Missing ME controller")
end
if redstoneIO == nil then
error("[Grade 7 Water] Missing Redstone I/O")
end
for _, label in ipairs(fakePatternLabels) do
if fakePatterns[label] == nil then
error("[Grade 7 Water] Missing pattern detected: " .. label)
end
end
print("[Grade 7 Water] Hardware/patterns successfully verified.")
end
local function waitForNewCycle()
event.pull("redstone_changed", redstoneIO.address, activityDetectorSide)
end
local function startup()
generatePatternMap()
verifyHardware()
end
local function main()
print("[Grade 7 Water] Starting main loop...")
print("[Grade 7 Water] -------------------------")
while true do
waitForNewCycle()
os.sleep(1)
processCycle()
end
end
startup()
main()